
Installation Instruction Manual
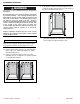
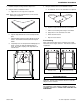


4. Install the soap shelf using method in Steps 5 or 6.
5. Using the silicone installation method:
a. Apply silicone to the edge of the soap shelf.
Note: Either clear or color matched silicone can be used for
attaching the soap shelf.
b. Align the soap shelf with the level lines and press it into
place.
c. Hold the soap shelf securely in place and wipe off excess
silicone. You will want a uniform bead on both top and
bottom.
d. Temporarily secure the soap shelf with masking tape, as
shown. Remove the tape after approximately two
hours. Do not place anything on the soap shelf for at
least 24 hours.
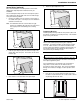
6. Using the stainless steel screw installation method:
a. Pre-install the screws in the underside screw pockets.
b. Dry fit the soap shelf and mark the hole locations.
c. Drill the four mounting holes using a 3/16” drill bit.
d. Apply silicone to the back side of the shelf.
e. Attach shelf with screws.
f. Wipe off excess silicone.
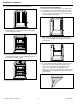
Final Caulking
Apply color-matched 100% silicone sealant to all the inside
seams and exterior edges, as shown. This silicone sealant is
nonpaintable.
Follow the manufacturer’s instructions on the tube for proper
application. Allow at least 24 hours for silicone to set before
using the shower enclosure.
The installation is now complete. DO NOT discard these
installation instructions. PLEASE LEAVE THEM WITH THE
HOMEOWNER.
IMPORTANT NOTICE
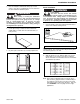
Standard 3 Panel Optional 4 Panel Overlap
800-325-7008 15 The Swan Corporation – Swanstone
Installation Procedure