
Installation Guide

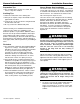

2. Use 2-1/2” to 3” long #12 drywall screws to attach
the 2 x 6 supports to the stud wall, as shown.
NOTE: After installing the 2 x 6 wall support, finish out
the wall with drywall and a Swanstone wall panel system
or a wall covering of your choice. After the wall covering
has been installed, set, and allowed to cure, move on to
Step 3.
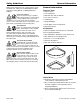
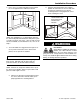
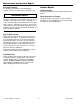
3. To accommodate the suggested seat height of 19”
use a pencil to mark a line on the shower wall
panels, 16-1/8" up from the subfloor.
Do not mark the Swanstone panels with anything other
than a pencil. DO NOT mark the panel with any
permanent marker, as this will void the warranty.
NOTE: Measure the height from subfloor to the top of
the shower floor shoulder and then up the shower wall
panel to a total height of 16-1/8”.
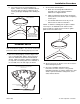
a. With a level and a pencil, and working out from
the corner, draw a line that will enable you to
properly position the mounting bracket.
b. Using the mounting bracket as a template,
position the bolt holes over the line and mark
the bolt hole locations. Be sure that the
mounting bracket is snug against the corner
before marking the holes.
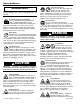
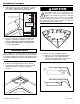
Dust Hazard
When drilling or sanding the Swanstone
product, use a dust collection method
which prevents dust particles from
going into the air. Always work in a well-ventilated area.
Always use an OSHA approved dust mask when cutting,
drilling, or sanding Swanstone products.
WARNING
POSITION BRACKET HOLES
OVER THE CENTER LINE
AND MARK THEIR
LOCATION
IMPORTANT NOTICE
16 1/8"
ON CENTER
Installation Procedure
800-325-7008 7 The Swan Corporation – Swanstone