
Installation Guide

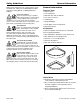
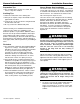
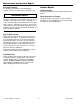

4. Drill six pilot holes at the marked locations, using the
3/16” drill bit. Drill through the wall panel and into
the 2 x 6 inch support block installed earlier.
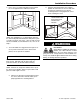
5. Use the 3/8” drill bit to enlarge the 3/16” pilot holes
through the Swanstone wall panel or other wall
material. Only drill the 3/8” holes through the
thickness of the wall panel. Do not drill into the
2 x 6 inch wall support.
Failure to drill the 3/8” clearance holes can cause damage
to the Swanstone or other wall panels when the lag bolts
are installed. Drilling the 3/8” holes too deep will not allow
the lag bolts to adequately secure the mounting bracket to
the wall.
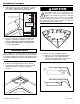
6. Position the mounting bracket in place, align the
holes and secure with six 5/16" x 2" long hex head
lag bolts and washers. Tighten the lag bolts
securely.
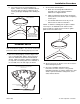
The locking tabs on the underside of the
Swanstone seat must engage behind the
stainless steel bracket to prevent the seat from
moving away from the wall. Do not apply
adhesive until you have trial fit the seat and made sure
the locking tabs fully engage. Failure to follow this
procedure may result in serious injury.
7. Trial fit the seat prior to applying adhesive.
a. Make sure the locking tabs molded into the
underside of the seat engage behind the
stainless steel support bracket to prevent the
seat from moving away from the wall.
CAUTION
IMPORTANT NOTICE
DRILL THE SIX PILOT HOLES
USING A 3/16” BIT.
2X6
SUPPORT
BLOCK
DRYWALL
SWANSTONE
SHEET
SWANSTONE SHEET
3/8” PILOT HOLE.
DO NOT PENETRATE
2X6 WALL SUPPORT
3/16” PILOT HOLE
The Swan Corporation – Swanstone 8 800-325-7008
Installation Procedure