
Installation Guide
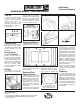

Trial Fit
1. Trial Fit–If required, it may
be necessary to trim vanity
top with a saber saw–install
trimmed side where an
exposed side edge is not
needed. If unit does not seat
properly, adjust supports or
notch dry wall.
Faucet Holes
Your Swanstone vanity top and
bowl comes with the center
hole drilled and standard hole
patterns designed on the
underside.
Drill-Outs for
4ⴖ or 8ⴖ Centers
Remove backing from the
pressure-sensitive template
and place the template in posi-
tion on top of the vanity with
the center hole of the template
directly over the drilled center
hole of the vanity. Follow
instructions below for drill-out
of 4⬙ or 8⬙ centers.
Drilling
2. Locate the desired drill
points and with a 1/4⬙ bit, drill a
pilot hole from the underside.
Drill fixture holes from the top
side with a 1-1/4⬙ router, spade
bit, twist drill or hole saw. Do
not use an auger bit. Faucets
may be installed at this time.
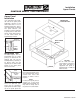
Applying Adhesive
3. Apply dabs of silicone or
Neoprene based panel adhe-
sive (not included) onto all glue
pads. Place Swanstone vanity
top onto support.
Optional Side
Splash Panels
4. Trial Fit Side Splash. To allow
for the installation of the side
splash so that it is flush with the
front edge of the vanity top, it
will be necessary to trim off
approximately 1/2⬙ from the
side splash. Install the trimmed
edge against the vanity top
back splash.
5. Clean side splash panel and
vanity top with a mild house-
hold abrasive cleaner prior to
installation. Making sure the
surface is clean and dry, apply
a thin bead of silicone or
Neoprene based adhesive (not
included) along the bottom of
the side splash panel and to
vanity top. Wipe off excess
adhesive with mineral spirits or
denatured alcohol. Use proper
color silicone sealant (not
included) to caulk joint between
top and side splash panel.
Caulk all exposed seams to
provide an adequate moisture
barrier. It is not recommended
that side splash panels be
attached to the wall.
6. Faucets, supply, and drain
fittings should be installed
according to manufacturers
instructions.
Cleaning
7. Clean your vanity lavatory as
you would any other fine bath
fixture, using normal household
detergents and cleansers.
Occasional scrubbing with mild
household abrasive cleansers
ensures that the original luster
is maintained, similar to tile and
other permanent type bath fix-
ture materials.
CONTOUR VANITY TOPS AND BOWLS
Installation
Care and Cleaning
A B
C D
TOOLS REQUIRED
• DRILL
• 1-1/4⬙ ROUTER, SPADE BIT, TWIST DRILL OR HOLE SAW
• SILICONE OR NEOPRENE BASED PANEL ADHESIVE
• CAULKING GUN
IMPORTANT
USE ROUTER, SPADE BITS, TWIST
DRILLS OR HOLE SAWS ONLY.
DO NOT USE
AUGER BITS.
APPLY MILDEW RESISTANT
SILICONE UNDER SIDE SPLASH
PANELS BEFORE SEATING.