
Installation Guide

T
OOLS REQUIRED
• DRILL
• 1 1/4” ROUTER, SPADE BIT, TWIST DRILL OR HOLE SAW
(
CARBIDE TIPPED)
• SILICONE OR NEOPRENE BASED PANEL ADHESIVE
• CAULKING GUN
IMPORTANT
USE ROUTER, SPADE BITS, TWIST DRILLS
OR HOLE SAWS ONLY.
DO NOT USE
A
UGER BITS.
Vanity Tops & Bowls
Installation Care and Cleaning
READ ALL INSTRUCTIONS BEFORE BEGINNING
T
rial Fit
– I
f required, it may be necessary to trim vanity top
with a saber saw. Install trimmed side where an exposed side edge is
not needed. If unit does not seat properly, adjust supports or notch
dry wall.
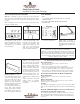
1. Faucet Holes
Your Swanstone vanity top and
bowl comes with the center hole
drilled. Standard hole patterns
are designed for 4” or 8” faucets
on the underside.
2. Drilling
Locate the desired drill points
and with a 1/4" bit, drill a pilot
hole from the underside. Drill
fixture holes from the top side
with a 1
1
⁄4" router, spade bit,
twist drill or hole saw. Faucets
may be installed at this time.
3. Applying Adhesive
Apply dabs of silicone or
Neoprene based panel adhesive
(not included) onto all glue pads.
Place Swanstone vanity top onto
support.
4. Optional Side Splash Panels
T
rial Fit Side Splash.
T
o allow for
the installation of the side splash
so that it is flush with the front
edge of the vanity top, it will be
necessary to trim off approxi-
mately 1/2" from the side splash.
Install the trimmed edge against
the vanity top back splash.
Clean side splash panel and van-
ity top with a mild household
abrasive cleaner prior to installa-
tion. Making sure the surface is
clean and dry, apply a thin bead
of silicone or Neoprene based
adhesive (not included) along
the bottom of the side splash
panel and to vanity top. Wipe off
excess adhesive with mineral
spirits or denatured alcohol. Use
proper color silicone sealant (not
included) to caulk joint between
top and side splash panel. Caulk
all exposed seams to provide an
adequate moisture barrier. It is
not recommended that side
splash panels be attached to the
wall.
Faucets, supply lines, and drain
fittings should be installed
according to manufacturers
instructions.
CAUTION
Do not use an auger bit.
Swanstone’s Recommended Cleaning Procedure
For Swanstone Solid Surface Vanity Tops and Bowls
Hard To Remove Stains
1. Abrasive cleaners such as Ajax, Comet, Bon Ami or
Bar Keeper’s Friend.
2. The use of an abrasive pad such as “Scotch-Brite.”
3. For the most stubborn stains, fill the Swanstone vanity bowl
about one-quarter full with a 50/50 solution of bleach and
water. After ten or fifteen minutes of soaking, drain solution
from the bowl as you wash and rinse both sides and bottom.
NOTE: DO NOT USE STEEL WOOL OR METAL SCOURING PADS
Mineral Based Stains
Cleaners designed to remove iron or rust should not harm
Swanstone.
Marks Or Discoloration
WHITE automotive rubbing compound may be used to remove
stubborn marks or discoloration.
Scratches
Use sandpaper starting with 150 grit. Use 220 grit next then finish
with 320-grit sandpaper. Blend the area with an abrasive-finishing
pad.
NOTE: FOR SWANSTONE GRANITES, Use #9 Fine Finishing Film for
F
inal blending. Use Paste Wax to Restore Color.
Use of these products will not damage the Swanstone solid sur-
face. Always follow label directions. If these methods fail to pro-
duce acceptable results, contact the Swanstone representative in
y
our area.
NOTE: Trimming only one side of the vanity top may result in the
bowl being slightly offset.
CAUTION
Install faucet and drain according to manufacturer's
instructions. DO NOT over tighten the drain pipe connection to the
bottom of the vanity. Upon installation, you should not exceed one
half turn past hand-tight. This could damage the overflow. DO NOT
use oil based caulk or putty around the overflow area. This may
cause the overflow to break or distort.