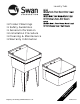
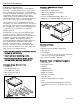
Laundry Tubs MF-1 1F (Single Bowl, Floor Mount Metal Legs) MF-1 1PF (Single Bowl, Floor Mount Plastic Legs) MF-1 1W (Single Bowl, Wall Mount) Product Warnings Safety Guidelines General Information Installation Procedure Cleaning & Maintenance Warranty Information MF-2 2W (Double Bowl, Wall Mount) R ea B da ef n or d e Un In d st er al s lin ta g nd MF-2 2F (Double Bowl, Floor Mount Metal Legs) Register your warranty at www.swanstone.com.
The Swan Assurance — if our product is properly installed and maintained, as stated in these instructions, it will not leak. Remember – Safety First IMPORTANT NOTICE The Swan Corporation, the makers of the Swan products, cannot anticipate every possible circumstance that might involve a potential hazard during the installation of our product(s). The warnings and instructions in this installation guide are, therefore, not all-inclusive.
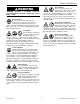
Safety Guidelines CAUTION IMPORTANT NOTICE CAUTION: Indicates a potentially hazardous situation which, if not avoided, may result in minor or moderate injury. It may also be used to alert against unsafe practices. IMPORTANT NOTICE: Indicates that equipment or property damage can result if instructions are not followed.
Safety Guidelines Shock Hazard Never use electric power tools around water, condensation, or other liquids. Electric shock can cause severe burns, significant injuries, and even death. If an extension cord is required, always use an OSHA approved extension cord. Power cords should only be connected to a circuit protected by a ground-fault circuit interrupter (GFI). WARNING WARNING: Indicates a potentially hazardous situation which, if not avoided, could result in serious injury or death.
General Information General Information Contents (Wall Mount Units) Laundry Tub A laundry tub or utility sink can be a useful addition to any home to soak dirty clothes, wash the dog, or clean large, odd-shaped household goods. Our laundry tubs are made from Veritek, which makes them easy to install and maintain. Our Veritek material has no surface coating to chip or crack and will not mold or mildew.
General Information Unpackaging Disclaimer Use care when opening the box so that you do not damage the product. The information contained in this Installation Instruction is given free of charge. It is based upon technical data which we believe to be reliable and is intended for use, by persons having knowledge of this technical area, at their own discretion and risk.
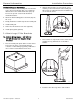
General Information Installation Procedure Quick Reference Assembly 2. Slide the metal leg into one of the plastic corner retaining sockets in the bottom of the laundry tub. All four legs are identical and can be installed in any one of the four corners. 1. Prior to installation of the laundry tub, first attach the legs to floor mount models (Step 1a) or attach the filler brackets to the wall mount models (Step 1b). Refer to the specific section in this manual for detailed instructions. 2.
Installation Procedure 5. Install one leg leveler on each leg using the screw and nut included with each unit. Do not completely tighten the screws until the laundry tub is in its final location and can be leveled. 2. Find the right-side filler bracket. Install it with the end of the filler bracket fitted between the outside of the sink and guide posts (1). Also place the filler bracket over guide post (2) and the screw hole in the bottom of the laundry tub. LEG LEVELER 2 SCREW NUT 1 LT-004 1b.
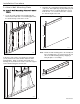
Installation Procedure 2. Attach Wall Mounting Plate 2. Determine the comfortable working height of the top of the sink. This height may vary depending on your application; however, a typical dimension is 32” up from the floor. Use a level to mark a line 1” below the desired height on the wall. 2a. Attach Wall Mounting Plate to Framed Walls 1. Locate the rough position of the laundry tub and then locate the wall studs. The mounting plate must be attached using at least three screws.
Installation Procedure 3. Position the top lip of the wall mounting plate on the mark. Be sure you mark the mounting holes over the studs/cross-blocks. Use a bubble level to make sure the wall mounting bracket is level. Note: Trial fit the wall mounting plate to the laundry tub. If the wall mounting plate is too long, break off the left side of the wall mounting plate by snapping it along the plate’s scored ridge. LT-024 LT-025 WARNING 4.
Installation Procedure 3. Insert the plastic anchor into the hole and drive it in until it is flush with the wall surface. For single bowl models use at least three anchors. For double bowl models use at least six anchors. LT-024 WARNING LT-027 Oversized holes may make it impossible to properly hold the Tapcon screw and will reduce the load (holding) capacity. This reduced holding capacity can result in the screw pulling free from the wall, resulting in possible personal injury or even death. 4.
Installation Procedure 3. Attach the mounting plate to the wall with 1/4" x 1-1/2" long Tapcon Hex Head Masonry Screws. Do not overtighten the screws. For single bowl models use at least three screws. For double bowl models use at least six screws. 4. Install the faucet assembly according to the manufacturer’s instructions (homeowner supplied). LT-006 Note: Preinstallation of the faucet, supply lines, and P-trap are easier when the laundry tub is not against and/or attached to the wall.
Installation Procedure 4. Final Installation 6. Assemble the PVC trap components (homeowner supplied) and attach them to the drain hole(s) in the laundry tub. 1. For models with legs, place the laundry tub where it will be installed. For wall mount models, hang the sink onto the wall mounting plate (see Step 2). LT-008 LT-009 2. On wall mount models only, lift and place the sink over the wall mounting plate. Make sure the laundry tub is seated securely into the lip of the wall mounting plate.
Installation Procedure 3. Attach the PVC tailpiece (homeowner supplied) to the drain pipe. Cut the tailpiece to the proper length using a hacksaw, if necessary. Use sandpaper or a file to remove any burrs or sharp edges. 5. The water lines and waste pipes should now be completely installed. LT-010 4. Attach the flexible water supply lines to the water shut off valves. The threaded ends of the water lines can be wrapped with Teflon pipe tape to ensure a tight, leak-proof seal.
Installation Procedure 7. Check all water lines and waste connections for leaks. Tighten the connection if a leak appears. Do not over-tighten. 2. Adjust the four leveling feet on the legs. A slight angle (front to back) toward the drain will eliminate water from standing in the bottom of the laundry tub. LT-014 5.
Care and Cleaning Warranty Care and Cleaning LIMITED WARRANTY FOR RESIDENTIAL APPLICATIONS Swan products are stain and wear resistant; however, the finish requires reasonable care. If a Swan Corporation product covered by this warranty is found to be defective in materials or workmanship, after inspection by an authorized Swan Corporation representative, we will repair, or at our option, exchange the product for a similar model.
NOTES: ___________________________________________________________________ ___________________________________________________________________ ___________________________________________________________________ ___________________________________________________________________ ___________________________________________________________________ ___________________________________________________________________ ___________________________________________________________________ _____________________________
Save these Installation Instructions for future reference. They provide important information on cleaning and maintenance of the Swan Corporation Laundry Tub. www.swanstone.