
Installation Guide
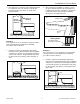
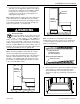


2. After the shower floor installation is complete, install
1/2” moisture-resistant wall board over the existing
wall surface, as shown.
3. The Swanstone or alternate shower wall material will
be installed over the new layer of 1/2”
moisture-resistant wall board and the shower floor
flange, as shown.
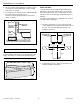
To prevent possible water (wicking affect) damage to the
wall, the wall board must have a 1/2 inch gap above the
shower floor flange, as shown in the illustration below.
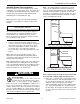
Drain Location
Using the Shower Floor and Drain Opening Rough-In
Dimensions chart in this manual, make sure the drain
hole is properly located. The recommended size of the
hole in the floor for the drain pipe is approximately 6” in
diameter.
The drain of the shower floor is designed for 2” cast-iron
(no-hub) or plastic drain pipes.
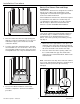
1. Dry fit the shower floor to ensure a proper fit and
correct alignment of the shower drain and the hole in
the floor. The top of the drain pipe must be 1/4”
below the floor level.
2. Temporarily remove the shower floor and proceed
with the installation instructions.
1/4"
2"
6"
BK-WB-002
1/2"
IMPORTANT NOTICE
Swanstone
Wall Panel
Moisture
Resistant
Wallboard
Existing
Wall
Surface
The Swan Corporation – Swanstone 12 800-325-7008
Installation Procedure