
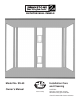
Installation Guide
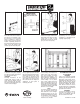

6. SIDE WALLS
If the end of the tub has settled or
the walls are out of plumb, it may
be necessary to cut the bottom
edge of a panel(s) to achieve a
good fit across the top. Measure
location of plumbing outlets from
back wall forward and from the top
ledge of the tub upward. Then
mark the position onto side panel.
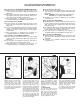
7. Cut holes 1/2⬙ larger than the
diameter of the pipes. Drill from the
finished side of the panel. For best
results place a scrap of wood
beneath the hole to be cut, this will
give you a clean cut opening.
8. Trial fit each panel before
proceeding. For an attractive
installation it is important that the
top edges properly align.
9. Apply a 1/8⬙ bead of adhesive
to the back of the panel, keeping
the adhesive at least one inch from
the tape and panel edges.
CAULKING
Following instructions on the
caulking tube…apply a bead of
caulk along the bottom and top
edge of the back and side walls.
Also make caulk applications to all
vertical seams and edges.
10. Remove the backing from the
factory applied pressure sensitive
tape. Grasp flat panel by the edge,
carefully position into the corner.
Press firmly to wall. Move hand
pressure up and down and side to
side, making sure all areas make
firm contact to the wall. Repeat for
application of other panel to
remaining side wall.
11. Locate the placement of the
corner moldings and measure the
vertical area of the corner seam.
Trim corner moldings to desired
length and trial fit. Apply a 3/16⬙
bead of adhesive (included in kit)
along the corner seam where the
corner molding is to be placed.
Press corner molding firmly into
position. Immediately remove any
excess adhesive with a damp cloth.
Temporarily secure corner molding
to the wall with masking tape. Allow
adhesive to cure overnight.
POSITIVELY
NO HAMMERING OR NAILING
IS TO BE DONE
CLEANING
Clean your Swanstone bathtub
panels as you would any other fine
bath fixture, using normal house-
hold detergents and cleansers. Just
wiping the wall surfaces quickly
removes watermarks and residues.
Occasional scrubbing with house-
hold abrasive cleansers ensures
that the original luster is maintained,
similar to tile and other permanent
type bath fixture materials.
REPAIRING
Use 400 grit sandpaper to remove
scratches and gouges in the
surface. A “Scotchbright pad” can
be used to blend in the area.
NOTE
To promote contact until adhesive
sets, use temporary bracing and
allow adhesive to cure overnight.
Temporary bracing may be con-
structed and wedged into position
as illustrated by using lengths of
1 x 2s, 2 x 2s, 1 x 3s. Lumber
should be cut as needed.
FORM #252-1-94-5M
Patent Pending
IMPORTANT
USE ROUTER, SPADE BITS,
TWIST DRILL OR HOLE SAWS
ONLY
.
DO NOT USE
AUGER BITS.