
Installation Instructions

Bathtub & Shower Wall Panel Systems
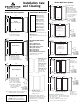
IMPORTANT SS-60-3 and SS-72-3 only
Measure the width of the back wall. If it measures more than 60", the SS-60-3 or
SS-72-3 cannot be installed.
If your bath area is more than 29" deep, the side panels will not come flush to
the front edge of the tub. For bath areas 32" deep, the TK-6072 trim kit may be
required. You must follow the procedures, as directed, in the Swanstone trim kit
installation instructions.
Measure the width of the back wall. If it
measures more than 60", Model SSIT-60-
3 cannot be used. Model SS-IT-60-3 is
designed to overhang the front edge of
the bathtub. To give a finished look to
your installation, the bathtub apron
strips may be cut to fit the wall area in
front of the bathtub.
Side panels can be notched so the inte-
gral trim butt-joints to the back panel.
However, this in not required as long as
the corner molding seals the joint below
the integral trim area.
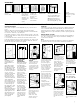
For best
results, extend
filler board
to the ceiling
Old Tiles
Tub
Wall
Panels
FILLER BOARD
Measure the height of the tiles from
the tub ledge upward. If the tiles
measure less than 59
5
/8", it is neces-
sary to install a filler board. The filler
board must equal the thickness of
the tile. Usually, 1/4" masonite or
similar material is adequate.
For best results, extend the filler
board from the top tile edge to the
ceiling.
Side Panel
Integral Trim
Back Panel
Integral Trim
NOTE
The Swanstone SS-29 Installation Kit (an accessory –– p.3) contains the four tubes
of adhesive, one tube of caulk, and one roll of pressure sensitive tape needed
for installation. This kit is suggested for installing the SS-60-3, SS-72-3 and SSIT-
60-3. To mount individual Swanstone wall panels, the SS-72 installation kit will
be needed.
TOOLS NEEDED TO INSTALL
Saber saw, drill, ruler, caulking gun and tools needed for faucet work.
CUTTING AND ROUTING TOOLS
• Circular saw: Minimum 40-tooth carbide blade (triple chip grind, 60-tooth will give
a smooth, clean cut).
• Portable power plane with carbide blades or cutter heads.
• Saber Saw (straight up/down blade travel). Fine plywood carbide blade or blade
with no tooth overhang (14 teeth per inch).
To mount panels to wall we suggest that your purchase the SS-72 installation kit
for each panel that you plan to install.
DO NOT NAIL PANELS TO TUB WALLS
Panels mount to walls with adhesive and pressure sensitive tape.
IMPORTANT SSIT-60-3
optional fit
Filler
Board
2
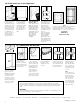
When installing over SHEETROCK/GREENBOARD/WOOD:
A. Surface must be dry, smooth, and free of any dust, soap scum or any other
contaminants. Wipe wall surface with a damp cloth.
B. To insure proper adhesion between the Swanstone product and
Sheetrock/Greenboard/Wood, it is best to use a primer/sealer, and it is IMPORTANT
to follow these guidelines: Oil based primer/sealers (such as Bin-Seal, or all pur-
pose enamel paint) should NOT be used to cover the entire wall surface
(Sheetrock/Greenboard/Wood) but only should be applied at the areas where the
double-faced tape adheres to the wall surface. Water based primer/sealers (such
as latex paint) MAY be used to cover the entire wall surface
(Sheetrock/Greenboard/Wood).
C. After the proper primer/sealer is completely dry, complete the installation fol-
lowing the installation instruction sheet.
When installing over PLASTER:
A. Surface must be dry, smooth and free of any dust, soap scum or any other cont-
aminants. Wipe wall surface with a damp cloth.
B. The wall surface (textured/swirled finish must be sanded smooth) must be
sealed with a primer (Bin-Seal or other primer/sealer).
C. After primer/sealer is completely dry, complete the installation following the
installation sheet.
When installing over CEMENT/CONCRETE:
A. Surface must be dry, smooth and free of any dust, soap scum or any other cont-
aminants. Wipe wall surface with a damp cloth.
B. The complete area must be sealed with two coats of primer. (Bin-Seal or other
primer/sealer).
C. After primer/sealer is completely dry, complete the installation following the
installation sheet.
NOTE:
CERAMIC: LOOSE TILE MUST BE REMOVED.
PLASTIC: ALL TILES MUST BE REMOVED.
When installing over OLD TILE:
A. Rough up the glossy tile surface by belt sanding the wall area with 60-grit sand-
paper.
B. Surface must be dry, smooth and free of any dust, or any other contaminants.
Wipe wall surface with a damp cloth.
C. For proper adhesion, the wall surface must be sealed with a primer (Bin-Seal or
other primer sealer).
D. After primer/sealer is completely dry, complete the installation following the
installation sheet.
When installing over WALL PAPER:
A. All wallpaper must be removed from the area to be covered. Surface must be
dry, smooth and free of any dust, soap scum or any other contaminants. Wipe
wall surface with a damp cloth.
B. The complete wall surface area to be covered by unit must be sealed with two
coats of primer (Bin-Seal or other primer sealer).
C. After primer/sealer is completely dry, complete the installation following the
installation sheet.
When installing over MASONITE:
A. Surface must be dry, smooth and free of any dust, soap scum or any other cont-
aminants. Wipe wall surface with a damp cloth.
B. For proper adhesion, the wall surface must be sealed with a primer (Bin-Seal or
other primer sealer).
C. Complete the installation following the installation sheet.
WALL SURFACE PREPARATION FOR SWANSTONE TUB WALL AND SHOWER WALL UNITS