
Installation Instructions
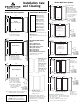

Wall Panel Trim Kits
TK-6072 Fits Swanstone 60"
and 72" high bathtub and
shower wall panel system.
TK-105 Fits Swanstone 96"
high shower wall panel sys-
tems including NEO 96" walls.
TK-0372
Batten Strip includes
one 3-3/4" x 72" flat
batten strip.
ACCESSORIES
NOTE
If installing a Corner
Shower Unit (DTF
Double Threshold or
NEO):
Select either wall for
initial panel installa-
tion. Measure out from
the wall which is per-
pendicular (right angle)
to the wall you select-
ed 3/16" onto the
shower floor threshold.
You will locate the
lower back corner of
the Swanstone panel
on this mark. This will
allow symmetrical
panel location as both
panels extend from the
corner along the wall
to the front edge of
the shower floor. There
must NEVER be more
than 3/16" gap
between the first panel
and the perpendicular
(right angle) wall. If a
gap greater than 3/16"
exists, it may be nec-
essary to shim the
panel slightly.
MULTIPLE PANEL
APPLICATION
FOR BACK WALL:
Measure the distance
along the back wall.
The width of the
panel will determine
the procedure to
use. If the back wall
is greater than the
overall width of the
panel, a second
panel, or possibly a
third, will be
required. When mul-
tiple panels are
installed, divide the
distance by two, or
three if a third panel
is required, and
transfer that mea-
surement to each of
the back panels.
Trim panels using
tools as directed in
step one. Repeat
steps two and three.
NOTE: Set trimmed
edges into the cor-
ner of the shower
area. They will be
covered with side
panel.
INSTALLATION PROCEDURE
Allow panels to adjust to room temperature (65
o
to 90
o
) for at least 6
hours.
Next, turn off hot and cold water supply, remove faucet handles,
escutcheons, filler spouts and any fittings mounted to the wall that will
be covered i.e. towel bars, soap dishes, etc.
Use hammer and chisel to remove objects cemented to walls. Old ceram-
ic tiles, if solidly adhered to walls, may be covered with this kit and need
not be removed.
Loose ceramic tiles must be removed and sub walls sanded smooth.
Front edge ceramic tiles may be reset for appearance only. Remove soap
film and all dirt from wall surface using detergent. Wipe dry. Wall sur-
face must be dry before panels can be applied.
READ ALL INSTALLATION INSTRUCTIONS (INCLUDING ANY ACCESSORIES) BEFORE STARTING.
47”
23
1
⁄2”
23
1
⁄2”
IMPORTANT
Trial fit before you begin. Swanstone panels have a finished surface side
and a non-finished backer side. Before trial fit, note which side of the
Swanstone panel has a sticker or stickers attached. This will be the non-
finished backer side and, upon installation, should be placed against the
sub-wall.
MEASURE BEFORE YOU START
The Swanstone wall panel system allows for variety of size applications.
One-, two-, or three-panel cartons may be combined for installing over
any shower floor situation.
NOTE
We recommend that professional installers be consulted on applications
for Swanstone panels not covered in these installations instructions.
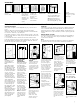
1. IF TRIMMING IS
REQUIRED
Transfer measurements
of the back wall onto
the back wall panel.
Cut the panel from the
back side with a saber
saw. Sand the cut edge
with fine or medium
sandpaper.
2. BACK WALL
Apply the pressure sen-
sitive tape (see SS-29 or
SS-72 installation kit) 1
"
from each edge.
Apply adhesive as
shown above. Keep
adhesive at least one
inch from the tape.
3. Remove the backing
from the pressure sensi-
tive tape. Carefully,
place panel edge into
the corner (left or right)
and press firmly into
place. Use hand pres-
sure up and down, side-
to-side, to make firm
contact to the wall.
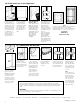
3a. If your wall panel kit
requires a batten strip
application, apply a 1/8
"
bead of adhesive to the
back of the batten strip.
Keep the adhesive at
least one inch from the
panel edges.
Carefully, center the
panel and firmly press,
from top to bottom,
making sure of a solid
contact.
4. SIDE WALL
If wall or tub are out of
square, cut the bottom
edge of side panel(s) for
a level edge across the
top from the back
panel(s). Measure loca-
tion of the plumbing
outlets from the back
wall forward and from
the top tub ledge
upward. Transfer these
measurements to the
side panel.
6. Trial fit each panel
before proceeding. For
an attractive installa-
tion, it is important that
the top edges properly
align.
5. Cut holes 1/2
"
larger
than the diameter of the
pipes. Drill from the fin-
ished side of the panel.
For best results place a
scrap of wood beneath
the hole to be made.
This will ensure a clean
cut.
IMPORTANT
USE ROUTER, SPADE
BITS, TWIST DRILLS
OR HOLE SAWS ONLY.
DO NOT USE
AUGER BITS
7. Apply adhesive and
tape as indicated in step
two.
AS-1075
Recessed
Accessory Shelf
SS-7211
Corner Soap Dish
ES-2
Two corner Soap
Dishes included
with SK-363672,
SK-344872, and
SS-326072 show-
er wall panel
system.
SS-29
Installation Kit.
The SE-363672,
SK-344872, and
SK-326072
includes all instal-
lation materials
SS-72
Installation Kit
3