
Installation Instructions
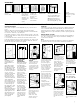

8. Remove the backing
from the pressure sensi-
tive tape. Place the
appropriate panel edge
carefully into the corner
seam and press entire
panel firmly to the wall.
Use hand pressure up
and down and side-to-
side. Make sure all
areas are in solid con-
tact with the wall.
Repeat the above for
the opposite panel.
9. CAULKING
Follow the instructions
on the caulking tube
and apply a bead of
caulk along the bottom
and top edge of the
back and side walls.
Also apply caulk to all
vertical seams and
edges.
11. CORNER MOLDING
Trial fit placement of cor-
ner moldings and trans-
fer the height measure-
ment of the vertical
seam to the corner
molding. Trim moldings
and apply a 3/16” bead
of adhesive in each cor-
ner seam.
Press corner moldings
firmly into appropriate
corners. Immediately
remove any excess
adhesive with a damp
cloth. Temporarily secure
corner moldings to the
back and side walls with
masking tape.
CLEANING
Clean your Swanstone Bathtub panels as you would any other fine bath fixture, using normal
household detergents and cleansers. Just wiping the wall surfaces, quickly removes watermarks and
residue. Occasional scrubbing with household abrasive cleansers maintains Swanstone’s beautiful
luster.
REPAIRING
Use 400 grit sandpaper to remove scratches and gouges in the surface. A “Scotchbright pad” can be
used to blend the repair into the surrounding area.
FORM #522-7-06-5M
10. BATHTUB APRON
STRIP INSTALLATION,
SSIT-60-3 ONLY.
Apron strips provide a
finished look to your
installation. Measure
the wall area in front
of the bathtub and
cut the apron strips
to fit. Apply a bead of
adhesive to back of
apron strips and
press into place.
Adhesive cures
overnight.
NOTE
To promote contact until adhesive sets, use temporary
bracing and allow adhesive to cure overnight.
Temporary bracing may be constructed by wedging, as
illustrated, lengths of 1 x 2’s, 2 x 2’s, and 1 x 3’s.
POSITIVELY NO
HAMMERING OR
NAILING IS TO BE DONE
Tape
The Swan Corporation One City Centre Suite 2300 St. Louis, MO 63101 p (800) 325-7008 f (314) 231-8165
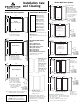
Trial Fit All Panels Prior To Final Application
Mark a line indicating
the amount to be
sanded if necessary.
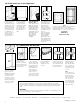
1. Select a desirable
location for the mount-
ing of the soap dish.
While Swan recommends
a minimum distance of
42
"
from the shower
floor ledge to the soap
dish, you may choose to
stack the soap dishes in
one corner or set them
in opposite corners.
2. After settling on a
location, draw a 4
"
level line on both walls.
These lines will be used
to line up the top edges
of the soap dish.
TRIAL FIT
3. Prior to applying
adhesive, set the soap
dish into position. This
will insure that it will
fit tightly against the
wall. If the wall is not
exactly 90 degrees
square, it will be nec-
essary to sand one
side in order to achieve
proper fit. Use a course
grit (60 grit) sandpaper.
4. Apply a generous
amount of adhesive to
both sides and the
sculpted back of the
soap dish.
7. Temporarily secure
with masking tape as
illustrated. Remove
tape after approximate-
ly two hours. Do not
place anything on the
soap dish for at least
24 hours.
NOTE
You may have extra
color coordinated caulk
left over from your
Swanstone wall instal-
lation. If this is the
case, you can run a
bead of caulk around
the soap dish installa-
tion. Do this after the
adhesive has dried.
5. Line up to the 4
"
level line and press and
hold into place. Wipe off
excess adhesive. You will
want a uniform bead on
both top and bottom.
ES-2 SOAP DISHES INSTALLATION
4