Safety Guidelines ‘The Swan Assurance — if our product is properly installed and maintained, as stated in these instructions, it will not leak, Remember = Safety First IMPORTANT NOTICE ‘The Swan Corporation, the makers of the Swan products, cannot anticipate every possible circumstance that might involve a potential hazard during the installation of our product(s). The warnings and instructions in this installation guide are, therefore, not all-incisive.
Safety Guidelines Lifting Hazard @ According to the Nation! Institute for Occupational Salty and Health, the recommended maximum safe lifting weight is 51 pounds, with all lighting conditions perfect— minimal forward reach, steady load close to the body, straight back, load between knees and shoulders, and good grips. To avoid personal injury, always use these proper filing techniques and use two people to move cartons weighing more than §1 pounds.
Safety Guidelines General Information A WARNING WARNING: Indicates a potentially hazardous situation which, if not avoided, could resit in serious injury or death, Electrocution Hazard ‘Water and other liquids conduct electric current and can create a short circuit, resulting io injury or death. Keep all liquids away from electrical cords and power totals. DO NOT crests a short circuit between a source of electricity and a liquid by being in contact with both simultaneously.
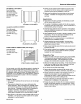
General Information D-346072 & D-326072 Four flat panels T One center pane! i Twe carer moldings i Two cheap dishes One tube color match ! D silicone “z < K-346072 & D-328072 SK-346072, 5-326072, & SK366072 Three flat panels Twa corner moldings “Two soap dishes One tube color match silicone fang = SK-346072 & SK-326072 STMK72-3662 & SQMK72-3662 (Tile Design) Three flat panels “Two soap dishes One tube color match * silicone “~ =Y STMK72-3662 & SQMK72-3662 For best results, use 100% clear silicone sealant fo
General Information O All Swan stone panels have a finished and unfinished side. ‘The finished side should always be Installed facing outward. Regardless of the appearance (shiny or dull), the finished side is very smooth. The unfinished side will many times have very slight grooves in it from the thickness sanding process.
Installation Procedure Installation Procedure Followed carefully, these installation instructions will result in an easy, trouble-free installation of your Swan Corporation product. Any deviations, additions, andiron deletions from the prescribed installation, without prior written approval, will void the warranty covering this product. Not following the directions could also result in personal injuries, water damage, and other damage to floors, pipes, walls, and other portions of your building or home.
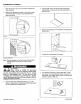
Installation Procedure Flat, Subway Tile, or Square Tile Panel Installation The installation process is the same for either flat or tile panels. Follow the steps in this section for installation incrustations, Back Panel 1 the back wall measures less than the width of the panel, cut the panel to fit the opening. 1. Using a builder's square, make aura the tub surface is perpendicular to the side walls.
Installation Procedure 7. Transfer the measurements onto the front surface of the back panel. Note: The back panel can be cut slightly smaller than the opening because the side panels will cover any small gap (less than 1/4 inch). Cutting the side panel to precisely fit the back wall is not necessary If a corner melding, supplied in some kits, is used. This corner molding will cover gaps up to 1/2 inch. A WARNING Dust Hazard é\ When cutting or drilling the Swan stone product, use a dust collection method wh
Installation Procedure 1. Place the panel on top of the tub and side it against the back wall panel, 2. Scribe {mark) the panel, as shown. If the panel is wider than the wall, take this width into consideration when ascribing the panel. Fat Fan at —l Squats Tile er Subway Tie Note: Precisely ascribing and cutting the panel will provide 2 clean 90 degree corner with no need for corner molding.
IMPORTANT NOTICE Any cutout for accessories should have rounded corners {sharp corners can promote stress cracks). 8. Dy fit the panel, and make any necessary adjustments. f b Side Panel (without tub or shower controls) | the panel does not require cutting to size, proceed to the ends section. Note: On 88IT-60-3, subway tile, and square tile panels, the side panels are marked with labels in the top, right-hand or left-hand comer of the panel.
Installation Procedure Panel Installation WARNING Fumes Hazard Aé The fumes from the silicone and solvents ===t &= used by the installer can be harmful if used in an ventilated room. Always work in a well-ventilated area. To keep the area well.ventilated, open windows and use exhaust fans. If adequate ventilation Is not achievable or practical, use respiratory protective equipment. 1. Clean the backs of each panel with denatured alcohol or another non oil-based cleaning solvent.
Installation Procedure b, If the uncovered area of the back wall is less than lhe width of the next panel, cut the panel to fit the opening. Iris riot necessary for the seam in the back panels to be centered, as it will be covered with the center pane. Gut the panel from the back side with a circular saw or a saber saw. Lightly sand the edge with fine or medium sandpaper to remove any rough edges. c.
Installation Procedure Corner Soap Dish Installation The soap dish is a corner mount design. The soap dishes can be stacked in one corner or placed in opposite comers. Note: The soap dish is molded with a square comer, as shown in the Illustrations. 1. Select a desirable height for mounting one or both soap dishes. 2. After marking the height, draw a 4 inch level line on both walls. These fines will be sad to align the top edges of the soap dish. Dry fit the cheap dish prior to applying clear silicone.
Installation Procedure 2. Dry fit the comer molding. Fumes Hazard é& The fumes from the silicone and solvents used by the installer can be harmful if used in an ventilated room. Always work in a wile-ventilated area. To keep the area well-ventilated, open windows and use exhaust fans. If adequate ventilation is not achievable or practical, use respiratory protective equipment, 3. Clean the surface of the panels and the back of the molding with denatured alcohol or another non-oil based solvent.
Installation Procedure 2. Place at least two braces against each left and right-side walls. maxima Install (wedge) horizontal braces against the left and right wall braces. 4. Insert (wedge) blocks or cross braces between the grant to rear panel braces and the back pave braces. These blacks or braces must apply pressure to the back panel to hold it in place. = Swan Corporation 5. Remove tha braces after 24 hours, 6.
Installation Procedure Maintenance & Cleaning Attaching Shower Doors and Accessories 1. Follow the mounting instructions that come with gate accessory, 2. Drill pilot holes, where fasteners pass through the wall panels, slightly larger than the fastener. 3. |f anchors are being used, drill the hole in the panel large enough for the head of the anchor to fit through the panel and the structural wall behind it 4. Use 100% clear silicone to seal any holes or joints between the accessory and the wall panel.
Warranty Warranty If & Swan Corporation product covered by this warranty is found to be defective in materials or workmanship, after inspection by an authorized Swan Corporation representative, we will repair, or at our option, exchange the product for 2 similar model. This warranty extends for a designated period of time, so long as it remains in use fn s original place of installation.
Save these Installation Instructions for future reference. They provide important information on cleaning and maintenance of Swan Corporation products. & Swan www.swanstone.