Veritek Bathtub and Shower Wall Kits TI-3 Bathtub Wall Kit TI-5 Bathtub Wall Kit www.swanstone.
Safety Guidelines The Swan Assurance — if our product is properly installed and maintained, as stated in these instructions, it will not leak. Remember – Safety First IMPORTANT NOTICE The Swan Corporation, the makers of the Swan products, cannot anticipate every possible circumstance that might involve a potential hazard during the installation of our product(s). The warnings and instructions in this installation guide are, therefore, not all-inclusive.
Safety Guidelines IMPORTANT NOTICE IMPORTANT NOTICE: Indicates that equipment or property damage can result if instructions are not followed. Read and Understand the Manual It is the responsibility of any individual who installs or maintains this product to fully understand and follow proper installation and maintenance procedures. Be aware of the inherent dangers in the use of power tools when installing this product. Read and understand all Warnings, Cautions, and Important Notices in this manual.
Safety Guidelines General Information Lifting Hazard According to the National Institute for Occupational Safety and Health, the recommended maximum safe lifting weight is 51 pounds, with all lifting conditions perfect— minimal forward reach, steady load close to the body, straight back, load between knees and shoulders, and good grips. To avoid personal injury, always use these proper lifting techniques and use two people to move cartons weighing more than 51 lbs.
General Information TI-3 Bathtub Wall Kit (Tile Design) WARNING One back panel Two side panels WARNING: Indicates a potentially hazardous situation which, if not avoided, could result in serious injury or death. Designed for bathtub enclosures 53 to 60 inches wide and 29 to 30 inches deep. Wall panels are 59-5/8 inches high. Electrical Shock Hazard Contacting live electrical wiring with power tools or hand tools can cause serious injury or death. Make sure all related circuit breakers are turned OFF.
General Information Installation Procedure Helpful Hints Caulking Tips mT he variety of installations possible for this kit may require procedures other than those shown. Ensure construction is correctly sized, plumb, and square. mW hen job is complete, inspect all caulked areas for gaps and fill as needed. mR ead these instructions carefully and familiarize yourself with the various parts of the kit. mF ollow the instructions on the color match silicone sealant tube.
Installation Procedure Swan Corporation panels can be installed over a variety of products. If you intend to apply the panels to any surface other than those described, consult with a professional contractor. Use the following sections when installing this product over: the substrate. mS urface must be dry, smooth, and free of any dust, soap scum, or any other contaminants. mC omplete the installation following the instructions in this manual.
Installation Procedure Filler Boards If an existing wall covering (i.e. tile) does not extend to a height equal to the height of the panel, it will be necessary to install a filler board to that height. The filler board must equal the thickness of the existing wall covering (tile). Usually 1/4 inch masonite, or similar material, is adequate. If desired, the filler board can extend from the top edge of the tile to the ceiling.
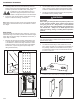
Installation Procedure Wall Kits With Separate Corner Panels - TF-57, TI-5, and TI-7260 Corner Panel with 7 Inch Dimension on Enclosure Back Wall Side Panel Fits TI-7260 Back Panel Fits 31 to 34 inch Side Wall 53-1/4 to 63-3/4 inch Back Wall Corner Panel with 5 Inch Dimension on Enclosure Back Wall Side Panel Fits 31 to 36 inch Side Wall TI-7260 Back Panel Fits 53-1/4 to 59-3/4 inch Back Wall TI-5 WARNING Fumes Hazard The fumes from the silicone sealant and solvents used by the installer can be harmfu
Installation Procedure 4. 5. Carefully position the corner panel and firmly press the surface of the corner panel against the walls. Apply hand pressure up and down and side-to-side, making sure all areas are in firm contact with the wall. It is important to apply hand pressure to the entire surface of the panel to bond it to the wall surface. 2. Use the measurements to make a cardboard template in order to check for proper fit around the plumbing outlets.
Installation Procedure WARNING IMPORTANT NOTICE ø11 Fumes Hazard The fumes from the silicone sealant and solvents used by the installer can be harmful if used in an unventilated room. Always work in a well-ventilated area. To keep the area wellventilated, open windows and use exhaust fans. If adequate ventilation is not achievable or practical, use respiratory protective equipment. 6. TI-5 Bathtub Wall Kit. If installing a shower door, do not install the apron strips.
Installation Procedure 4. Install the back panel, overlapping the corner panels. Carefully line up any faux grout lines. Press the back panel firmly to the wall. Use even hand pressure from top to bottom and side-to-side to ensure solid wall contact. IMPORTANT NOTICE Do not use oil-based cleaners, such as mineral spirits, to clean the panels. The oil in the cleaner will prevent the panel from properly adhering to the wall. 3. Apply several dots of silicone over the back surface of the apron strip.
Installation Procedure plumping fixture outlets. 6. 2. Measure the openings for faucet(s), bathtub spout, and/ or shower head. Measure the height up from the ledge of the bathtub or shower floor ledge. Measure out from the back wall. A Trial fit the panel, and make any necessary adjustments. Note: The corner side panel should not extend all the way to the front edge of the bathtub.
Installation Procedure 11. Repeat Step 6 through Step 9 to install the remaining corner-side panel. 3. Note: Make sure the top edge of both corner side panels are at the same height measured from the tub ledge. 4. Install the back panel, overlapping the corner side panels. Carefully line up any faux grout lines. Press the back panel firmly to the wall. Use even hand pressure from top to bottom and side-to-side to ensure solid wall contact. Back Panel 1.
Installation Procedure wall braces. IMPORTANT NOTICE To ensure contact between the panels and walls until the silicone sealant sets, install the temporary bracing after completing installation. The bracing should be constructed from 1 x 2 inch, 1 x 3 inch, and 2 x 2 inch lumber. Cut the boards to length so that the braces wedge against the wall panels and/or each other when installed.
Installation Procedure 5. Remove the braces after 24 hours. 6. After the temporary bracing is removed, refer to the Caulking section for information on applying color match silicone sealant to joints and seams. Caulking Maintenance & Cleaning Day-To-Day Cleanup Wash regularly with warm water. Use a soft cloth with a mild detergent such as Handy Andy, Mr. Clean, Top Job, Tough Act, Ajax Liquid Cleaner, or Lestoil. Always rinse off cleaners within five minutes of application.