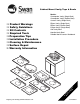
Cabinet Mount Vanity Tops & Bowls Models: R ea B da ef n or d e Un In d st er al s lin ta g nd Product Warnings Safety Guidelines Kit Contents Required Tools Preparation Tips Installation Procedure Cleaning & Maintenance Surface Repair Warranty Information Chesapeake Vanity (Single Bowl) Chesapeake Vanity (Double Bowl) Contour Vanity (Single Bowl) Ellipse Vanity (Single Bowl) Ellipse Vanity (Double Bowl) Europa Vanity (Single Bowl) Hilo Vanity Bowl Islandia Vanity Bowl Palladio Above-C
Safety Guidelines IMPORTANT NOTICE The Swan Assurance — if our product is properly installed and maintained, as stated in these instructions, it will not leak. Remember – Safety First IMPORTANT NOTICE The Swan Corporation, the makers of the Swan products, cannot anticipate every possible circumstance that might involve a potential hazard during the installation of our product(s). The warnings and instructions in this installation guide are, therefore, not all-inclusive.
Safety Guidelines Personal Protection Be sure to use all personal protective equipment, such as sturdy work boots, preferably with steel toes, gloves, and hard hat, if necessary, to ensure your own safety. To prevent possible damage to your hearing, always wear ear protection, such as earmuffs or earplugs, when working around power tools. Dust Hazard When cutting or drilling the Swanstone product, use a dust collection method which prevents dust particles from going into the air.
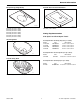
General Information Contour Vanity (Single Bowl) Sink Contents Confirm that all parts for the vanity top or bowl have been included before beginning installation.
General Information Europa Vanity (Single Bowl) Palladio Above-Counter Washbasin EUVSB-01 EV-2225 EV-2231 EV-2237 EV-2243 EV-2249 EV-2255 EV-2261 (22-1/2"D (22-1/2"D (22-1/2"D (22-1/2"D (22-1/2"D (22-1/2"D (22-1/2"D x x x x x x x PACW-01 25"W) 31"W) 37"W) 43"W) 49"W) 55"W) 61"W) WB-2218 (18"D x 22"W) Vanity Top Accessories Side Splash and Front Apron Panels Hilo Vanity Bowl Side Splash Panel for Vanity Tops (one per carton) Model VT18-3SS VT19-SS VT21-3SS VT22-SS Part VT01803SS VT00019SS VT02103
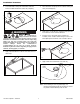
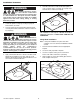
Installation Procedure Installation Procedure Unpack Carton Use care when opening the box not to damage the sink. Disclaimer This product is shipped to you or your retail center after careful inspection. After purchasing the sink, carefully unpack and inspect the product for any shipping damage that may have occurred. If damage is found, report it immediately to the store of purchase.
Installation Procedure 1. If necessary, identify the location of additional holes for the faucet or other accessories and drill a 1/4” pilot hole from the back side of the sink. 2. Drill fixture hole(s), using the 1/4” pilot hole for a guide, with a 1-3/8” hole saw. VI-008 VI-002 3. Faucet may be installed at this time per manufacturer’s instructions. IMPORTANT NOTICE To prevent damage to the unit, do not use an auger style drill bit. VI-009 Vanity Top Installation — Cabinet Mount 1.
Installation Procedure 2. Clean underside of vanity sink with denatured alcohol. Remove all dust and allow the surface dry completely. 4. Place Swanstone vanity top onto the cabinet, making sure vanity is seated properly. VI-006 Dena ture Alcoh d ol VI-007 WARNING Solvents Hazard Follow all manufacturers’ safety instructions for silicone sealants and denatured alcohol. Alcohol vapors are both flammable and hazardous to breathe. Silicone vapors may irritate eyes and nose.
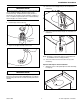
Installation Procedure 10. Connect the faucet supply lines per the manufacturer’s instructions. IMPORTANT NOTICE To prevent breakage or distortion of the overflow assembly, do not use oil-based caulking or plumber’s putty near the overflow assembly. Oil-based plumber’s putty will have a harmful effect on the plastic overflow assembly, resulting in a leak. If a sealant is required between the overflow assembly and the tail pipe, use a silicone sealant. 8. Install tail pipe onto the sink ring. VI-011 11.
Installation Procedure 5. WARNING Dust Hazard When sanding Swanstone product, use a dust collection method which prevents dust particles from going into the air. Always work in a well-ventilated area. To keep the area well ventilated, open windows and use exhaust fans. Always use an OSHA approved dust mask when cutting, drilling, or sanding Swanstone products. 2. Trial fit side splash to vanity top checking for proper fit. Sand and trim, as needed. 3.
Installation Procedure 5. Drill starter hole inside of cutout line. 9. If installing for raised mount, apply adhesive around base flange and set bowl in place. VI-030 VI-033 Apply Silicone Here 6. Use a saber saw to cut inside of cutout line. 10. If installing for drop-in mount, apply adhesive on the underside of bowl flange and set bowl into opening. VI-031 VI-033 Apply Silicone Here WARNING 11. Install faucet per the manufacturer’s instructions.
Installation Procedure 2. Cut opening and finish the edge of the hole. IMPORTANT NOTICE WARNING To prevent breakage or distortion, do not use oil-based caulking or putty to connect the overflow assembly. Oil-based plumber’s putty will have a harmful effect on the overflow assembly, resulting in a leak. If a sealant is required between the overflow assembly and the tail pipe, use silicone sealant.
Installation Procedure 9. WARNING Solvents Hazard Follow all manufacturers’ safety instructions for silicone sealants and denatured alcohol. Alcohol vapors are both flammable and hazardous to breathe. Silicone vapors may irritate eyes and nose. Personal injury can result from improperly handling or use of products, such as denatured alcohol. Always follow the manufacturer’s recommendations for the safe use of these products.
Installation Procedure 15. Connect the drain lines and p-trap per the manufacturer’s instructions. 17. Install tail pipe onto the sink ring. VI-010 No Plumber’s Putty in this location VI-051 18. Tighten the tail pipe assembly onto the sink Note: Swanstone recommends using a licensed plumber for the installation of all necessary plumbing. 16. Apply sealant to the bottom side of the sink ring.
Installation Procedure 3. Attach template to counter with masking tape and trace inside template with a pencil. 7. Install faucet per the manufacturer’s instructions. 8. Clean bowl flange and countertop with denatured alcohol. Remove all dust. Let the surfaces dry completely. 9. Apply a bead of silicone around the underside of sink flange and position it over the countertop opening. VI-040 4. Drill starter hole inside of cutout line. VI-043 VI-041 WARNING 5.
Installation Procedure 12. Apply sealant to the bottom side of the sink ring IMPORTANT NOTICE Apply Plumber’s Putty Here Do not overtighten the nut when installing the tail pipe. Handtighten the nut and then tighten NO MORE than one-half turn. Overtightening will break the overflow assembly and void the warranty. 15. Connect the faucet supply lines per the manufacturer’s instructions. 16. Connect the drain lines and p-trap per the manufacturer’s instructions. VI-050 17. Check for leaks.
Installation Procedure ADA Installation Recommendations Accessibility Requirements In order to comply with ADA requirements, the lavatory must have adequate floor clearances in front of the sink. It must also be installed at the proper height with the specified leg and wheel chair clearance under the sink. For complete wall mount instructions, refer to the Wall Mount Vanity Tops and Bowls, form number 1255.
Maintenance and Cleaning Warranty Care and Cleaning Warranty The Swanstone products are stain and abrasion resistant; however, the finish requires reasonable care. If a Swan product covered by this warranty is found to be defective in materials or workmanship, after inspection by an authorized Swan Corporation representative, we will repair, or at our option, exchange the product for a similar model.
Save these Installation Instructions for future reference. They provide important information on cleaning, maintenance, and surface repair of the Swanstone Products. www.swanstone.