
Instructions / Assembly


ATTACHING THE TOP BEAM TO THE A-FRAMES
You are now ready to start hanging your swings!
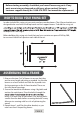
120’’
12 ft
PAGE 11
NOTE: YOU WILL REQUIRE THE ASSISTANCE OF ANOTHER
PERSON FOR THIS PART OF THE ASSEMBLY.
1. Lay the top beam on the ground on a 6” side, with the screw hangers on the side
closer to you.
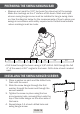
2. Stand one A-Frame on its side, with one beam at on the ground and the other in
the air. The legs should be pointing in the same direction as the swing hangers. (See
Image)
3. Lift the top beam slightly and tilt it so that it can slide into the opening on the
A-Frame bracket. Slide the top beam into opening of the bracket.
4. Secure the bracket to the beams using 6 lag bolts and washers for each beam, 3 on
each side. Drive the bolts through the ready holes of the bracket rmly into the
wooden beam. (Pre-drilling holes smaller than the bolts before screwing the bolts
in may allow easier securing with less risk of splintering the wood. )
5. Repeat steps 2-4 for the second A-Frame at the other end of the top beam.
6. Together with your assistant, life the top beam o the ground by holding the two
A-Frame brackets. Lift the beam until it is above the two support frames, and the
support frames rest rmly on the ground.
7. Check that your swing frame is standing rm and stable. Add stakes for a stronger
grounding if desired.