
Operating Guide

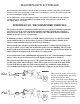


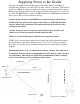

Step 4: Once the two main frame assemblies
are fastened, install the 20008TK height
indicator bracket #1 over the actuator #4 and
slide towards front of unit. While holding
actuator up run NB132 bolt #5 through frame,
20008TK #1, 19942TK #2, actuator, then
through second spacer and opposite side of
bracket. Capture the bolt with the NB281 nut
#3 provided.
ASSEMBLY CONTINUED
SHOWN BELOW IN FIG. 2 IS THE PROPER
A
SSEMBLY OF HEIGHT INDICATOR AND
ACTUATOR.
Fig. 2
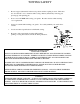
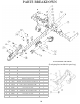
Step 3: Remove main tongue assembly
from crate and bolt both frame ends #1 to
the inside of main frame rail sides using
(2) 11431 bolts #2 and (2) 13997 nuts #3
provided. Tighten hardware snug but do
not lock completely, allow frame
assemblies to hinge.
STEP 3
STEP 4
8