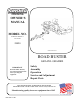
swisherinc.com OWNER’S MANUAL MODEL NO. STARTING SERIAL #: L115160001 20020 Model 20020 shown ROAD BUSTER GRAVEL GRADER IMPORTANT Read and follow all Safety Precautions and Instructions before operating this equipment. Safety Assembly Operation Service and Adjustment Repair Parts 1602 CORPORATE DRIVE, WARRENSBURG, MISSOURI 64093 PHONE 800-222-8183 FAX 660-747-8650 EMAIL CustomerCare@SwisherInc.
LIMITED WARRANTY The manufacturer’s warranty to the original consumer purchaser is: This product is free from defects in materials and workmanship for the period's shown below beginning from the date of purchase by the original consumer purchaser. We will repair or replace, at our discretion, parts found to be defective due to materials or workmanship.
SAFETY PRECAUTIONS This Safety Alert Symbol indicates important messages in this manual. When you see this symbol, carefully read the message that follows and be alert to the possibility of personal injury. Read this manual completely. This machine can amputate hands, feet, and throw objects. Failure to observe the following safety instructions could result in serious injury or death. • Read and understand the manual. Learn to operate this equipment in a safe manner.
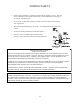
TOWING SAFETY • Be sure support jackstand is in the travel position and the coupling is secure. This must also be retracted so not to interfere while towing. Retract jackstand by removing pin, pivoting up, and replacing pin. • Never exceed 15 MPH while towing your grader. Be extra cautious when traveling over rough terrain. • Always be careful while backing your grader. You could jackknife your grader if not careful. • See tire and wheel specifications for PSI while towing.
MAINTENANCE & STORAGE When storing the grader always lower the grader to which the scarifiers contact the ground and the actuator is relieved of carrying any load. It is not recommended to ever leave the grader stored with the actuator holding the weight of the unit. It is recommended to use the jackstand provided to raise and lower the unit when connecting and disconnecting from vehicles. DO NOT try and lift the weight of the grader by yourself when uncoupling, it may cause injury.
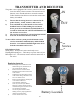
TRANSMITTER AND RECEIVER The grader comes equipped with a remote control to raise and lower the unit by electric actuator. The remote has two buttons, one to extend and one to retract the actuator. Follow the directions below to activate the remote once battery is installed. 1) 2) 3) 4) Ensure that the wiring harness is connected at all points: battery, switch, actuator, and receiver. Press and hold one of the buttons on the wireless handheld remote.
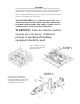
ASSEMBLY This grader has been mostly assembled at the factory. Refer to uncrating and assembly instructions below to complete the final assembly steps. Refer to the drawings and part lists should it become necessary to disassemble the unit for repair or replacement of parts. Inspect all components for damage. If you believe you have a damaged part please contact customer service immediately at 1-800-222-8183.
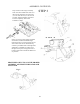
ASSEMBLY CONTINUED Step 3: Remove main tongue assembly from crate and bolt both frame ends #1 to the inside of main frame rail sides using (2) 11431 bolts #2 and (2) 13997 nuts #3 provided. Tighten hardware snug but do not lock completely, allow frame assemblies to hinge. Step 4: Once the two main frame assemblies are fastened, install the 20008TK height indicator bracket #1 over the actuator #4 and slide towards front of unit.
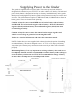
Supplying Power to the Grader The grader is supplied with two power leads. The remote power lead (20038) is designed to be attached to your ATV/UTV or other vehicles 12V battery. The onboard power lead (20039) is designed to hook up to a battery installed directly on the grader. Both power leads plug directly into the grader wiring harness but only one can be used at a time. The 20039 harness requires (2) NB524 nuts and (2) NB690 bolts to fasten to battery posts. These are located in the parts bag.
PARTS BREAKDOWN ɘɘ LATCH PIN OPTION (Latch pin plates included in parts bag) ITEM NO. PART NUMBER 1 19946TK 2 NB577 3 19957 4 19942TK 5 NB100 6 NB281 7 19974 8 NB274 9 NB180 10 12447 11 19179 12 19477TK 13 NB272 14 NB182 15 NB577 16 19958TK 17 7365 18 NB281 19 19962TK DESCRIPTION Weldment - Main Tongue, Grader; Txt Blk Bolt - 1/2-13 X 3 1/2 GR5 ZY Act uator - 12VDC, 20:1, ACME 6", 1500# Spacer - .515"ID X 1"OD X .
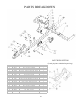
PARTS BREAKDOWN ˦ɘɘﷻﷻ ITEM NO. PART NUMBER 1 19971 2 NB195 3 NB126 4 15177 5 NB132 6 19944TK 7 NB121 8 20057 9 19961TK 10 19945TK 11 11431 12 10501 13 19941TK 14 19940TK 15 NB280 16 NB127 17 19943TK 18 20051 19 19929TK 20 NB281 DESCRIPTION Tire -13 X 650-6 3/4 ID Smoot h Washer - 13/16 X 1 1/4 X 1/8 ZY; Mild Pin - Cot t er, 1/8 X 1, Crbn St l Ext Prng Bent Pin - W/ Hair Pin 1/2OD X 3.
PARTS BREAKDOWN HEIGHT INDICATOR ITEM NO. PART NUMBER 1 NB281 2 NB577 3 19942TK 4 20008TK 5 19857 6 19858 DESCRIPTION Nut - Nyloc 1/2-13 ZY Bolt - 1/2-13 X 3 1/2 GR5 ZY Spacer - .515"ID X 1"OD X .500", Txt Blk Bracket - Height Indicator Txt Blk Butt on - Plast ic, Bot tom But t on - Plast ic, Top ɘﷻ ELECTRICAL CONTROLS ITEM NO.
SAFETY DECALS Replace decals immediately if damaged. 20068 20082 The operation of any grader can produce foreign objects to be thrown into the air, resulting in severe eye damage. Always wear certified safety glasses or wide-vision safety goggles over spectacles before and while operating such a machine.
SPECIFICATIONS Dimensions Length Width Weight Shipping Dim. Shipping Weight 95" 50" 380lbs 51.5" X 51.5" X 24" 460lbs Working Dimensions Working Width Max. Teeth Ground Clearance Grading Depth Range Total Scarifier Adjustment 50" 10" 1-10" 9" 2" max.
SWISHER HISTORY Back before electricity came to rural Missouri Max Swisher was producing lawn mowers from his mother’s chicken house. Max never liked to mow grass. He installed a gearbox on his family’s lawn mower creating a self-propelled unit. By tying one end of a rope to the mower and the other end to a tree in the center of the yard the mower circled the tree, shortening the rope and guiding the mower in concentric circles. Max enjoyed relaxing under a shade tree while his invention did all the work.
GRAVEL GRADER ROAD BUSTER OWNER’S MANUAL HOW TO ORDER REPAIR PARTS: Each Grader has its own serial number. MODEL NO. All Grader parts listed herein may be ordered directly from Swisher, your nearest Swisher dealer, or from our website.