
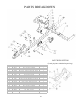
Replacement Part List


݆
◌
ɘ
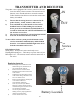
TRANSMITTER AND RECEIVER
The grader comes equipped with a remote control to raise and
lower the unit by electric actuator. The remote has two
buttons, one to extend and one to retract the actuator.
Follow the directions below to activate the remote once
battery is installed.
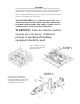
1) Ensure that the wiring harness is connected at all
points: battery, switch, actuator, and receiver.
2) Press and hold one of the buttons on the wireless
handheld remote. While holding the one button
down, press the second button and hold both for 3
seconds at which time the red LED will illuminate on
the wireless receiver box.
3) The wireless system is now activated and operational
4) Press the IN and OUT button as needed.
To turn off the wireless system press both buttons on the
wireless transmitter simultaneously and hold them
down for 3 seconds until the RED light turns off on
both the transmitter and receiver.
LED Indicator Light
Steady RED – The system is active and ready to use.
Flashing RED during use – The battery or power source is low.
RED light is off – The wireless remote control is turned off, or
not active.
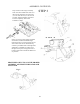
Replacing batteries
If the indicator light on the handheld remote
flashes during use, the batteries are
low and should be replaced.
1) Remove the two screws from the
handheld remote located on the back
of the remote.
2) Separate the top and bottom sections
of the remote using a flat head screw
driver or similar device.
3) Remove the old batteries and dispose
in accordance with local
environmental regulations.
4) Insert (2) new A23 style alkaline
batteries as shown with the positive
terminals facing the switches. Do not
mix old and new batteries.
5) Join the top and bottom sections
making sure they snap together and
rubber seal remains intact.
6) Secure with the two screws.
Battery Location
Screws
OUT
IN
6