
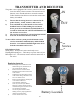
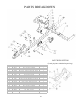
Replacement Part List


콆 ﷻﷻ
˦ ɘ
7
ASSEMBLY
This grader has been mostly assembled at the factory. Refer to uncrating and assembly
instructions below to complete the final assembly steps. Refer to the drawings and part lists
should it become necessary to disassemble the unit for repair or replacement of parts.
Inspect all components for damage. If you believe you have a damaged part please contact
customer service immediately at 1-800-222-8183.
TOOLS REQUIRED: (2) ¾” WRENCH OR SOCKET, (2) 1 ¼”
WRENCHES/SOCKETS OR LARGE CRESCENT WRENCHES
HAMMER, CROW BAR/PRY BAR, WIRE CUTTERS, GLOVES
AND PROTECTIVE EYEWEAR RECOMMENDED
WARNING:
Exercise extreme caution,
as parts are very heavy. Sufficient
persons or mechanical handling
equipment should be used.
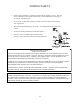
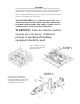
Step 1: Carefully remove top,
sides, and ends of crate with
hammer and pry bar.
Step 2: Remove the ball coupler
assembly #1 from within the frame
assembly and install it on to the tongue
assembly with the NB577 (bolts) #2
and NB281 (nuts) #3 provided.
STEP 1
STEP 2