
Use and Care Manual


煆
Ȭ
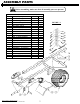
FIGURE 8.1
GENERAL RECOMMENDATIONS
• Use at least two people to uncrate & assemble the unit.
The bin and its components are very heavy.
UNCRATING See Figure 8.1
• Always wear gloves and safety glasses when
disassembling the crate.
• Using a hammer and pry bar, separate the boards of the
crate starting with the top. Use caution to not damage
the equipment inside the crate.
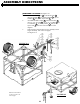
AXLE & WHEEL
See Figure 8.2
1. Check that all parts are present before beginning
assembly. See Figure 7.1
2. Unlatch the two rubber latches securing the lid to the
hopper. With help from another person, remove the lid
and tires from the bin and set them aside.
3. Place a blanket or some cardboard in front of the crate
base and with assistance from another person, carefully
roll the hopper assembly 180° until it is upside down on
the blanket or cardboard.
4. Fasten the Axle Weldment 21 to the Side Frame Tubes
as shown using (8) 3/8” X 2-3/4” Bolts 4 and (8) 3/8”
Flange Nuts 3 .
5. Connect the (2) Fender Weldments 18 to the Axle
Weldment 21 using (4) 1/4” X 1/2” Bolts 2 and (4) 1/4”
Flange Nuts 1 .
6. Assemble the (2) Wheels 17 to the axles using (4) 1”
Washers 9 , (2) E-Rings 11 and (2) Caps 13 in the
order shown.
Use Care When
Uncrating.
Wrench/Socket
Qty. Size
(2) 9/16”
(1) 7/16”
Tools Required:
FIGURE 8.2
8
ASSEMBLY DIRECTIONS
Note: The Item Numbers
on this page refer to the
table on page 7