SWISH ER OWNER'S/OPERATOR'S E4--$3000 MAN UAL FR|MMER E4-$3000 Minimize the risk of injury to yourself and others! Read this manual and familiarize yourself with the contents. Always wear eye and hearing protection when operating this unit. Part Number 81950 Rev.
introduction Attention Statements The Swisher E4-$3000 hand held power equipment has been designed and built to deliver superior performance and reliability without compromise to quality, comfort, safety or durability. Swisher engines represent the leading edge of high-performance engine technology, delivering exceptionally high power with remarkably low displacement and weight. As an owner!operatoL you'll soon discover for yourself why Swisher is simply in a class by itseli!.
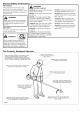
General Work Safety Instructions Safely Swisher trimmers operate at very high speeds and can do serious damage or injury if they are misused or abused. Never allow a person without la_ainingor insh_uction to operate this unit! Never make unauthorized attachment installations. Do not use attachments not approved by Swisher for use on this unit. Stay WARN|NG! Use Good Judgment ALWAYS wear eye protection against thrown objects. NEVER extend trimming line beyond the length specified for your unit.
Be Aware of the Working Environment Avoid long-term operation in very hot or very cold weather. Make sure bystanders or observers outside the 50-foot "danger zone" wear eye protection. 50 FEET Reduce the risk of bystanders being by flying debris. Make sure no one is within 50 feet (15 meters)--that's about 16 paces--of an operating attachment. When operating in rocky terrain or near electric wires or fences, use extreme caution to avoid contacting such items with the cutting attachment.
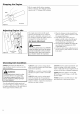
Product Description E4-$3000 TRIMMER Using the accompanying illustrations as a guide, familiarize yourself with this unit and its various components. See Figure 4. Understanding your unit helps ensure top performance, long service life, and safer operation.
Assemb|y and Adjustments Handle 1. Position the handle on the outer tube as shown. See Figure 3. Socket-head Throttle Assembly Capscrews Handle 2. Install the mounting bracket with the socket head cap screws. Tighten the screws finger-tight ONLY at this time. 3. Ix)care the handle in the best position for operator comfort (usually about 10 inches ahead of the throttle assembly). 4. Secure the handle by alternately tightening the four socket-head screws in a diagonal or "criss-cross" fashion.
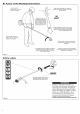
Assembly Cutting and Adjustments Attachment Shield Head Cap __ Screw E4-$3000 WARN|NG! Outer Tube Cutting Attachment Shield NEVER operate the unit without the cutting attachment shield installed and tightly secured! Bracket __-_-i CAUT|ON! Shim __ Nuts Line Cutter I Retaining Nut Shim Cutting Attachment Mounting Plate Scre ws Figure Figure 9 9A Install the Cutting Attachment Shield E4-$3000 2. Fit the two shims and the bracket over 1.
Install the Trimmer Head Turn trimmer head COUNTERCLOCKWISE to tighten _ WARNING! A standard grass trimmer machine should NEVER be operated with blade-type attachments. Tool holder Position attachment so that the gearcase output shaft faces UP 1. Turn the trimmer over so that the gearcase output shaft faces UR See Figure 5. 2. Remove and discard ing plug. 3. the plastic retain- Output shaft Position the tool holder as shown, and slide the holder onto the output shaft. See Figure 5. 4.
Starting the Engine ,_ WARNING! The cutting attachment may rotate when the engine is started! _ WARNING! Never start the engine without the tool assembly and cutting attachments installed to the engine. Failure to do so could damage the engine and increase unexpected risk to the operator and any bystander. _h_ ARN|NG! Never start the engine from the operating position.
Stopping the Engine Idle the engine briefly before stopping (about 2 minutes), then slide the ignition switch to the "O" (Engine OFF) position. OFF E4-$3000 ure 21 Adjusting Engine |die The engine must return to idle speed whenever the throttle lever is released. Idle speed is adjustable, and must be set low enough to permit the engine clutch to disengage the cutting attachment.
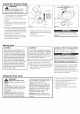
Shoulder Operating Strap With A Trimmer Head Although a shoulder strap accessory is not required for use with a grass trimmer, a shoulder strap can increase operator comfort during extended periods of operation. See Figure 23. Adjust the shoulder strap so the rests comfortably on the off-side the cutting path of the cutting is parallel to the ground. Make hooks and adjustment devices Cutting shoulder pad shoulder and attachment sure all are secure.
General Maintenance MAINTENANCE, REPLACEMENT OR RE-PAIR OF EMISSION CONTROL DEVICES AND SYSTEMS MAY BE PERFORMED BYANY REPAIR ESTABLISHMENT OR INDIVIDUAL; HOWEVER, WARRANTY REPAIRS MUST BE PERFORMED BYA DEALER OR SERVICE CENTER AUTHORIZED BY SWISHER. THE USE OF PARTS THATARE NOT EQUIVALENT IN PERFORMANCE AND DURABILITY TO AUTHORIZED PARTS MAY IMPAIR THE EFFECTIVENESS OF THE EMISSION CONTROL SYSTEM AND MAY HAVE A BEARING ON THE OUTCOME OF A WARRANTY CLAIM.
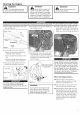
10/15-Hour Maintenance Every 0.024-0.028 inch (0.6-0. 7 mm) 10 to 15 hours of operation: Remove and clean the spark plug. Adjust the spark plug electrode gap to 0.024 - 0.028 inch (0.6 - 0.7 ram). If the spark plug must be replaced, use only an NGK CMR5H or equivalent resistor type spark plug of the correct heat range. See Figure 29. Clean the spark plug and check the gap at the electrode. The NGK CMR5H also meets the requirements for electro magnetic compliance (EMC).
139/150-Hour Maintenance Maintenance after first 139-hours, then every Combustion chamber should be decarbonized, and the valve clearance should be adjusted. It is highly recommended that this is done by a Swisher-trained service technician. Valve 150-hours thereafter. The NGK CMRSHalso meets the requirements for electro magnetic compliance _MC). m Replace the spark plug annually: Use only NGK CMR5H or equivalent resistor type spark plug of the correct heat range. Set spark plug electrode gap to 0.
Long Term Storage Whenever the unit will not be used for 30 days or longer, use the following procedures to prepare it for storage: II Clean external parts thoroughly. II Drain all the fuel from the fuel tank. All stored fuels should be stabilized with a fuel stabilizer such as STA-BIL TM, if Swisher E4 Engine Oil with fuel stabilizer is not used. CAUT|ON! Gasoline stored in the carburetor for extended periods can cause hard starting and could also lead to increased service and maintenance cost.
Troub|eshootin Guide What To Check Does the engine crank? _ Possible Cause Remedy Flnkt in the crankcase. aulty recoil starter. Internal damage. Consult with an authorized servicing dealer. Consult with an authorized Tighten and re-test. servicing dealer. YES 1 Good compression? I NO I Ix)ose spark plug. Excess wear on cylinder, piston, rings. Valves not seating.
Troubleshooting Guide (continued) Possible Cause Symptom Clogged air filter, Remedy Clean tile air filter. Clogged fuel filter, Replace tile fuel filter. Poor acceleration. Lean fuel/air Idle speed mixture. set too low. Switch turned off. Consult with an authorized servicing dealer. Adjust: 3,000 (±300) RPM (mind). Reset tile switch and restart. Engine stops abruptly. [Engine difficult to shut off._ Fuel tank empty, Refuel. See page 10. Clogged Replace fuel filter.
NOTES 18
NOTES 19
Emission System Your Warranty Rights Warranty and Statement (Administered by Shindaiwa Corporation) Obligations The California Air Resources Board, the U.S. Environmental Protection Agency and Shindaiwa Corporation are pleased to explain the exhaust and evaporative emission control system warranty on your new small off-road (non-road) engine. In California, new small off-road engines must be designed, built, and equipped to meet the State's stringent anti-smog standards.