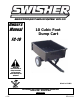
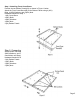
MANUFACTURING QUALITY LAWN CARE EQUIPMENT SINCE 1945 Owner’s Manual 10 Cubic Foot Dump Cart FC-10 IMPORTANT Read and follow all Safety Precautions and Instructions Before Operating this Equipment. Made In CHINA 1602 CORPORATE DRIVE PO BOX 67 WARRENSBURG, MISSOURI 64093 PH 660. 747. 8183 FAX 660. 747. 8650 swisherinc.com 11765 REV.
LIMITED WARRANTY The manufacturer’s warranty to the original consumer purchaser is: This product is free from defects in materials and workmanship for a period of One (1) year from the date of purchase by the original consumer purchaser. We will repair or replace, at our discretion, parts found to be defective due to materials or workmanship.
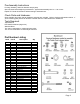
Pre-Assembly Instructions For easy assembly, follow all directions step by step. Open all boxes before beginning to assemble. Approximate assembly time is: 1.5 to 3 hours Helpful TIP: Read all instructions before starting to assemble cart. Check Parts and Hardware: Group together and check that all hardware and parts are included. Refer to listing and illustration below. If you are missing parts please call Swisher Customer Service 1-800-222-8183 for assistance.
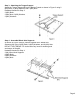
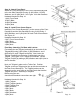
Complete Parts Illustration for Trailer Cart Page 4
Step 1: Attaching Front Cross Brace Position the two Bottom Panels(#1) as shown in Figure 1 below. Attach the Front Cross Brace(#2) to the Bottom Panels using 4 (#21) Bolts, 4 (#23) Washers, and 4 (#24) Nuts. Hardware Needed for Step 1: 1 (#2) Cross Brace 4 (#21) Bolts 4 (#23) Washers 4 (#24) Nuts 2 (#1) Bottom Panels Step 2: Connecting Bottom Panels Attach Bottom Panels(#1) as shown in Figure 2, using 2 (#21) Bolts, 2(#23) Washers, and 2 (#24) Nuts.
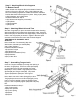
Step 3: Attaching the Tongue Support Attach the Tongue Support(#3) to the Bottom Panels as shown in Figure 3 using 2 (#22) Bolts, 2 (#23) Washers, and 2 (#24) Nuts. Hardware Needed for Step 3: 2 (#22) Bolts 2 (#24) Nuts 2 (#23) Washers 2 (#23) Washers Step 4: Assemble Wheel Axle Supports As shown in Figure 4 below, connect together the 2 Wheel Axle Supports (#4) using 8 (#25) Bolts, 8 (#23) Washers, and 8 (#24) Nuts. DO NOT TIGHTEN BOLTS—leave bolts very loose for inserting axle and tongue in Step #6.
Step 5: Attaching Wheel Axle Supports To Bottom Panels Attach Wheel Axle Supports (#4) to the Bottom Panels as shown in Figure 5 to the right, using 4 (#21) Bolts per side. Next, finish bolting together two middle connections of Bottom Panels after Wheel Axle Support is in place. Using 2 (#21) Bolts, 2 (#23) Washers, and 2 (#24) Nuts.
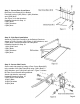
Step 8: Installing the Hitch Pin Bracket Install the Hitch Pin Bracket(#11) in the back two holes of the Hitch Tongue(#10) using 2 (#25) Bolts, 2 (#23) Washers, and 2(#24) Nuts. Refer to Figure 8. Place Hitch Pin(#28) in the front hole, using Cotter Pin(#27) to hold in place. Hardware Needed for Step 8: 1 (#11) Hitch Pin Bracket 2 (#25) Bolts 2 (#23) Washers 2 (#24) Nuts 1 (#28) Hitch Pin 1 (#27) Cotter Pin Step 9: Installing the Rear Cross Brace Turn the Trailer Cart over onto its wheels.
Step 11: Secure Rear Cross Brace Bolt Rear Cross Brace(#12) to Bottom Panels(#1) using 6 (#21) Bolts, 6 (#23) Washers, and 6 (#24) Nuts. See Figure 11 for bolt locations. Hardware Needed for Step 11: 6 (#21) Bolts 6 (#23) Washers 6 (#24) Nuts Step 12: Side Panel Installation Attach the Right Side Panel(#14) to the Bottom Panels as shown in Figure 12 using 2 (#21) Bolts, 2 (#23) Washers, and 2 (#24) Nuts. Note bolt locations for side panel.
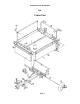
Step 14: Attach Front Panel Attach the Front Panel(#16) to the Front Cross Brace(#2) and to the two Side Panels(#14) using 12 (#21) Bolts, 12 (#23) Washers, and 12 (#24) Nuts. See Figure 14 for bolt locations.
Operation/Maintenance NOTES: Operation notesA full capacity load is 500 pounds, DO NOT exceed rated capacity. Cart only to be used with lawn tractor or ATV. Cart is not to for highway use. Do not exceed 10mph when towing. Maintenance notesOn a regular basis, check that tires are inflated properly. Pressure should be approx. 14psi. NEVER over-inflate tires, ALWAYS check pressure max. on the tire. Grease axle and wheel bearing area regularly or when needed. Dry off cart after using in wet conditions.
MANUFACTURING QUALITY LAWN CARE EQUIPMENT SINCE 1945 Owner’s Manual FC-10 ATV & LAWN ACCESSORIES WHEN ORDERING PARTS, PLEASE HAVE THE FOLLOWING INORMATION AVAILABLE: * PRODUCT – ________________ * SERIAL NUMBER - _______________ * MODEL NUMBER - _______________ TYPE - _______________ * PART NUMBER WITH PAINT CODE * PART DESCRIPTION TELEPHONE - 1-800-222-8183 FAX - 1-660-747-8650 IMPORTANT Read and follow all Safety Precautions and Instructions Before Operating this Equipment.