
Use and Care Manual
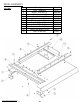
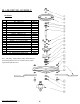
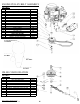
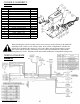

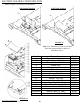
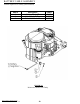
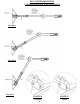
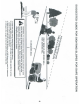
Table Of Contents
- Cover
- Limited Warranty
- Safety Precautions 1
- Saftey Precautions 2
- Assembly
- Operation 1
- Operation 2
- Operation 3
- Maintenance
- Troubleshooting
- Safety Decals
- Deck Leveling Detail
- Front Skirt Detail
- Hitch Detail
- Motor Base Detail
- Wheel Detail
- Height Adjust Detail
- Deck Detail
- Blade Driver Detail
- Engine Detail
- Idler Detail
- Belt Configuration
- Console Detail
- Wiring Diagram
- Fuel Tank Detail
- Carbon Canister Detail
- Battery Detail
- Battery Cable Assembly
- Hitch Positioning
- Slope Guide
- Ordering Information
