
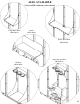
Replacement Part List
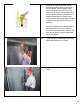


41. With the door in the closed and latched
position check the operation of the
Locking Pin. Install the Locking Pin into
the Key Hole on the Door Jamb. If the
Pin will not freely slide through the Jamb
further adjustment is needed to the door.
Once the Pin is fully engaged through
the Jamb and Door rotate the handle 90°
counterclockwise (down) to the locked
position.
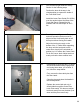
40. Attempt to replace the top Latch Pin
through the Jamb and the Door Latch
Plate. If it hits the Door Latch Plate
adjust the ½” Nyloc Nuts (PN 20117)
under the top door frame until the Latch
Pin will easily slide through the Latch
Plate.
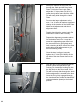
Do not make large adjustment to the
nuts, ¼ or ½ turns will make a significant
change in the location of the Latch Plate.
Make small adjustments and check
alignment often.
Double check that the center Latch Pin
continues to slide in and out freely.
Repeat the alignment procedure above
for the bottom Latch Pin. It may take
some time (depending upon how level
the concrete floor is) going back and
forth, checking all three Latch Pins often
and making small adjustments to get
them all latching freely.
Once the door is aligned, securely
tighten the ½” Nuts (PN 19832) on the
top side of the door frame down to the
frame.
34