
Use and Care Guide
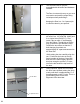
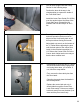
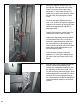
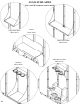


Table Of Contents
- Cover
- Warranty 1
- Warranty 2
- Warranty 3
- Operation & Safety Instructions 1
- Operation & Safety Instructions 2
- Operation & Safety Instructions 3
- Operation & Safety Instructions 4
- Operation & Safety Instructions 5
- Operation & Safety Instructions 6
- Recommended Tools For Assembly
- Anchor Bolt Alignment Templates
- Assembly Detail
- Assembly Table
- Door Assembly Detail
- Door Assembly Table
- Decals 1
- Decals 2
- Decals 3
- Concrete Slab & Anchoring Requirements
- Guidelines for Locating a Qualitfied Inspector
- Assembly Instructions 1
- Assembly Instructions 2
- Assembly Instructions 3
- Assembly Instructions 4
- Assembly Instructions 5
- Assembly Instructions 6
- Assembly Instructions 7
- Assembly Instructions 8
- Assembly Instructions 9
- Assembly Instructions 10
- Assembly Instructions 11
- Assembly Instructions 12
- Assembly Instructions 13
- Assembly Instructions 14
- Medeco Key Registration Card
- Accessory Items Also Available
- Ordering Information

黀
ǩ
37. You will need a light inside the Safety
Shelter for the following steps.
Position the door all the way in the
closed position to expose the inside of
the Front Wall Panel.
Install the Lower Door Guide (PN 19764)
over the anchor bolts at the base of the
Front Wall Panel. Reinstall the flat
washers and nuts and torque to 40 Ft-
lbs.
38. Door Adjustment/Alignment – For proper
and safe operation the door must be
aligned so that it will easily latch on all
three pins without forcing the handle.
Adjust both nuts evenly on the bottom of
the ½” Roller Bolts supporting the door
until the hook point on the center Door
Latch (in the unlocked up position) is
1/16” above the Center Latch Pin in the
Corner Jamb. Adjust each nut evenly so
that the door remains level.
39. Now attempt to close the door. If it shuts
and all three latches easily engage with
out forcing them down, you’re done. If
not, follow the steps below:
First, remove the three latch pins from
the Door Jamb.
Close the door and place the handle in
the locked position.
Replace the center latch pin only. It
should slide through the center Door
Latch Plate easily. If it does not, adjust
both nuts evenly to move the door up or
down until the pin moves freely.
33