INSTALLATION INSTRUCTIONS Swiss Madison Wall Hung Concealed Tank System SM-WC424 Share your pictures for a feature! using #SwissMadison www.swissmadison.com | 19 Stults Rd, Dayton, NJ 08810 | 1-434-623-4766 | info@swissmadison.
Prior to Installation: Read instructions thoroughly. Remove existing toilet. Be sure to properly bleed all air from the piping system, trapped air can cause damage to the flushing system and toilet bowl. Observe all local plumbing codes. Additional floor and wall preparations may be necessary to avoid damage to the product We recommend a professional contractor. Customer is responsible for any damage that may occur during installation.
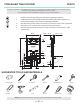
CONCEALED TANK SYSTEM SPECS The step-by-step guidelines in the installation instructions are a general reference for installing a Swiss Madison Concealed Tank System. Should there be any discrepancies, Swiss Madison cannot be held liable. It is recommended to install all Swiss Madison products by hiring a licensed professional 1. 2. Read the complete instruction manual before beginning installation.
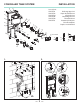
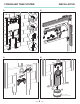
CONCEALED TANK SYSTEM 18 INSTALLATION 19 Loose Parts: SM-CPT41 SM-CPT42 SM-CPT44 SM-CPT46 SM-CPT48 SM-CPT51 20 21 1 2 22 3 23 Discharge pipe 2x4 Pipes inlet/outlet 2x4 4 Pcs bolts 2x4 Mounting box 2x4 Thread bolt 2x4 Actuator plastic pins Cut-out template Coupler- not included 4 5 24 25 7 8 26 27 10 6 28 9 11 29 17 36 31 15 37 -not included 32 14 16 12 36 34 35 30 33 1. 2.
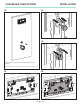
CONCEALED TANK SYSTEM 3. 4. A A INSTALLATION OR B OR B 5. 6.
CONCEALED TANK SYSTEM INSTALLATION 7. 8. 2 1 Cover installation bolts with protective slip, do not remove slip until after toilet is in place. 9. 10. 11. 2 1 1 2 2 Install dry wall over carrier system in intended location. • Find Cut-out template that was included with your carrier. • Cut out the small marked holes (1) to align cutout with threaded bolts. — 5 — • Align template up on your wall so the threaded bolts fit through the previously cut holes.
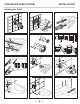
CONCEALED TANK SYSTEM INSTALLATION 12. 13. 14. Cut out drywall to reveal where to install flush plate and attach plumbing. NOTE: Swiss Madison is not responsible for any damage done to wall or carrier system. 15. 16.
CONCEALED TANK SYSTEM 17. 1 INSTALLATION 18. 2 19 3 19. 20. 21. 22.
CONCEALED TANK SYSTEM 23. INSTALLATION 24. “Click” 2 1 25. 26. “Click” 27. 28. max. ¹⁄8” max.
CONCEALED TANK SYSTEM INSTALLATION Installing the Toilet. 1. 2. 3. 4. 5. 6. L2 L1 L1 L1+¹⁵⁄16” L2 7. 8. 9. 10. 11. 12.
Swiss Madison® ONE YEAR LIMITED WARRANTY 1-434-MADISON (623-4766) 19 Stults Rd., Dayton, NJ 08810 www.swissmadison.com Swiss Madison® products are made with quality materials and excellent craftsmanship to provide the customers a long lasting product.