Wall-Hung Carrier System INSTALLATION INSTRUCTIONS Swiss Madison Residential Concealed In-Wall Toilet Tank Carrier System for Wall-Hung Toilet SM-WC424 @SwissMadison #WellMadeForever www.swissmadison.com | 1-434-623-4766 | info@swissmadison.
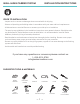
WALL-HUNG CARRIER SYSTEM INSTALLATION INSTRUCTIONS PRIOR TO INSTALLATION: · Inspect carrier to ensure no damages have occurred while in shipping. · Observe all plumbing and building codes in accordance with your state and local requirements. · All dimensions are nominal! Be sure to measure your toilet prior to installation. · The step-by-step guidelines in the installation instructions are a general reference. Should there be any discrepancies, Swiss Madison cannot be held liable.
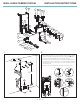
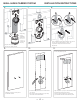
WALL-HUNG CARRIER SYSTEM 1 2 3 INSTALLATION INSTRUCTIONS 4 5 8 22 23 6 7 9 10 11 12 24 35 32 13 33 18 19 34 27 37 40 41 16 26 28 39 15 25 36 38 14 29 30 20 17 21 31 42 1. 2. · Before fastening sides, you must first attach legs to framing. At this point it is possible to readjust your bowl rim to your desired height. A: · L-shaped mounting brackets are for masonry applications.
WALL-HUNG CARRIER SYSTEM 3. INSTALLATION INSTRUCTIONS 4. 5. · When connecting to a 3” sewer line it is advised · It is possible to offset the discharge pipe left to drill a 3 5⁄8” hole before connecting the or right. If offsetting is required, you must discharge pipe to the frame. move the top bracket holding the discharge pipe to the back holes in the frame. This allows you to miss the carrier frame when connecting the necessary plumbing. · For a vertical discharge, leave bracket as shown above.
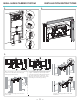
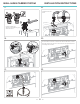
WALL-HUNG CARRIER SYSTEM 6. INSTALLATION INSTRUCTIONS 7. 8. Depending on your installation it will either be a 4” x 3” or a 3” x 3” mechanical coupling. · Cover installation bolts with protective slip, do not remove slip until after toilet is in place. It is important to keep threads clean for later adjustment. *coupler not included, please consult your local plumber. 9. 10. 11. · Ensure template is plumb. · Install dry wall over carrier system in intended location.
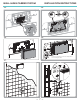
WALL-HUNG CARRIER SYSTEM 12. INSTALLATION INSTRUCTIONS 13. · Install mud guards into proper holes to ensure no debris enters pipes after sheetrock has been cut. 14. · Cut drywall to reveal where to install flush plate and attach plumbing. NOTE: Swiss Madison is not responsible for any damage done to wall or carrier system. 15. 16.
WALL-HUNG CARRIER SYSTEM 17. INSTALLATION INSTRUCTIONS 18. · Install the locknut as shown. · Hold the shutoff valve stationary while tightening your water connection. 19. 20. · Once the water connection is made to the water shutoff valve, undo the other side of the hose. Next, turn valve on to flush out any debris before reinstalling to the actuator. 21. 22.
WALL-HUNG CARRIER SYSTEM INSTALLATION INSTRUCTIONS 23. 24. 25. 26. · Ensure roughing box is secure to keep debris from entering the tank. 27. 28.
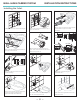
WALL-HUNG CARRIER SYSTEM INSTALLATION INSTRUCTIONS Installing the Toilet. 1. · Install pipes. Be sure to seal them thoroughly. 4. 2. 3. · With a ruler, against finished wall, on top of pipe, mark as shown. · Remove pipes from wall and install into back of bowl. Make sure pipes are sealed thoroughly. 5. 6. L1 L2 L1 L2 L1+15/16” · With a ruler, against the back of the bowl, on top of pipe, mark as shown. · Measure distance between both lines on pipes.
Swiss Madison ® ONE YEAR LIMITED WARRANTY 1-434-MADISON (623-4766) 19 Stults Road Dayton, NJ 08810 www.swissmadison.com Swiss Madison® products are made with quality materials and excellent craftsmanship to provide our customers with beautiful, durable, long-lasting products.