Wall-Mount Sink INSTALLATION INSTRUCTIONS @SwissMadison #WellMadeForever www.swissmadison.com | 1-434-623-4766 | info@swissmadison.
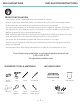
WALL MOUNT SINK INSTALLATION INSTRUCTIONS PRIOR TO INSTALLATION: · Inspect sink to ensure no damages have occurred while in shipping. · Observe all plumbing and building codes in accordance with your state and local requirements. · All dimensions are nominal! Be sure to measure your sink prior to installation. · The step-by-step guidelines in the installation instructions are a general reference. Should there be any discrepancies, Swiss Madison cannot be held liable.
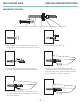
WALL MOUNT SINK INSTALLATION INSTRUCTIONS MOUNTING THE SINK Plastic Solenoid Metal Screw Plastic Gasket Metal Gasket Metal Nut 1. Drill two holes in the required position on the wall using a 14mm masonry drill bit, to a depth of 75mm. 2. Push a wall plug into each hole. 3. Screw a fixing bolt into each fixing plug using a 8mm spanner until the spanner contacts the wall. 4. Place the basin in position against the wall. Locating the fixing bolts through the holes in the rear of the basin.
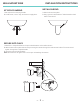
WALL MOUNT SINK INSTALLATION INSTRUCTIONS INSTALL SHROUD ATTACH PLUMBING 1. Set sink into the mounting bracket. 2. Install faucet, most of trap, and connect supply lines. 1. Slide the shroud into place. 2. Using a pencil mark location of holes located on both sides of the shroud. SECURE INTO PLACE 1. Attach the L-shaped brackets to the pre-marked location on the wall as shown. 2.
well made forever ONE YEAR LIMITED WARRANTY 1-434-MADISON (623-4766) www.swissmadison.com Swiss Madison products are made with quality materials and excellent craftsmanship to provide our customers with beautiful, durable, long-lasting products.