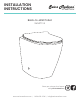
INSTALLATION INSTRUCTIONS Swiss Madison ® Back-to-Wall Toilet SM-WT514 Share your pictures for a feature using #SwissMadison www.swissmadison.com | 1-434-623-4766 | info@swissmadison.
Prior to Installation: Inspect toilet to ensure no damages have occurred while in shipping. Observe all plumbing and building codes in accordance with your state and local requirements. Remove old toilet. Make sure mounting surface is CLEAN and LEVEL. All dimensions are nominal! Be sure to measure your toilet prior to installation. General Recommendations: Read installation and maintenance instructions thoroughly before installing.
Thank you for your purchase! Thank you for purchasing a Swiss Madison Toilet. We appreciate your business and know you will enjoy your product for many years to come. If you have any questions or require assistance we would be happy to help, please contact us at 1-434-6234766 or info@swissmadison.com. To learn more about our products, please visit: www.swissmadison.
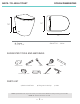
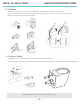
BACK-TO-WALL TOILET ROUGH DIMENSIONS 14” 16” 7” 22” St. Tropez 22” x 14” x 16” SM-WT514 - White SUGGESTED TOOLS AND MATERIALS Safety Glasses Wrench Putty Knife Flexible Supply Tube Hacksaw Tape Measure Screwdriver Level Sealant PARTS LIST Back-to-Wall Toilet Flange and Inlet Pipe Bolts NOTE: Specialized tools may be necessary to install a Swiss Madison Toilet, plumbing not included. NOTE: All measurements are nominal.
BACK-TO-WALL TOILET INSTALLATION INSTRUCTIONS The step-by-step guidelines in the installation instructions are a general reference for installing a Swiss Madison Toilet. Should there be any discrepancies, Swiss Madison cannot be held liable. It is recommended to install all Swiss Madison products by hiring a licensed professional 1. Read the complete instruction manual before beginning installation. 2.
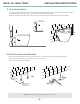
BACK-TO-WALL TOILET INSTALLATION INSTRUCTIONS 3. Cut Pipes · Remove the pipes from the bowl then measure the space between the marks on the pipes. · Carry this measurement over to the end of the pipes, adding 3/16” and then cut off the end of the pipes. · Using a file, smooth the cut ends of the pipe. + 3/16” + 1/8” 4. Connect Pipes · Apply lubricant on rubber washers of straight tube and connecting pipe.
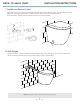
BACK-TO-WALL TOILET INSTALLATION INSTRUCTIONS 5. Fit and Level Bowl · Place the ceramic bowl facing the flush pipe and waste pipe, then push firmly until it touches the wall to ensure that both pipes are in the correct position and the correct length. · Make sure bowl is level then mark on both sides of the bowl where the anchors will be installed. 6. Install Anchors and Brackets · Remove the toilet bowl and measure the thickness of the bowl.
BACK-TO-WALL TOILET INSTALLATION INSTRUCTIONS 7. Install and Secure Toilet · Apply lubricant on joint surface of straight tube and connecting pipe, then place the toilet. Make sure the pipes fit in properly and the toilet is making contact with the floor and the wall surface. · Once the toilet is placed properly, tighten the bolts to secure the toilet. 8. Seal Edges · Apply a thin layer of silicone sealant around the perimeter of the toilet bowl. The use of an anti-mold silicone is recommended.
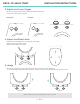
BACK-TO-WALL TOILET INSTALLATION INSTRUCTIONS Toilet Seat Installation 1. Dissassemble · Disassemble the cover cap and the hinge. Pull 2. Construct Hinges · Insert screw and nut into the hole on the hinge. · Attach blind hole screw fixing to the bottom on the screw. or 3. Attach Hinges · Insert hinges with blind hole screw fixings attached into holes on toilet bowl. · Lightly tighten hinges with a screwdriver too allow for later adjustment. NOTE: Drawings may not exactly define contour of china.
BACK-TO-WALL TOILET INSTALLATION INSTRUCTIONS 5. Adjust and Cover Hinges · Be sure the hinge is all the way forward for proper seat fitting. · Place the covers onto the hinges. Incorrect: Correct: 4. Adjust and Attach Seat · Align seat to the hinges then firmly tighten the hinges. · Attach seat to the secure hinges. · Adjust seat to align to the bowl. 5. Usage · To remove, push both inner buttons until you hear a “click”, then pull straight up.
Swiss Madison ® ONE YEAR LIMITED WARRANTY 1-434-MADISON (623-4766) 19 Stults Road Dayton, NJ 08810 www.swissmadison.com Swiss Madison® products are made with quality materials and excellent craftsmanship to provide our customers with beautiful, durable, long-lasting products.