Freestanding Vanity INSTALLATION INSTRUCTIONS @SwissMadison #WellMadeForever www.swissmadison.com | 1-434-623-4766 | info@swissmadison.
FREESTANDING VANITY INSTALLATION INSTRUCTIONS PRIOR TO INSTALLATION: · Inspect product to ensure no damages have occurred while in shipping. · Observe all plumbing and building codes in accordance with your state and local requirements. · Floor must be level prior to installation of vanity. · All dimensions are nominal! Be sure to measure your vanity prior to installation. · The step-by-step guidelines in the installation instructions are a general reference.
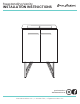
FREESTANDING VANITY Parts for Reference: 1. Left side panel 2. Right side panel 3. Bottom panel 4. Rear top bar 5. Rear bottom bar 6. Left door 7. Right door 8. Front cross bar A. Cam bolt B. Cam lock C. Wooden dowel D. Metal bracket E. Hinge F. Screw & plastic anchor G. Screw H. Screw for handle I. Handle J. Screw for legs INSTALLATION INSTRUCTIONS F A B C AA A D I E J A 2. Construct Base · Use 1 cam lock (B) to lock the rear bottom bar (5) to the bottom panel (3).
FREESTANDING VANITY INSTALLATION INSTRUCTIONS 3. Attach Doors · Use 24 screws (G) to install 2 hinges to the left door (6) and right door (7). G G E 6 E G G E Before adjustments: After adjustments: E 7 Hinge/Door Adjustment and Realignment · If adjustment or realignment is needed, follow the instructions provided in the following chart. Vertical adjustment 1. Loosen screws 2. Adjust hinge Horizontal adjustment Door gap adjustment — 3 — 3.
FREESTANDING VANITY INSTALLATION INSTRUCTIONS 4. Attach Handles · Install the 2 handles (I) by screwing 4 screws (H) to the doors (6 & 7). H 1 I H 7 I 6 4. Attach Legs · Invert the cabinet and assemble the legs to the bottom panel with necessary screws (J).
FREESTANDING VANITY INSTALLATION INSTRUCTIONS 6. Secure Vanity to Wall · Attach the 2 metal brackets (D) to the cabinet body using 16 screws (G) as shown. · Mark desired mounting location on wall and ensure placement is level. · Select installation option from below. 4 pcs F F D Gx8 I D Gx8 I Option 1: Securing to Drywall · Position cabinet against wall in desired location. · Using a pencil, make a mark on the wall through the holes in each bracket (D). · Move cabinet away from the wall.
® well made forever ONE YEAR LIMITED WARRANTY 1-434-MADISON (623-4766) www.swissmadison.com Swiss Madison® products are made with quality materials and excellent craftsmanship to provide our customers with beautiful, durable, long-lasting products.