
Installation Instructions


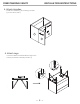

6. Secure Vanity to Wall
· Attach the 2 metal brackets (D) to the cabinet body using 16 screws (G) as shown.
· Mark desired mounting location on wall and ensure placement is level.
· Select installation option from below.
— 5 —
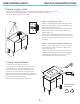
7. Vanity Top Installation
· Install faucet and drain according to
manufacturer’s installation instructions. Do not
overtighten, this may cause the sink to crack.
· Set the vanity top on top of the vanity base,
checking the location of the p-trap and drain.
· Remove vanity top from vanity base. Apply a thin
bead of silicone around the vanity base and set
the vanity top carefully in place.
· Remove excess silicone with a wet cloth.
Wait 24 hours
before use.
24H
!
Option 1: Securing to Drywall
· Position cabinet against wall in desired location.
· Using a pencil, make a mark on the wall through
the holes in each bracket (D).
· Move cabinet away from the wall. Create a pilot
hole in each mark on the wall, then insert the
plastic anchor (F).
· Place cabinet against the wall, insert a screw (F)
through the metal bracket (D) into each hole in the
wall, then tighten to plastic anchors (F) to secure
the vanity.
Option 2: Securing to Drywall & Wood Stud
· Position cabinet against wall in desired location,
be sure desired mounting location aligns with
existing wood studs.
· Insert screw (F) through the holes in the metal
bracket (D), then tighten through the drywall into
the wood stud. Repeat this step for the other
metal bracket (D) to secure the vanity.
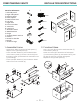
FREESTANDING VANITY INSTALLATION INSTRUCTIONS
4 pcs
F
F
I
I
D
Gx8
D
Gx8