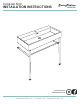
Console Sink INSTALLATION INSTRUCTIONS Swiss Madison @SwissMadison #WellMadeForever www.swissmadison.com | 1-434-623-4766 | info@swissmadison.
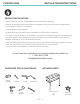
CONSOLE SINK INSTALLATION INSTRUCTIONS PRIOR TO INSTALLATION: · Inspect product to ensure no damages have occurred while in shipping. · Observe all plumbing and building codes in accordance with your state and local requirements. · Floor must be level prior to installation. · Console height is not adjustable. · All dimensions are nominal! Be sure to measure your sink prior to installation. · The step-by-step guidelines in the installation instructions are a general reference.
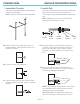
CONSOLE SINK 1. Assemble Console · Using the provided hardware assemble the console as illustrated. NOTE: Height of console is NOT adjustable. INSTALLATION INSTRUCTIONS 2. Install Sink · Use your assembled console to mark on the wall where the bottom of the sink should rest. · Following the steps illustrated below, install your sink. NOTE: Make sure your sink is LEVEL before marking and securing into place. Anchor 2a.
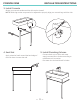
CONSOLE SINK INSTALLATION INSTRUCTIONS 3. Install Console · Secure your console underneath the sink and to the wall. NOTE: Solder lug washer may need to be adjusted to properly align your console legs with the sink. 4. Seal Sink 5. Install Plumbing Fixtures · Apply a bead of caulk around the back edge of the sink where it meets the wall. · Connect drain trap to drain, and water supply connections to faucet according to manufacturer’s instruction. · Run water into sink and check for leaks.
Swiss Madison ® ONE YEAR LIMITED WARRANTY 1-434-MADISON (623-4766) 19 Stults Road Dayton, NJ 08810 www.swissmadison.com Swiss Madison® products are made with quality materials and excellent craftsmanship to provide our customers with beautiful, durable, long-lasting products.