3-Sided Integral Flange Bathtub INSTALLATION INSTRUCTIONS @SwissMadison #WellMadeForever www.swissmadison.com | 1-434-623-4766 | info@swissmadison.
3-SIDED INTEGRAL FLANGE BATHTUB INSTALLATION INSTRUCTIONS PRIOR TO INSTALLATION: · Inspect bathtub to ensure no damages have occurred while in shipping. · Observe all plumbing and building codes in accordance with your state and local requirements. · All dimensions are nominal! Be sure to measure your bathtub prior to installation. · The step-by-step guidelines in the installation instructions are a general reference. Should there be any discrepancies, Swiss Madison cannot be held liable.
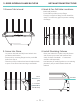
-SIDED INTEGRAL FLANGE BATHTUB 1. Rough-In · Rough plumbing must be pre-installed by a certified plumber before installation. · If floor drain-hole installation is needed, contact a certified plumber. · Place tub at final desired location and verify floor drain and bathtub drain align. Wall studs INSTALLATION INSTRUCTIONS 2. Position Tub · Do not install the product with any air gaps under the bottom support or product damage will occur.
3-SIDED INTEGRAL FLANGE BATHTUB INSTALLATION INSTRUCTIONS 3. Ensure Tub is Level 4. Mark & Pre-Drill Hole Locations 5. Screw Into Place 6. Install Plumbing Fixtures · Mark stud locations. · Pre-drill Ø5 mm holes on top flange. · If stud is not flush to flange, a shim should be used. This will fix any gaps to prevent cracking the flange. · Lay mortar bed and carefully lower bathtub into predetermined location. · Secure tub by screwing flange into the pre-drilled holes from step 4.
® well made forever ONE YEAR LIMITED WARRANTY 1-434-MADISON (623-4766) www.swissmadison.com Swiss Madison® products are made with quality materials and excellent craftsmanship to provide our customers with beautiful, durable, long-lasting products.