INSTALLATION INSTRUCTIONS Swiss Madison Share your pictures for a feature! using #SwissMadison www.swissmadison.com | 19 Stults Rd, Dayton, NJ 08810 | 1-434-623-4766 | info@swissmadison.
Prior to Installation: Inspect showerbase to ensure no damages have occurred while in shipping. Observe all plumbing and building codes in accordance with your state and local requirements. Additional floor and wall preparations may be necessary to avoid damage to the product. All dimensions are nominal! Be sure to measure your showerbase prior to installation to accurately determine your enclosure size. General Recommendations: Read installation and maintenance instructions thoroughly before installation.
Thank you for your purchase Thank you for purchasing a Swiss Madison Shower Base. We appreciate your business and know you will enjoy your shower base for many years to come. If you have any questions or require assistance we would be happy to help, please contact us at 1-434-6234766 or info@swissmadison.com. To learn more about our products, please visit: www.swissmadison.
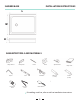
SHOWER BASE INSTALLATION INSTRUCTIONS L W H SUGGESTED TOOLS AND MATERIALS Safety Glasses Square Expansion Foam Utility Knife Pencil Shims Caulk Gun Level Slip-Joint Pliers Tape Measure Adhesive (1 tube) Drop Cloth Sealant (1 tube) Drain Wrench If installing a wall set, refer to wall set installation instructions.
SHOWER BASE INSTALLATION INSTRUCTIONS CAUTION: DO NOT damage will occur and will void the warranty. 1. 2. Read the complete instruction manual before beginning installation. 3. located where legally required before beginning installation. Not all drawings on this manual are drawn to scale. Please refer to the model chart. 5. 6. Always use drop cloth to protect shower base from damage during installation. Two people are recommended to install and move this product.
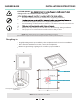
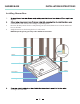
SHOWER BASE 1. 2. INSTALLATION INSTRUCTIONS Verify that the shower base is level using the “level” tool on all four sides. • If the shower base is level proceed to step 2. level use shims or mortar compound to adjust accordingly. Verify with “level • If shower base tool.” Mark drain hole on floor.
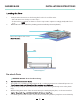
SHOWER BASE INSTALLATION INSTRUCTIONS Installing Shower Base aligned. 3. 4. 6-8 inches from end of shower area empty of expanding foam. Re-insert shower pan into shower cavity leaving 1/8” (use shims) between wood studs and shower base on all sides. Verify shower base is level using level tool on all 4 sides. NOTE: Expanding foam generally settles within10-15 minutes. Wall Studs Shim Square 1/8” gap Level Square Top Flange Side Flange securing to the wall studs.
Swiss Madison ® ONE YEAR LIMITED WARRANTY 1-434-MADISON (623-4766) 19 Stults Rd., Dayton, NJ 08810 www.swissmadison.com Swiss Madison® products are made with quality materials and excellent craftsmanship to provide the customers a long lasting product. In the case of any defects in materials or craftsmanship under regular charge, or at its option, replace any product or part of the product that is deemed defective, under normal installation, use, service and maintenance.