ENGLISH FRANÇAIS ESPAÑOL ITALIANO User's Manual Manuel de l'utilisateur Manual del Usuario Bedienungsanleitung Manuale d'uso DEUTSCH Drahtlose Video-Überwachungskamera Caméra de surveillance vidéo à distance Telecamera di video sorveglianza a distanza Remote video surveillance camera Please read carefully before using this equipment.
Watch the things that matter to you anytime and anywhere Easy iCAM Smartphone,Tablet Internet Easy iCAM Wi-Fi Router Smartphone,Tablet Easy iCAM is a wireless network camera. It can connect with your smartphone or tablet via wireless technology, and monitor everything that matters to you on your smartphone or tablet anywhere and anytime.
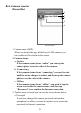
1 ENGLISH EN Package Contents One Camera Two Cable Clips One Adapter This User's Manual One Screw and One Wall Anchor 2 Product Layout Camera 1 5 2 3 4 6 9 8 7 1.Light sensor 2.Microphone 3.Camera lens 4.Infrared LEDs 5.Antenna 6.Power/Status LED 7.Power adapter plug 8.Reset to factory default button 9.
3 First-time Setup 3 .1 Before setting up 1. Make sure your Wi-Fi router is turned on and it can connect to the Internet. 2. Download Easy iCAM app: Key in the keyword “Easy iCAM” and download the app from the Apple App Store or Android Market (Google Play). 3 .2 Power on the camera 1. Plug one end of the provided power adapter into a wall outlet and the other end into the back of the camera. Note : Use the adapter labeled OUTPUT: 6V DC with the camera. 2.
3 .3 Connect your smartphone or tablet to the camera 1. Turn on the Wi-Fi of your smartphone or tablet. 2. Tap the screen to select “Easy_iCAM_XXXXXX” under Wi-Fi Networks. iPhone/iPad Android system 3. Enter the password for “Easy_iCAM_XXXXXX”. The default password is “12345678”.
3 .4 Setting up the camera and Internet connection 1. Launch the Easy iCAM App on your smartphone or tablet. 2. Follow the on-screen app instructions. 3. Setting up the camera name (SSID) or password: The screen will show a message that reminds you to change the Wi-Fi camera name (SSID) or password. a. If you select “Yes”, you can change the Wi-Fi camera name or password.
4 Operation Mode – Local View/Internet View: Easy-iCAM is a wireless network camera. It can connect with your smartphone or tablet by wireless technology directly, and you can watch live video feeds on your smartphone or tablet in local view mode. In Internet view mode, your smartphone or tablet needs to connect to the camera through a Wi-Fi router or 3G/4G mobile network, then you can access a live stream of video and audio on your smartphone or tablet from anywhere in the world.
3. Camera name (SSID) This row shows the camera name, which is the same as the Wi-Fi Network (SSID). 4. Image display area Touch the image display area of the screen with two fingers and move them apart for zoom function. You also can slide on the screen for digital pan-tilt function. 5. Photo Tap the icon to see all of the photos you have taken. 6. Snapshot Tap the icon to save a snapshot of the camera on your smartphone or tablet. 7. Audio ON/OFF Tap the icon can turn on or off the sound. 8.
. Setting Tap the icon to set up camera functions. a. Internet Setting You can setup an Internet connection, or change the camera connection to another Wi-Fi router. b. Wi-Fi Setting If you want to change the camera name (Wi-Fi SSID) or password, please tap this row to carry out the change. c. VOX Level (volume trigger level) Tap and slide the VOX Level bar to adjust the volume trigger level. Android system iPhone/iPad 4 .
4 .2 .1 Internet view for iPhone/iPad 5 1 3 2 4 iPhone/iPad 1. Camera name (SSID) When you launch the app, all the Easy-iCAM cameras you have added will be shown on the screen. 2. Camera status: a. Online If the camera status shows “online” you can tap the camera photo to see the video of the camera. b. Connecting If the camera status shows “connecting” you need to wait until the status changes to online, and then tap the camera photo to see the video of the camera. c.
b. Reconnect You need to tap “Reconnect” to re-confirm the Internet connection if the camera status shows offline. 4. Camera photo Tap the camera photo to see the video of the camera. 5. Edit Tap the Edit icon to select which camera you want to delete.
4 .2 .2 Internet view for Android system 5 1 3 2 4 Android system 1. Camera name (SSID) When you launch the app, all the Easy-iCAM cameras you have added will be shown on the screen. 2. Camera status: a. Online If the camera status shows “online” you can tap the camera photo to see the video of the camera. b. Connecting If the camera status shows “connecting” you need to wait until the status change to online, and then tap the camera photo to see the video of the camera. c.
c. View Snapshot Tap the row and you can see all of the photos you have taken. d. Remove Camera Tap the row if you want to remove the camera. 4. Camera photo Tap the camera photo and you can see the video of the camera. 5. Tap the icon and select “Exit” if you want to exit the app.
5 Add camera to second or more other smartphones or tablets If Internet setup has been carried out for the camera and you want to add the camera to a second or even more smartphones or tablets, you just need to follow the step “3.3 Connect your smartphone or tablet to the camera”, and then the smartphone or tablet can connect with the camera through a Wi-Fi router or 3G/4G mobile network.
6 .1 .2 Add camera Tap the Add icon in the camera list of Internet view and then tap the Add icon in the next page. Type in UID and password information of the camera and then tape OK icon to finish the setup. 6 .2 Add camera through remote setup for Android system 6 .2 .1 Get UID information Tap the i (information) icon in local view to get UID information.
6 .2 .2 Add camera Tap the dots icon in the camera list of Internet view and then tap the Add icon in the next page. Type in UID and password information of the camera and then tap the Save icon to finish the setup. 7 Reset the camera to factory defaults While the camera is powered on for at least 1 minute, press the reset button (using a small object or a pin) for at least 3 seconds, the power/status LED will start blinking.
Troubleshooting Cannot connect the camera to your smartphone or tablet in local view Make sure the power plug is pushed all the way in. Make sure the camera is turned on and power/status LED glows red or green. Make sure the camera and your smartphone/tablet are within range of each other. Make sure you have entered the right password of the camera on your smartphone/tablet. You may need to reset the camera by pressing the reset button with a thin object (i.e. paper clip).
Care and Maintenance Keep all parts and accessories out of children's reach. Fingerprints or dirt on the lens surface can adversely affect camera performance. Avoid touching the lens surface with your fingers. Should the lens become dirty, use a blower to blow off dirt and dust, or a soft, dry cloth to wipe off the lens. Keep the camera dry. Precipitation, humidity, and other liquids containing minerals will corrode electronic circuits. Do not use or store in dusty, dirty areas. Do not store in hot areas.
FCC Statement This equipment has been tested and found to comply with the limits for a Class B digital device, pursuant to Part 15 of the FCC Rules. These limits are designed to provide reasonable protection against harmful interference in a residential installation. This equipment generates, uses and can radiate radio frequency energy and, if not installed and used in accordance with the instructions, may cause harmful interference to radio communications.
Following the safety tips To prevent deaths and injuries associated with camera cords, make sure the camera and AC adapter cords are always out of reach of the baby by least 3 feet (1 meter). Note : This is important even if your baby is not yet standing or mobile. 3 feet (1 metre) adapter cable Never use extension cords with AC adapters. Only use the AC adapters provided.
Service hotline In the case of technical problems, contact our Service hotline. Switzerland: Tel. 0900 00 1675 (national charges, Swisscom at time of going to print: CHF 2.60/min). In the case of claims under the terms of guarantee, contact your sales outlet. EuP2 Power adapter plug Using the energy-efficient power adapter plug (input 100-240 VAC, output 6 VDC, 800 mA) the zero load is approx. 0.08W. The average efficiency is approx. 73 %. The maximum power consumption is approx. 1.94 W.
Regardez à tout moment et partout les choses qui comptent pour vous Vue locale Easy iCAM Smartphone, tablette Vue Internet Internet Easy iCAM Routeur Wi-Fi Smartphone, tablette Easy iCAM est une caméra réseau sans fil. Elle peut se connecter à votre smartphone ou tablette par technologie sans fil et surveiller tout ce qui compte pour vous sur votre smartphone ou tablette partout et à tout moment.
FR 1 Contenu de la boîte • Une caméra • Deux clips de câble • Un adaptateur • Ce Manuel de l'utilisateur 2 FRANÇAIS • Une vis et un ancrage de mur Description du produit Caméra 1 5 2 3 4 6 7 9 8 6V DC 80 0m A 1.Capteur de lumière 2.Microphone 3.Objectif de la caméra 4.LED infrarouge 5.Antenne OF F ON 6.DEL d'alimentation/d'état 7.Prise de l'adaptateur de courant 8.Bouton de réinitialisation aux paramètres d'usine 9.
3 3 .1 Première configuration Avant la configuration 1. Assurez-vous que votre routeur Wi-Fi est allumé et qu'il peut se connecter à Internet. 2. Télécharger l'application Easy iCAM : Saisissez le mot-clé « EASY iCAM » et téléchargez l'application sur l'App Store d'Apple ou sur Google Play (Android Market). 3 .2 Allumer la caméra 1. Branchez un coté de l'adaptateur d'alimentation fourni sur une prise de courant et l'autre coté sur la prise derrière la caméra.
3 .3 Connecter votre smartphone ou tablette à la caméra 1. Allumez le Wi-Fi de votre smartphone ou tablette. 2. Touchez l'écran pour sélectionner «Easy_iCAM_XXXXXX » sous les réseaux Wi-Fi. iPhone/iPad Système Android 3. Saisissez le mot de passe pour « Easy_iCAM_XXXXXX ». Le mot de passe par défaut est « 12345678 ».
3 .4 Configurer la caméra et la connexion à Internet 1. Lancez l'application Easy iCAM sur votre smartphone ou tablette. 2. Suivez les instructions de l'application à l'écran. 3. Configurer le nom de la caméra (SSID) et son mot de passe : Cet écran affichera un message vous rappelant que vous devez modifier le nom de la caméra (SSID) ou son mot de passe. a. Si vous sélectionnez «Oui», vous pourrez modifier le nom de la caméra Wi-Fi ou son mot de passe.
4 Mode de fonctionnement - Vue locale/Vue Internet : Easy-iCAM est une caméra réseau sans fil. Elle peut se connecter directement à votre smartphone ou tablette sans fil, et vous pouvez voir les flux vidéo sur votre smartphone ou tablette en mode vue locale. En mode vue Internet, votre smartphone ou tablette doit accéder à la caméra via un routeur Wi-Fi ou réseau mobile 3G/4G, puis vous pouvez accéder à un flux en direct de vidéo et d'audio sur votre smartphone ou tablette à tout endroit dans le monde.
3. Nom de la caméra (SSID) Cette ligne affiche le nom de la caméra, le même que celui du réseau Wi-Fi (SSID). 4. Zone d'affichage de l'image Touchez la zone d'affichage de l'image de l'écran avec deux doigts et déplacez-les pour utiliser le zoom. Vous pouvez aussi les faire glisser sur l'écran pour utiliser les fonctions de panorama/inclinaison numérique. 5. Photo Touchez l'icône pour voir toutes les photos que vous avez prises. 6.
9. Paramètre Touchez l'icône pour configurer les fonctions de la caméra. a. Paramètres Internet Vous pouvez configurer une connexion à Internet ou modifier la connexion de la caméra vers un autre routeur Wi-Fi. b. Paramètres Wi-Fi Si vous souhaitez modifier le nom (SSID Wi-Fi) ou le mot de passe de la caméra, touchez cette ligne pour le faire. c. Niveau de VOX (niveau sonore de déclenchement) Touchez et faites glisser la barre d'ajustement du niveau de VOX pour ajuster le niveau sonore de déclenchement.
4 .2 .1 Vue Internet pour iPhone/iPad 5 1 3 2 4 iPhone/iPad 1. Nom de la caméra (SSID) Lorsque vous lancez l'application, toutes les caméras Easy-iCAM que vous avez ajoutées s'afficheront à l'écran. 2. État de la caméra: a. En ligne Si l'état de la caméra est « en ligne », vous pouvez toucher la photo de la caméra pour en voir la vidéo. b.
b. Se reconnecter Vous devez toucher «Se reconnecter» pour confirmer la connexion à Internet de la caméra si son état est «hors ligne». 4. Photo de la caméra Touchez la photo de la caméra pour voir sa vidéo. 5. Modifier Touchez l'icône Modifier pour sélectionner la caméra que vous souhaitez supprimer.
4 .2 .2 Vue Internet pour 5 Android system 1 3 2 4 Système Android 1. Nom de la caméra (SSID) Lorsque vous lancez l'application, toutes les caméras Easy-iCAM que vous avez ajoutées s'afficheront à l'écran. 2. État de la caméra: a. En ligne Si l'état de la caméra est «en ligne», vous pouvez toucher la photo de la caméra pour en voir la vidéo. b.
c. Voir capture Touchez cette ligne pour voir toutes les photos que vous avez prises. d. Supprimer caméra Touchez cette ligne si vous souhaitez supprimer la caméra. 4. Photo de la caméra Touchez la photo de la caméra pour voir sa vidéo. 5. Touchez l'icône et sélectionnez «Quitter» si vous souhaitez quitter l'application.
5 Ajouter une caméra à un deuxième smartphone ou tablette ou plus Si la configuration Internet a été effectuée pour la caméra et que vous souhaitez l'ajouter à un ou plusieurs smartphones ou tablettes, vous devez simplement suivre l'étape «3.3 Connecter votre smartphone ou tablette à la caméra», le smartphone ou tablette pourra alors se connecter à la caméra via un routeur Wi-Fi ou un réseau mobile 3G/4G.
6 .1 .2 Ajouter caméra Touchez l'icône Ajouter dans la liste de caméras de la vue Internet puis touchez l'icône Ajouter sur la page suivante. Saisissez l'UID et le mot de passe de la caméra et touchez l'icône OK pour terminer la configuration. 6 .2 Ajouter une caméra via la configuration distante sur Android 6 .2 .1 Obtenir les informations d'UID Touchez l'icône i (informations) sur la vue locale pour obtenir les informations d'UID.
6 .2 .2 Ajouter caméra Touchez l'icône de points de suspension dans la liste de caméras de la vue Internet puis touchez l'icône Ajouter sur la page suivante. Saisissez l'UID et le mot de passe de la caméra et touchez l'icône Enregistrer pour terminer la configuration.
Guide de dépannage Impossible de se connecter à la caméra depuis votre smartphone ou tablette en vue locale • Assurez-vous que la prise est bien branchée jusqu'au fond. • Assurez-vous que la caméra est allumée et que la DEL d'alimentation/d'état s'éclaire en rouge ou vert. • Assurez-vous que la caméra et votre smartphone ou tablette sont à portée l'un de l'autre. • Assurez-vous d'avoir saisi le bon mot de passe pour la caméra sur votre smartphone ou tablette.
Entretien et maintenance • Gardez toutes les pièces et les accessoires hors de portée des enfants. • Les empreintes de doigt ou de la poussière sur la surface de l'objectif • • • • • • • • • peuvent affecter les performances de la caméra. Évitez donc de toucher la surface de l'objectif avec les doigts. Si l'objectif est sale, utilisez un souffleur pour enlever la saleté et la poussière, ou un chiffon doux et sec pour essuyer l'objectif. Gardez la caméra au sec.
Suivez les astuces suivantes de sécurité Pour protéger contre les blessures ou la mort à cause des cordons de la caméra, Assurez-vous que la caméra et le cordon de l'adaptateur secteur sont hors de la portée des bébés, par au moins 3 pieds (1 mètre). Remarque: Cela est important même si votre bébé ne peut pas encore marcher ou se déplacer. 3 pieds (1 mètre) Câble d'adaptateur N'utilisez jamais des cordons d'extension avec les adaptateurs électriquess.
Ligne d'assistance directe En cas de problèmes techniques, adressez-vous à notre ligne d'assistance directe. Suisse : Tél. 0900 00 1675 (frais Swisscom à l'impression de ce mode d'emploi : CHF 2,60/min). En cas de recours en garantie, adressez-vous à votre revendeur. EuP2 Bloc secteur Dans le cas de l'alimentation à efficacité énergétique (entrée 100-240 VAC, sortie 6 VDC, 800 mA) la puissance nulle est d'env. 0,08 W. L'efficacité moyenne est d'env. 73 %. La puissance maximale absorbée est d'env. 1,94 W.
Vigile en todo momento y en cualquier lugar las cosas que le importan Vista local Easy iCAM Teléfono inteligente y tableta Vista a través de Internet Internet Easy iCAM Enrutador Wi-Fi Teléfono inteligente y tableta Easy iCAM es una cámara de red inalámbrica. Se puede conectar con su teléfono inteligente o tableta mediante tecnología inalámbrica y supervisar todo aquello que le importa en dichos dispositivos en cualquier momento y lugar.
ES 1 Contenido del paquete • Una cámara • Dos abrazaderas de cables • Un adaptador • Este manual del usuario • Un tornillo y un taco para pared Diseño del producto Cámara 1 5 2 3 4 6 7 9 8 6V DC 80 0m A 1.Sensor de luz 2.Micrófono 3.Objetivo de la cámara 4.LED infrarrojos 5.Antena 6.LED de alimentación y estado 2 OF F ON 7.Enchufe para el adaptador de alimentación 8.Botón de restablecimiento de valores predeterminados de fábrica 9.
3 3 .1 Primera configuración Antes de la configuración 1. Asegúrese de que el enrutador Wi-Fi está encendido y se puede conectar a Internet. 2. Descargue la aplicación Easy iCAM: Escriba la palabra clave “Easy iCAM” y descargue la aplicación de Apple App Store o Android Market (Google Play). 3 .2 Encender la cámara 1. Enchufe un extremo del adaptador de alimentación proporcionado a una toma de corriente eléctrica y el otro extremo en la parte posterior de la cámara.
3 .3 Conectar el teléfono inteligente o tableta a la cámara 1. Active la funcionalidad Wi-Fi del teléfono inteligente o la tableta. 2. En Wi-Fi Networks (Redes Wi-Fi), toque la pantalla para seleccionar “Easy_iCAM_XXXXXX”. iPhone/iPad Sistema Android 3. Escriba la contraseña para “Easy_iCAM_XXXXXX”. La contraseña predeterminada es “12345678”.
3 .4 Configurar la cámara y la conexión a Internet 1. Inicie la aplicación Easy iCAM en el teléfono inteligente o tableta. 2. Siga las instrucciones de la aplicación que aparezcan en la pantalla. 3. Configurar el nombre (SSID) o la contraseña de la cámara: La pantalla mostrará un mensaje que le recordará que cambie el nombre Wi-Fi (SSID) o la contraseña de la cámara. a. Si selecciona “Sí”, podrá cambiar el nombre Wi-Fi o la contraseña de la cámara.
4 4 .1 Modo de funcionamiento - Vista local o vista a través de Internet: Easy-iCAM es una cámara de red inalámbrica. Puede conectar la cámara con su teléfono inteligente o tableta mediante tecnología inalámbrica directamente y ver imágenes de vídeo en directo en dichos dispositivos en el modo de vista local.
3. Nombre de la cámara (SSID) Esta fila muestra el nombre de la cámara, que es el mismo que el de la red Wi-Fi (SSID). 4. Área de visualización de la imagen Toque el área de visualización de la imagen de la pantalla con dos dedos y sepárelos para llevar a cabo la función de zoom. También puede desplazarse por la pantalla para disponer de la función de panorámica e inclinación digital. 5. Fotografía Toque el icono para ver todas las fotografías que ha realizado. 6.
9. Configuración Toque el icono para configurar las funciones de la cámara. a. Configuración de Internet Puede configurar una conexión a Internet o cambiar la conexión de la cámara a otro enrutador Wi-Fi. b. Configuración Wi-Fi Si desea cambiar el nombre (SSID Wi-Fi) o la contraseña de la cámara, toque esta fila para llevar a cabo el cambio. c. Nivel de VOX (nivel de activación de volumen) Toque y deslice la barra VOX Level (Nivel VOX) para ajustar el nivel de activación de volumen. iPhone/iPad 4 .
4 .2 .1 Vista a través de Internet para iPhone/iPad 5 1 3 2 4 iPhone/iPad 1. Nombre de la cámara (SSID) Cuando inicie la aplicación, todas las cámaras Easy-iCAM que haya agregado se mostrarán en la pantalla. 2. Estado de la cámara: a. En línea Si el estado de la cámara que se muestra es “En línea”, puede tocar la fotografía de la cámara para ver el vídeo de la misma. b.
b. Reconectar Es necesario tocar “Reconectar” para volver a confirmar la conexión a Internet si el estado de la cámara que se muestra es Sin conexión. 4. Fotografía de la cámara Toque la fotografía de la cámara para ver el vídeo de esta. 5. Editar Toque el icono Editar para seleccionar la cámara que desea eliminar.
4 .2 .2 Vista a través de 5 Internet para sistemas Android 1 3 2 4 Sistema Android 1. Nombre de la cámara (SSID) Cuando inicie la aplicación, todas las cámaras Easy-iCAM que haya agregado se mostrarán en la pantalla. 2. Estado de la cámara: a. En línea Si el estado de la cámara que se muestra es “En línea”, puede tocar la fotografía de la cámara para ver el vídeo de la misma. b.
c. Ver instantánea Toque la fila para ver todas las fotografías que ha realizado. d. Quitar cámara Toque la fila si desea quitar la cámara. 4. Fotografía de la cámara Toque la fotografía de la cámara para ver el vídeo de ésta. 5. Toque el icono y seleccione “Salir” si desea salir de la aplicación.
5 Agregar una cámara a un segundo (o más) teléfono inteligente o tableta Si se ha llevado a cabo la configuración de Internet para la cámara y desea agregar ésta a un segundo (o más) teléfono inteligente o tableta, simplemente tiene que seguir los pasos de la sección “3.3 Conectar el teléfono inteligente o la tableta a la cámara”. Una vez realizados dichos pasos, el teléfono inteligente o la tableta se podrá conectar con la cámara a través de un enrutador Wi-FI o de una red móvil 3G/4G.
6 .1 .2 Agregar cámara Toque el icono Agregar de la lista de cámaras de la vista a través de Internet y, a continuación, toque el icono Agregar en la siguiente página. Escriba la información de UID y contraseña de la cámara y, a continuación, toque el icono Aceptar para terminar la configuración. 6 .2 Agregar una cámara a través de configuración remota para sistemas Android 6 .2 .1 Obtener la información UID Toque el icono i (información) en la vista local para obtener la información UID.
6 .2 .2 Agregar cámara Toque el icono de puntos de la lista de cámaras de la vista a través de Internet y, a continuación, toque el icono Agregar en la siguiente página. Escriba la información de UID y contraseña de la cámara y, a continuación, toque el icono Guardar para terminar la configuración.
Solucionar problemas No puede conectar la cámara al teléfono inteligente o tableta en la vista local • Asegúrese de que el enchufe de alimentación está totalmente insertado. • Asegúrese de que la cámara está encendida y de que el LED de alimentación y estado está iluminado en color rojo o verde. • Asegúrese de que la cámara y el teléfono inteligente o tableta se encuentran dentro del alcance uno del otro.
Cuidado y mantenimiento • Mantenga todas las piezas y accesorios pequeños fuera del alcance de los niños. • Las huellas dactilares o la suciedad en la superficie del objetivo puede • • • • • • • • • afectar negativamente al rendimiento de la cámara. Evite tocar la superficie del objetivo con los dedos. Si el objetivo se ensucia, utilice un soplador para eliminar la suciedad y el polvo, o un paño suave y seco para limpiar dicho objetivo. Mantenga la cámara seca.
Consejos de seguridad Para evitar muertes y lesiones asociadas con los cables de la cámara, asegúrese de que dichos cables y los del adaptador de CA siempre estén fuera del alcance de bebés, a una distancia de, al menos, 1 metro (3 pies). Nota: es importante incluso si su bebé aún no se pone de pie o se mueve. 1 metro (3 pies) cable del adaptador Nunca utilice cables de extensión con adaptadores de CA. Utilice solo los adaptadores de CA proporcionados.
Betrachten Sie jederzeit und überall das, was Ihnen wichtig ist Lokale Ansicht Easy iCAM Smartphone, Tablet Internetansicht Internet Easy iCAM WLAN-Router Smartphone, Tablet Easy iCAM ist eine drahtlose Netzwerkkamera. Über Drahtlostechnologie kann sie eine Verbindung zu Ihrem Smartphone oder Tablet herstellen und per Smartphone oder Tablet jederzeit und überall alles überwachen, was Ihnen wichtig ist.
DE 1 Lieferumfang • Eine Kamera • Zwei Kabelklemmen • Ein Netzteil • Diese Bedienungsanleitung • Eine Schraube und ein Dübel Produktübersicht Kamera 1 5 2 3 4 6 7 9 8 6V DC 80 0m A OF F ON 6.Betriebsanzeige/Status-LED 7.Netzteilstecker 8.Taste zum Rücksetzen auf werkseitigen Zustand 9.Ein-/Ausschalter 1.Lichtsensor 2.Mikrofon 3.Kameraobjektiv 4.Infrarot-LEDs 5.
3 3 .1 Erstmalige Einrichtung Vor der Einrichtung 1. Stellen Sie sicher, dass Ihr WLAN-Router eingeschaltet ist und eine Verbindung zum Internet herstellen kann. 2. Easy iCAM-App herunterladen: Geben Sie den Suchbegriff „Easy iCAM“ ein, laden Sie die App aus dem Apple App Store bzw. dem Android Market (Google Play) herunter. 3 .2 Kamera einschalten 1. Schließen Sie ein Ende des mitgelieferten Netzteils an eine Steckdose an, verbinden Sie das andere Ende mit dem Anschluss an der Rückseite der Kamera.
3 .3 Ihr Smartphone oder Tablet mit der Kamera verbinden 1. Schalten Sie WLAN an Ihrem Smartphone oder Tablet ein. 2.Tippen Sie zur Auswahl von „Easy_iCAM_XXXXXX“ unter WLAN-Netzwerke auf den Bildschirm. iPhone/iPad Android-System 3. Geben Sie das Kennwort für „Easy_iCAM_XXXXXX“ ein. Das Standardkennwort lautet „12345678“.
3 .4 Kamera- und Internetverbindung einrichten 1. Führen Sie die Easy iCAM-App an Ihrem Smartphone oder Tablet aus. 2. Befolgen Sie die Bildschirmanweisungen der App. 3. Kameranamen (SSID) oder Kennwort einrichten: Eine Meldung am Bildschirm soll Sie daran erinnern, den WLANKameranamen (SSID) bzw. das Kennwort zu ändern. a. Wenn Sie „Ja“ wählen, können Sie den WLAN-Kameranamen bzw. das Kennwort ändern. Wenn Sie die Einrichtung von Kameranamen bzw.
4 Betriebsmodus – Lokale Ansicht/Internetansicht: Easy-iCAM ist eine drahtlose Netzwerkkamera. Sie kann per Drahtlostechnologie direkt eine Verbindung mit Ihrem Smartphone oder Tablet herstellen und Sie können Echtzeitvideo-Feeds an Ihrem Smartphone oder Tablet im lokalen Ansichtsmodus betrachten.
3. Kameraname (SSID) Diese Reihe zeigt den Kameranamen, der mit dem WLAN-Netzwerk identisch ist (SSID). 4. Bildanzeigebereich Berühren Sie den Bildanzeigebereich des Bildschirms mit zwei Finger, schieben Sie diese zum Zoomen auseinander. Zur Nutzung der digitalen Schwenk-/Neigungsfunktion können Sie auch über den Bildschirm wischen. 5. Foto Tippen Sie zur Anzeige aller Fotos, die Sie aufgenommen haben, auf das Symbol. 6.
9. Einstellungen Tippen Sie zum Einrichten der Kamerafunktionen auf das Symbol. a. Interneteinstellungen Sie können eine Internetverbindung einrichten oder die Kameraverbindung auf einen anderen WLAN-Router einstellen. b. WLAN-Einstellungen Wenn Sie Kameranamen (WLAN-SSID) oder Kennwort ändern möchten, tippen Sie zum Modifizieren bitte auf diese Reihe. c. VOX-Pegel (Lautstärkeauslösepegel) Passen Sie den Lautstärkeauslösepegel durch Antippen und Verschieben des VOX-Lautstärkereglers an. iPhone/iPad 4 .
4 .2 .1 Internetansicht für iPhone/iPad 5 1 3 2 4 iPhone/iPad 1. Kameraname (SSID) Wenn Sie die App ausführen, werden alle von Ihnen hinzugefügten Easy-iCAM-Kameras auf dem Bildschirm angezeigt. 2. Kamerastatus: a. Online Falls der Kamerastatus mit „Online“ angegeben wird, können Sie zur Anzeige des Kameravideos auf das Kamerafoto tippen. b.
b. Erneut verbinden Tippen Sie zum erneuten Bestätigen der Internetverbindung auf „Erneut verbinden“, falls der Kamerastatus „Offline“ anzeigt. 4. Kamerafoto Tippen Sie zur Anzeige des Kameravideos auf das Kamerafoto. 5. Bearbeiten Tippen Sie zur Auswahl der Kamera, die Sie löschen möchten, auf das Bearbeiten-Symbol.
4 .2 .2 Internetansicht für 5 Android-System 1 3 2 4 Android-System 1. Kameraname (SSID) Wenn Sie die App ausführen, werden alle von Ihnen hinzugefügten Easy-iCAM-Kameras auf dem Bildschirm angezeigt. 2. Kamerastatus: a. Online Falls der Kamerastatus mit „Online“ angegeben wird, können Sie zur Anzeige des Kameravideos auf das Kamerafoto tippen. b.
c. Schnappschuss anzeigen Tippen Sie auf die Reihe und Sie sehen alle Fotos, die Sie aufgenommen haben. d. Kamera entfernen Tippen Sie auf die Reihe, falls Sie die Kamera entfernen möchten. 4. Kamerafoto Tippen Sie auf das Kamerafoto und Sie sehen das Kameravideo. 5. Tippen Sie auf das Symbol und wählen „Verlassen“, falls Sie die App verlassen möchten.
5 Fügen Sie die Kamera zu einem zweiten oder weiteren Smartphones oder Tablets hinzu. Falls die Interneteinrichtung für die Kamera ausgeführt wurde und Sie die Kamera einem zweiten oder weiteren Smartphones bzw. Tablets hinzufügen möchten, müssen Sie einfach den Schritt „3.3 Ihr Smartphone oder Tablet mit der Kamera verbinden“ befolgen; anschließend kann das Smartphone oder Tablet über einen WLAN-Router oder ein mobiles 3G/4GNetzwerk eine Verbindung zur Kamera herstellen.
6 .1 .2 Kamera hinzufügen Tippen Sie auf das Hinzufügen-Symbol in der Kameraliste der Internetansicht und anschließend auf der nächsten Seite auf das Hinzufügen-Symbol. Geben Sie UID- und Kennwortinformationen der Kamera ein, tippen Sie dann zum Abschließen der Einrichtung auf das OKSymbol. 6 .2 Kamera über externe Einrichtung zu Android-System hinzufügen 6 .2 .1 UID-Informationen beziehen Tippen Sie in der lokalen Ansicht zum Beziehen der UIDInformationen auf das i-Symbol (Informationen).
6 .2 .2 Kamera hinzufügen Tippen Sie auf das Punkte-Symbol in der Kameraliste der Internetansicht und anschließend auf der nächsten Seite auf das Hinzufügen-Symbol. Geben Sie UID- und Kennwortinformationen der Kamera ein, tippen Sie dann zum Abschließen der Einrichtung auf das Speichern-Symbol. 7 Kamera auf werkseitige Standardwerte zurücksetzen Halten Sie die Reset-Taste (mit Hilfe eines kleinen Objekts bzw.
Problemlösung Die Kamera lässt sich in der lokalen Ansicht nicht mit dem Smartphone oder Tablet verbinden • Prüfen Sie, ob der Netzstecker vollständig eingesteckt ist. • Stellen Sie sicher, dass die Kamera eingeschaltet ist und die Betriebsanzeige/Status-LED rot oder grün leuchtet. • Vergewissern Sie sich, dass sich Kamera und Smartphone/Tablet innerhalb der Reichweite befinden. • Prüfen Sie, ob Sie das Kamerakennwort richtig an Ihrem Smartphone/Tablet eingegeben haben.
Pflege und Wartung • Bewahren Sie alle Teile und sämtliches Zubehör außerhalb der Reichweite von Kindern auf. • Fingerabdrücke und Schmutz an der Linsenoberfläche können sich erheblich auf die Kameraleistung auswirken. Achten Sie darauf, die Linsenoberfläche nicht mit Ihren Fingern zu berühren. • Sollte die Linse schmutzig werden, beseitigen Sie Schmutz und Staub mit einem Druckluftreiniger oder einem weichen, trockenen Tuch. • Halten Sie die Kamera trocken.
Sicherheitstipps befolgen So vermeiden Sie (lebensgefährliche) Verletzungen in Verbindung mit den Kabeln der Kamera, Achten Sie darauf, dass sich die Kabel von Kamera und Netzteil immer außerhalb der Reichweite des Babys befinden (mindestens 1 Meter entfernt). Hinweis: Dies ist auch dann zu beachten, wenn Ihr Baby noch nicht stehen oder sich bewegen kann. 1 Meter Netzteilkabel Verwenden Sie niemals Verlängerungskabel in Verbindung mit Netzteilen. Verwenden Sie nur die mitgelieferten Netzteile.
Service-Hotline Bei technischen Problemen wenden Sie sich an unsere Service-Hotline. Schweiz: Tel. 0900 00 1675 (Kosten national, Swisscom bei Drucklegung: CHF 2,60/min). Bei Garantieansprüchen wenden Sie sich an Ihren Fachhändler. EuP2 Netzteil Beim energieeffizienten Netzteil (Input 100-240 VAC, Output 6 VDC, 800 mA) beträgt die Nulllast ca. 0,08 W. Die durchschnittliche Effizienz beträgt ca. 73 %. Die maximale Leistungsaufnahme beträgt ca. 1,94 W.
Guardate sempre e ovunque ciò che vi interessa Visione locale Easy iCAM Smartphone, Tablet Visione Internet Internet Easy iCAM Router Wi-Fi Smartphone, Tablet Easy iCAM è una videocamera di rete wireless. Può connettersi a smartphone o tablet tramite tecnologia wireless e monitorare sempre e ovunque tutto ciò che vi interessa su smartphone o tablet.
IT 1 Contenuto della confezione • Una videocamera • Due fermacavi • Un adattatore • Il presente manuale dell'utente • Una vite e una grappa Layout del prodotto Videocamera 1 5 2 3 4 6 ITALIANO 2 7 9 8 6V DC 80 0m A OF F ON 6.LED di alimentazione/stato 7.Spina adattatore di corrente 8.Tasto di ripristino delle impostazioni predefinite 9.Interruttore di accensione/spegnimento 1.Sensore luci 2.Microfono 3.Obiettivo videocamera 4.LED a infrarossi 5.
3 3 .1 Prima impostazione Prima dell'impostazione 1. Assicurarsi che il router Wi-Fi sia acceso e possa connettersi a Internet. 2. Scaricare l'app Easy iCAM: Digitare la parola chiave “Easy iCAM” e scaricare l'app da Apple App Store o Android Market (Google Play). 3 .2 Accensione della videocamera 1. Inserire un'estremità dell'adattatore di alimentazione in dotazione in una presa di corrente e l'altra estremità nella parte posteriore della videocamera.
3 .3 Collegamento di smartphone o tablet alla videocamera 1. Attivare il Wi-Fi di smartphone o tablet. 2.Toccare lo schermo per selezionare “Easy_iCAM_XXXXXX” in Wi-Fi Networks (Reti Wi-Fi). iPhone/iPad Sistema Android 3. Inserire la password di “Easy_iCAM_XXXXXX”. La password predefinita è “12345678”.
3 .4 Impostazione della videocamera e connessione Internet 1. Avviar el'app Easy iCAM su smartphone o tablet. 2. Osservare le istruzioni su schermo dell'app. 3. Impostazione del nome (SSID) o della password della videocamera:Sullo schermo viene visualizzato un messaggio che ricorda all'utente di modificare il nome (SSID) o la password della videocamera Wi-Fi. a. Se si seleziona “Sì”, è possibile modificare il nome o la password della videocamera Wi-Fi.
4 Modalità operativa – Visione locale/Visione Internet: Easy-iCAM è una videocamera di rete wireless. Può connettersi direttamente a smartphone o tablet tramite tecnologia wireless e consente di guardare feed video in tempo reale su smartphone o tablet in modalità di visione locale.
3. Nome videocamera (SSID) Questa riga mostra il nome della videocamera, che corrisponde a quello della rete Wi-Fi (SSID). 4. Area di visualizzazione immagine Toccare l'area di visualizzazione dell'immagine dello schermo con due dita e separarle per la funzione di zoom. È inoltre possibile scorrere sullo schermo per la funzione pan-tilt digitale. 5. Foto Toccare l'icona per vedere tutte le foto scattate. 6. Istantanea Toccare l'icona per salvare un'istantanea della videocamera su smartphone o tablet. 7.
9. Impostazione Toccare l'icona per impostare le funzioni della videocamera. a. Impostazione Internet È possibile impostare una connessione Internet o modificare la connessione della videocamera su un altro router Wi-Fi. b. Impostazione Wi-Fi Per modificare il nome (SSID Wi-Fi) o la password della videocamera, toccare questa riga per effettuare la modifica. c. Livello VOX (livello di attivazione volume) Toccare e far scorrere la barra di VOX Level (Livello VOX) per regolare il livello di attivazione volume.
4 .2 .1 Visione Internet per iPhone/iPad 5 1 3 2 4 iPhone/iPad 1. Nome videocamera (SSID) Quando si avvia l'app, tutte le videocamere Easy-iCAM aggiunte vengono visualizzate sullo schermo. 2. Stato videocamera: a. Online Se lo stato della videocamera è “online”, è possibile toccare la fotocamera per visualizzare il video della videocamera. b.
b. Riconnetti È necessario toccare “Riconnetti” per confermare di nuovo la connessione Internet se lo stato della videocamera è “offline”. 4. Fotocamera Toccare la fotocamera per visualizzare il video della videocamera. 5. Modifica Toccare l'icona Modifica per selezionare la videocamera da eliminare.
4 .2 .2 Visione Internet per 5 sistema Android 1 3 2 4 Sistema Android 1. Nome videocamera (SSID) Quando si avvia l'app, tutte le videocamere Easy-iCAM aggiunte vengono visualizzate sullo schermo. 2. Stato videocamera: a. Online Se lo stato della videocamera è “online”, è possibile toccare la fotocamera per visualizzare il video della videocamera. b.
c. Visualizza istantanea Toccare la riga per vedere tutte le foto scattate. d. Rimuovi videocamera Toccare la riga per rimuovere la videocamera. 4. Fotocamera Toccare la fotocamera per visualizzare il video della videocamera. 5. Toccare l'icona e selezionare “Esci” per uscire dall'app.
5 Aggiunta della videocamera su altri smartphone o tablet Se si è effettuata l'impostazione Internet per la videocamera e si desidera aggiungere la videocamera ad altri smartphone o tablet, basta attenersi alla procedura “3.3 Collegamento di smartphone o tablet alla videocamera” per poter collegare lo smartphone o il tablet alla videocamera tramite un router Wi-Fi o una rete mobile 3G/4G.
6 .1 .2 Aggiunta della videocamera Toccare l'icona Aggiungi nell'elenco di videocamere della visione Internet, quindi toccare l'icona Aggiungi nella pagina successiva. Digitare le informazioni relative a UID e password della videocamera, quindi toccare l'icona OK per terminare l'impostazione. 6 .2 Aggiunta della videocamera tramite impostazione remota per sistema Android 6 .2 .1 Per ottenere informazioni UID Toccare l'icona i (informazioni) in visione locale per ottenere informazioni UID.
6 .2 .2 Aggiunta della videocamera Toccare l'icona con i punti nell'elenco di videocamere della visione Internet, quindi toccare l'icona Aggiungi nella pagina successiva. Digitare le informazioni relative a UID e password della videocamera, quindi toccare l'icona Salva per terminare l'impostazione.
Risoluzione dei problemi Impossibile collegare la videocamera a smartphone o tablet in visione locale • Assicurarsi che la spina di alimentazione sia inserita completamente. • Assicurarsi che la videocamera sia accesa e il LED di alimentazione/stato si illumini di rosso o verde. • Assicurarsi che la videocamera e lo smartphone/il tablet rientrino nel raggio reciproco. • Assicurarsi di aver inserito la password corretta della videocamera su smartphone/tablet.
Cura e manutenzione • Tenere tutte le parti e gli accessori lontano dalla portata dei bambini. • La presenza di impronte digitali o sporcizia sulla superficie dell'obiettivo possono influire negativamente sulle prestazioni della videocamera. Evitare di toccare la superficie dell'obiettivo con le dita. • Se l'obiettivo si sporca, utilizzare un vaporizzatore per eliminare polvere e sporco o un panno asciutto e morbido per pulire l'obiettivo. • Tenere asciutta la videocamera.
Osservare le istruzioni sulla sicurezza Per prevenire la morte e lesioni in associazione ai cavi della videocamera, assicurarsi che i cavi della videocamera e dell'adattatore CA siano sempre fuori della portata del bambino, ad una distanza di almeno 3 piedi (1 metro). Nota: È importante, anche se il vostro bambino non è ancora in grado di stare in piedi o di muoversi autonomamente. 3 piedi (1 metro) Cavo adattatore Non usare mai prolunghe con gli adattatori AC.
ILinea diretta di assistenza In caso di problemi tecnici, rivolgersi alla nostra linea diretta di assistenza. Svizzera: tel. 0900 00 1675 (spese da rete nazionale Swisscom alla data di stampa: CHF 2,60/min). In caso di reclami entro il periodo di garanzia commerciale, rivolgersi al rivenditore autorizzato. Alimentatore di rete Con alimentatore di rete efficiente in termini di consumo energetico (input 100-240 VAC, output 6 VDC, 800 mA) la potenza a vuoto corrisponde a ca. 0,08 W.
408-000722-00