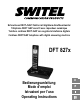
Schnurloses DECT−/GAP−Telefon mit digitalem Anrufbeantworter Téléphone DECT GAP sans fil avec répondeur numérique Telefono cordless DECT−GAP con segreteria telefonica digitale Cordless DECT/GAP telephone with digital answering machine DFT 827x Bedienungsanleitung Mode d’emploi Istruzioni per l’uso Operating Instructions D
Bedienungsanleitung . . . . . . . . . . . . . . . . . . . 3 Mode d’emploi . . . . . . . . . . . . . . . . . . . . . . 31 Istruzioni per l’uso . . . . . . . . . . . . . . . . . . . . 61 Operating Instructions . . . . . . . . . . . . . . . . . 91 Declaration of Conformity . . . . . . . . . . . . . . .
Sicherheitshinweise 1 Sicherheitshinweise Lesen Sie diese Bedienungsanleitung sorgfältig durch. Bestimmungsgemäße Verwendung Dieses Telefon ist geeignet zum Telefonieren innerhalb eines Telefonnetzes. Jede andere Verwendung gilt als nicht bestimmungsgemäß. Eigenmächtige Veränderungen oder Umbauten sind nicht zulässig. Öffnen Sie das Gerät in keinem Fall selbst und führen Sie keine eigenen Reparaturversuche durch.
Telefon in Betrieb nehmen 2 Telefon in Betrieb nehmen Sicherheitshinweise Achtung: Lesen Sie vor der Inbetriebnahme unbedingt die Sicherheitshinweise in Kapitel 1.
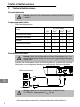
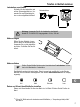
Telefon in Betrieb nehmen Ladestation anschließen2 Schließen Sie die Ladestation wie auf der Skizze abgebildet an. Verwenden Sie aus Sicherheitsgründen nur das mitgelieferte Netzteil. Netzsteckdose Achtung: Verwenden Sie für die Ladestation das Netzteil Modell Nr. SY−06020−GS, Ausgangsdaten: 6 VDC, 200 mA. Akkus einlegen Öffnen Sie das Akkufach. Legen Sie die Akkus in das Akkufach ein. Verwenden Sie nur die mitgelieferten Akkus. Schließen Sie das Akkufach.
Bedienelemente Displaysprache einstellen Die Displaysprache ist in Deutsch, Englisch, Italienisch und Französisch vorhanden. Sie können die Sprache über das Menü einstellen. Auf Seite 23 finden Sie die Position im Menü. Automatische Anrufannahme Haben Sie die Funktion aktiviert, wird ein Anruf automatisch beim Herausnehmen des Mobilteils aus der Basisstation angenommen. Die automatische Anrufannahme wird über das Menü aktiviert oder deaktiviert. Auf Seite 23 finden Sie die Position Direktannahme im Menü.
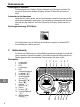
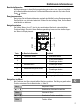
Einführende Informationen Mobilteil 3 1 2 3 4 5 6 7 8 9 10 11 12 13 14 15 16 17 18 4 1 Hörer Display INT−Taste Softkey−Taste rechts Freisprechen Aufwärts Rechts / Anrufliste Auflegen−Taste Bereitschaftsmodus Zifferntastenblock #−Taste / Tonruf ausschalten Mikrofon *−Taste / Tastensperre / Temporäre Tonwahl Gesprächstaste Abwärts / Wahlwiederholung Links R−Taste (Flash) Softkey−Taste links Lautsprecher (auf der Rückseite) Einführende Informationen In diesem Kapitel finden Sie grundlegende In
Einführende Informationen Mobilteil aus der Basisstation nehmen Mobilteil in die Basisstation stellen Menü Darstellung von Display−Texten Darstellung von Display−Symbolen Zurück Softkey−Taste drücken Seite 7 Symbole und Texte im Display des Mobilteils Symbol Beschreibung Konstant: Anzeige der Batteriekapazität. Durchlaufende Segmente: Die Akkus werden geladen Seite 5. Konstant: Blinkend: tt/mm hh:mm Alarmfunktion aktiviert. Alarm. Anzeige des Datums und der Uhrzeit Seite 23.
Einführende Informationen Bereitschaftsmodus 4 Alle Beschreibungen in dieser Bedienungsanleitung gehen davon aus, dass sich das Mobilteil im Bereitschaftsmodus befindet. Den Bereitschaftsmodus erreichen Sie, indem Sie die Taste drücken. Energiesparmodus Nach einiger Zeit im Bereitschaftsmodus wechselt das Mobilteil in einen Energiesparmodus. Das Display ist nun nicht mehr beleuchtet. Drücken Sie eine beliebige Taste, um den Bereitschaftsmodus zu aktivieren.
Telefonieren / Gewünschte Einstellung auswählen Über Tastenfeld Nummern oder Buchstaben eingeben Wähle Eingaben bestätigen Zurück Eine Ebene zurück Programmier−/Speichervorgänge abbrechen, Bereitschaftsmodus Jeder Vorgang wird automatisch abgebrochen, wenn innerhalb von 30 Sekunden keine Eingabe erfolgt. Telefonbucheinträge erstellen − Beispiel 6 Verfahren Sie bei allen Einstellungen wie in diesem Beispiel.
Telefonieren Sie können auch zuerst die Gesprächstaste /Freisprech−Taste drücken und erhalten damit das Freizeichen. Die eingegebenen Ziffern Ihrer gewünschten Rufnummer werden sofort gewählt. Eine Korrektur einzelner Ziffern der Rufnummer ist bei dieser Form des Gesprächsaufbaus nicht möglich. Wahlwiederholung Ihr Telefon speichert die 20 zuletzt gewählten Rufnummern in einer Wahlwiederholungsliste. Weitere Informationen Seite 14.
Telefonieren Rücksprache / Makeln Während eines externen Gesprächs können Sie ein anderes Mobilteil anwählen, um Rücksprache zu halten. Der externe Gesprächspartner wird gehalten, während Sie mit dem internen Gesprächspartner sprechen. Diesen Vorgang können Sie beliebig oft wiederholen.
Telefonbuch / Anrufliste Tastensperre 11 Die Tastensperre verhindert, dass versehentlich Tasten gedrückt werden. Tastensperre einschalten 2 Sek. Bei eingeschalteter Tastensperre können eingehende Anrufe wie gewohnt angenommen werden. 2 Sek. Tastensperre ausschalten Tonrufmelodie des Mobilteils 12 Sie können die Tonrufmelodie am Mobilteil ausschalten. Tonrufmelodie ausschalten 2 Sek. 2 Sek.
Telefonbuch / Anrufliste Anrufliste 13 Insgesamt werden 30 Rufnummern in einer Anrufliste gespeichert. Die Rufnummernanzeige (CLIP1) ist ein Zusatzdienst Ihres Netzbetreibers. Ihr Telefon zeigt die Rufnummern im Display, wenn Ihr Netzbetreiber diesen Service anbietet. Bitte fragen Sie Ihren Netzbetreiber nach weiteren Informationen.
Anrufbeantworter Rufnummern aus der Wahlwiederholungsliste anzeigen , / , Wähle Wahlwiederholungsliste öffnen und Eintrag auswählen Rufnummern aus der Wahlwiederholungsliste speichern Eine Rufnummer kann direkt aus der Wahlwiederholungsliste im Telefonbuch gespeichert werden. , / , Wähle Menü Wahlwiederholungsliste öffnen und Eintrag auswählen / , In TB speichern , Wähle Speichervorgang starten , , Namen eingeben und weiter ggf.
Anrufbeantworter Spracheinstellung der Ansagetexte 15 Die Sprachausgabe des Anrufbeantworters ist in Deutsch und Französisch vorhanden. Maximale Aufnahmezeit Der Anrufbeantworter speichert bis zu 59 Nachrichten. Die maximale Aufnahmezeit beträgt 15 Minuten. Die Länge für die Nachrichten−Aufnahme ist einstellbar Seite 25. Ist die Speicherkapazität für neue Nachrichten erschöpft, wird kein Anruf mehr aufgezeichnet. Verzögerung der Anrufannahme Sie können zwischen 2 bis 9 Tonrufen wählen.
Anrufbeantworter Ansagen aufzeichnen Bevor Sie eine Ansage aufzeichnen, wählen Sie den Ansagemodus (Mit Aufzeichnung/ Ohne Aufzeichnung), für den Sie eine eigene Ansage aufzeichnen möchten. Menü Hauptmenü öffnen ! oder " Anrufbeantworter , Wähle Untermenü auswählen und bestätigen ! oder " Einstellungen , Wähle Funktion auswählen und bestätigen , Wähle Funktion auswählen und bestätigen ! oder " Ansage einst.
Anrufbeantworter Aufgezeichnete Nachrichten abhören Die aufgezeichneten Nachrichten werden in der Reihenfolge wiedergegeben, in der sie eingegangen sind. Nachrichtenmenü öffnen Menü Hauptmenü öffnen ! oder " Anrufbeantworter , Wähle Untermenü auswählen und bestätigen ! oder " Nachricht hören , Wähle Nachrichtenmenü auswählen und bestätigen Während Sie die Nachricht abhören, haben Sie die Möglichkeit mit der Auswahl Menü schen). weitere Untermenüs zu öffnen (Stop, Nächste Nachr., Vorherige Nachr.
Anrufbeantworter Memo aufzeichnen Ein Memo ist eine Mitteilung, die wie eine eingegangene Nachricht abgehört werden kann. Memo aufzeichnen Menü Hauptmenü öffnen ! oder " Anrufbeantworter , Wähle Untermenü auswählen und bestätigen ! oder " Memo , Wähle Ok Memo wird aufgezeichnet Aufzeichnung beenden Nach Beendigung wird Ihre Aufzeichnung laut wiederholt. Fernabfrage 18 Sie können Ihren Anrufbeantworter anrufen, um Nachrichten abzuhören und weitere Funktionen durchzuführen.
Anrufbeantworter Die folgende Tabelle verschafft Ihnen eine Übersicht über die jeweiligen Funktionen der einzelnen Tasten.
Nebenstellenanlagen / Zusatzdienste Alle Nachrichten löschen Gelöschte Nachrichten können nicht wiederhergestellt werden! Es werden alle bereits abgehörten Nachrichten gelöscht. 5 Sek. Nachrichten löschen Anrufbeantworterdisplay Das Display des Anrufbeantworters zeigt den Status des Geräts an. −− Anrufbeantworter ausgeschaltet 0−59 Anrufbeantworter eingeschaltet, Anzahl gespeicherter Nachrichten Wenn neue Nachrichten vorhanden sind, blinkt die Anzeige der gespeicherten Nachrichten.
Menüstruktur Rufnummernanzeige (CLIP1) Die Rufnummernanzeige ist ein Zusatzdienst Ihres Netzbetreibers. Fragen Sie Ihren Netzbetreiber nach weiteren Informationen. Wenn diese Funktion an Ihrer Telefonleitung zur Verfügung steht, wird Ihnen bereits die Rufnummer des Anrufers angezeigt, wenn das Telefon klingelt. Hat der Anrufer das Übertragen seiner Rufnummer unterdrückt, wird eine entsprechende Meldung angezeigt. Die Rufnummer kann nicht angezeigt und somit auch nicht in der Anrufliste gespeichert werden.
Menüstruktur Nummer Melodie Mel 1−15 Löschen Eintrag wählen Ok/Zurück Alle löschen Ok/Zurück Telbuch−Status Telb.
Menüstruktur Reichweite Sprache Aus/Ein Deutsch Français Italiano English MT−Namen ändern Kontrast Level 1−5 Direktannahme Aus/Ein Rufnummernsperre PIN: SOS−Nummer PIN: Basisauswahl Basis 1−4 MT rücksetzen PIN: Sperr−Modus Aus/Ein Sperrnummer Nummer 1−4 Nummer1 Nummer2 Nummer3 Ok/Zurück 26 Basis einstellen MT löschen PIN: Mobilteil 1−6 Tonrufeinstellung Tonrufmelodie Melodie 1−5 Tonruflautstärke Aus, 1−5 Wahlverfahren Tonwahl/Pulswahl Flash−Zeit Kurz/Mi
Besondere Funktionen Basis 2 PIN: Basis 3 PIN: Basis 4 PIN: 28 Anrufbeantworter Nachricht hören Alle löschen Memo AB ein/aus Ein/Aus Einstellungen Antwortmodus Mit Aufzeichnung Ohne Aufzeichnung AB−Sprache Deutsch / Français Ansage einst. Mit Aufzeichnung Ohne Aufzeichnung Antw.Verzögerung Sparmodus, 2 Rufe−9 Rufe Aufzeichnungszeit 60 s / 120 s / 180 s / Unbegrenzt Mithören Basis Ein/Aus Fernabfrage Ein/Aus PIN Fernabfr. neu PIN alt: PIN neu: Best.
Erweitern des Telefonsystems Nach Gesprächsende wird wieder automatisch auf das Impuls−Wahlverfahren zurückgeschaltet. Alarm Mit dieser Funktion können Sie sich zu einer bestimmten Zeit von Ihrem Mobilteil alarmieren lassen. Auf Seite 23 finden Sie die Position im Menü. Rufnummernsperre Die Rufnummernsperre hindert Mobilteile daran, von Ihnen hinterlegte Rufnummern zu wählen. Sie können 4 Sperrnummern, die aus jeweils 4 Ziffern bestehen können, hinterlegen. Auf Seite 23 finden Sie die Position im Menü.
Falls es Probleme gibt Mehrere Mobilteile Sie können insgesamt 6 Mobilteile an Ihre Basisstation anmelden. Anmelden von Mobilteilen Bevor Sie ein Mobilteil anmelden, müssen Sie die Basisstation in den Registriermodus setzen. halten Registriermodus gestartet Melden Sie nun das Mobilteil an Seite 24. Benutzen Sie zur Anmeldung den aktuell eingestellten PIN−Code Seite 24. Nach dem Anmelden wird dem Mobilteil eine interne Rufnummer zugeordnet. Diese interne Rufnummer wird im Display angezeigt.
Falls es Probleme gibt Kein Telefongespräch möglich − Das Telefon ist nicht korrekt angeschlossen oder gestört. Verwenden Sie nur das mitgelieferte Telefonanschlusskabel. − Testen Sie mit einem anderen Telefon, ob Ihr Telefonanschluss in Ordnung ist. − Das Netzteil ist nicht eingesteckt oder es liegt ein totaler Stromausfall vor. − Die Akkus sind leer oder defekt. − Sie haben sich zu weit von der Basisstation entfernt. − Wahlverfahren falsch eingestellt Seite 24.
Technische Eigenschaften 13 Technische Eigenschaften Technische Daten Merkmal Wert Standard DECT1−GAP2 Stromversorgung (Basisstation) Eingang: 230 VAC, 50 Hz Ausgang: 6 VDC, 600 mA Stromversorgung (Ladestation) Eingang: 230 VAC, 50 Hz Ausgang: 6 VDC, 200 mA Reichweite Außen: ca. 300 m / Innen: ca. 50 m Bereitschaft Bis zu 100 h Max.
Pflegehinweise / Garantie Akku leer Ein Erster Ruf Ein Name: DFT 8271 Sprache Deutsch Ein Aufzeichnungszeit 120 s AB−Sprache Deutsch PIN: 0000 Anrufbeantworter Anrufbeantworter Antwortmodus Mit Aufzeichnung Antw.Verzögerung 6 Rufe Konformitätserklärung Dieses Gerät erfüllt die Anforderungen der EU−Richtlinie: 1999/5/EG Richtlinie über Funkanlagen und Telekommunikationsendeinrichtungen und die gegenseitige Anerkennung ihrer Konformität. Die Konformität mit der o. a.
Consignes de sécurité 1 Consignes de sécurité Lisez très attentivement ce mode d’emploi. Utilisation conforme aux prescriptions Ce téléphone convient pour téléphoner à l’intérieur d’un réseau téléphonique. Toute autre utilisation est considérée comme non conforme à l’usage. Des modifications ou changements effectués d’un propre gré ne sont pas autorisés. N’ouvrez en aucun cas l’appareil et n’effectuez aucun essai de réparation vous−même.
Mettre votre téléphone en service 2 Mettre votre téléphone en service Remarques concernant la sécurité Attention : Avant de mettre votre appareil en service, lisez impérativement les consignes de sécurité mentionnées au chapitre 1.
Mettre votre téléphone en service Raccorder le chargeur2 Raccordez le chargeur comme représenté sur le croquis. Pour des raisons de sécurité, n’utilisez que le bloc secteur fourni avec l’appareil. Prise réseau Attention : Pour le chargeur, utilisez le bloc secteur modèle n° SY−06020−GS, données de sortie : 6 VDC, 200 mA. Poser des piles rechargeables Ouvrez le compartiment à piles. Introduisez les piles rechargeables dans le compartiment à piles.
Éléments de manipulation Prise d’appel automatique Si vous avez activé la fonction, l’appel sera automatiquement réceptionné quand vous prendrez le combiné de la base. La prise d’appel automatique s’active ou se désactive via le menu. À la page 52 vous trouverez la position Réponse auto dans le menu. Réduction du rayonnement (mode ÉCO) En mode de communication, le rayonnement du combiné est considérablement réduit par rapport aux téléphones DECT sans fil standard.
Introduction Combiné 31 1 2 3 4 5 6 7 8 9 10 11 12 13 14 15 16 17 18 1 Écouteur Écran Touche INT Touche softkey droite Mode mains−libres Vers le haut Vers la droite / Liste d’appels Touche pour raccrocher Mode veille Pavé numérique Touche # / Désactiver la sonnerie d’appel Microphone Touche * / Verrouillage du clavier / Numérotation temporaire par tonalité Touche de communication Vers le bas / Répétition automatique des derniers numéros Vers la gauche Touche R (Flash) Touche softkey gauche Hau
Introduction La base sonne Prendre le combiné de la base Poser le combiné sur la base Menu Visualisation des textes de l’écran Visualisation des icônes de l’écran Retour Appuyer sur la touche softkey page 35 Icônes et textes sur l’écran du combiné Icône Description Constant: affichage de la capacité des piles. Segments continus : les piles rechargeables se rechargent page 33. Constant: la fonction d’alarme est activée. Clignotant: alarme.
Introduction Mode veille 32 Toutes les descriptions dans ce mode d’emploi partent du principe que le combiné se trouve en mode veille. Vous parvenez au mode veille en appuyant sur la touche . Mode économie d’énergie Au bout d’un certain temps en mode veille, le combiné passe en mode économie d’énergie. L’écran n’est maintenant plus éclairé. Appuyez sur une touche quelconque pour activer le mode veille.
Téléphoner / Sélectionner le paramétrage désiré Saisir des chiffres ou des lettres via le pavé numérique Sélect Confirmer les entrées Retour Reculer d’une position Annuler les opérations de programmation / de sauvegarde, mode veille Chaque opération est automatiquement interrompue si vous n’effectuez pas de saisie dans les 30 secondes. Créer des enregistrements dans le répertoire − exemple 34 Pour tous les réglages, procédez comme dans cet exemple.
Téléphoner Appeler Composer le numéro d’appel (max. 24 chiffres) Efface En cas de saisie erronée, effacer le dernier chiffre Composer le numéro Vous pouvez appuyer d’abord sur la touche de communication / touche mains−libres et obtenir ainsi la tonalité. Les chiffres saisis de votre numéro d’appel seront immédiatement composés. La correction individuelle de chiffres du numéro d’appel n’est pas possible quand la communication est établie de cette manière.
Téléphoner Transférer des communications externes en interne CB1: , ou , Sélect CB2: Composer un numéro interne pendant la communication externe. Prendre une communication interne sur un autre combiné Transférer la communication CB1 : Intercommunication / Va−et−vient Vous pouvez, pendant une communication externe, composer le numéro d’un autre combiné, pour intercommuniquer. Le correspondant externe est maintenu en ligne pendant que vous parlez avec le correspondant interne.
Répertoire/Liste d’appels Muet Désactiver le microphone (régler sur silencieux) Parler Activer le microphone Verrouillage du clavier 39 Le verrouillage empêche que vous n’appuyiez sur des touches par inadvertance. Activer le verrouillage du clavier 2 sec. Lorsque le verrouillage du clavier est activé, vous pouvez comme d’habitude réceptionner des appels entrants. 2 sec.
Répertoire/Liste d’appels Maintenir Efface Effacer tous les caractères Pour saisir deux fois la même lettre, appuyez sur la lettre correspondante. Attendez que le curseur soit passé derrière la lettre. Puis tapez la lettre une nouvelle fois. Liste d’appels 41 30 numéros d’appel en tout peuvent être sauvegardés dans une liste d’appels. L’affichage du numéro d’appel (CLIP1) est un service confort de votre opérateur.
Répertoire/Liste d’appels Effacer tous les numéros , Sélect Menu / , Tout effacer Ok Ouvrir la liste d’appels , Sélect ou Retour Activer l’effacement Confirmer ou annuler l’effacement Liste de répétion automatique des derniers numéros 42 20 numéros d’appel en tout peuvent être sauvegardés dans une liste de répétition automatique des derniers numéros.
Répondeur Effacer tous les numéros , Sélect Menu , Tout effacer Ok 7 Ouvrir la liste de répétition automatique des derniers numéros / , Sélect ou Retour Activer l’effacement Confirmer ou annuler l’effacement Répondeur Manipulations sur le combiné Ouvrir le menu de réglage Vous effectuez les réglages du répondeur via votre combiné page 25. Activer / désactiver le répondeur Vous allumez / éteignez le répondeur via le combiné 25.
Répondeur Intercepter un appel Si le répondeur a déjà répondu à un appel, vous pouvez intercepter celui−ci. L’enregistrement du message est, dans ce cas, interrompu. Prendre l’appel Modes de réponse Votre répondeur met à votre disposition deux modes de réponse. Après le texte de réponse Rép Enregistreur , vous pouvez laisser un message. Dans le cas du texte d’annonce Rép. Seul , il s’agit d’une simple annonce après laquelle vous ne pouvez pas laisser de message.
Répondeur Menu Ouvrir le menu principal ! ou ", Répondeur , Sélect Sélectionner le sous−menu et confirmer ! ou ", Rég. Répondeur , Sélect Sélectionner la fonction et confirmer , Sélect Sélectionner la fonction et confirmer ! ou ", Régl. annonces ! ou ", Rép Enregistreur / Rép.
Répondeur ( Quitter le menu de messages et retourner en mode veille Effacer tous les anciens messages 45 Tous les messages déjà écoutés doivent être effacés. Menu Ouvrir le menu principal ! ou ", Répondeur , Sélect Sélectionner le sous−menu et confirmer ! ou ", Tout effacer , Sélect Ok Sélectionner la fonction et confirmer Appuyer Les messages effacés ne peuvent pas être restaurés ! Enregistrer un mémo Un mémo est une information qui peut être écoutée comme un message entré.
Répondeur Brancher la consultation à distance du répondeur Composer le numéro d’appel personnel Si vous avez oublié de brancher votre répondeur, votre appel ne sera réceptionné qu’au bout de 10 sonneries. , Appuyer sur ces touches pendant l’annonce et saisir le code PIN ) * Activer le répondeur ou Désactiver le répondeur Vous avez maintenant la possibilité de d’opérer d’autres fonctions.
Installations à postes suppl. / Services confort Écouter / effacer les messages enregistrés Écouter les messages Les messages enregistrés sont reproduits dans l’ordre dans lequel ils sont arrivés. Le jour de la semaine et l’heure sont toujours indiqués avant la reproduction de chaque message.
Structure du menu Saisir manuellement la pause de numérotation Vous pouvez, après le chiffre de la ligne principale, insérer manuellement une pause de numérotation pour pouvoir continuer à composer le numéro sans avoir à attendre la tonalité. 2 sec. Insérer une pause de numérotation Après le chiffre de la ligne principale, le numéro est composé au bout d’un temps déterminé. La pause peut également être enregistrée lors de la saisie de numéros d’appel dans le répertoire.
Structure du menu Mél 1−15 Numéro Mélod. Effacer Tout effacer Ok/Retour Ok/Retour 51 Répertoire Voir Sélectionner l’enregistrement Menu Ajouter Nom: Numéro Mélod. Mél 1−15 Nom: Numéro Mélod. Sélectionner l’enregistrement Mél 1−15 Ok/Retour Editer Effacer Editer Effacer Tout effacer Etat répertoire Ok/Retour Copie répert.
Structure du menu 53 Réglages Combiné Réglages audio Réglages sonn. Vol. H−parleur 1−5 Volume d’écoute 1−5 Sonnerie Interne Mélod. Sonnerie Externe Mélod. Volume Sonnerie Alertes Sonores Langue Off, 1−5 Bip touches Off/On Batterie faible Off/On Hors Portée Off/On Deutsch Français Italiano English Renommer combiné Contraste Niveau 1−5 Réponse auto Off/On Restriction PIN: Numéro d’urgence PIN: Choix base Base 1−4 Rég. CB Défaut PIN: Mode Restriction Off/On Num.
Structure du menu Modifier PIN PIN: Nv PIN: Confirm: Numéro d’urgence PIN: Sonnerie 1 Off/On Rég. défaut base PIN: Numéro1 Numéro2 Numéro3 Ok/Retour 55 Association Base 1 PIN: Base 2 PIN: Base 3 PIN: Base 4 PIN: 56 Répondeur Lire Tout effacer Mémo Rép On/Off On/Off Rég. Répondeur Mode Répondeur Rép Enregistreur Rép. Seul Langue Rép. Deutsch / Français Régl. annonces Rép Enregistreur Rép. Seul Nb de Sonneries Eco.
Fonctions particulières 10 Fonctions particulières Système de numérotation Vous pouvez faire fonctionner votre téléphone aussi bien sur les raccordements analogiques (numérotation par impulsions/DC) que sur les nouveaux raccordements numériques (numérotation par tonalité/FV). Le système de numérotation est programmé via le menu. La page 52 vous donnera la position dans le menu.
Élargissement du système téléphonique / Copie répert. Sélect Sélectionner "copie répert.", confirmer / , Ok , Sélect / Annule Sélectionner le combiné et confirmer Confirmer sur le combiné récepteur ou annuler l’opération 11 Élargissement du système téléphonique Le mode standard international normé GAP1 règle la compatibilité entre les combinés et les bases de fabricants différents.
En cas de problèmes 12 En cas de problèmes Hotline de service Si vous avez des problèmes avec votre téléphone, contrôlez d’abord les indications suivantes. En cas de problèmes techniques, vous pouvez également vous adresser à notre ligne directe, tél. 0900 00 1675 (coûts Swisscom à la date d’impression de ce manuel : CHF 2.00 / Min). Si vous avez des droits de garantie, adressez−vous à votre revendeur. La durée de la garantie est de 2 ans.
Caractéristiques techniques L’affichage du numéro d’appel (CLIP1) ne fonctionne pas − L’affichage du numéro d’appel est un service confort de votre opérateur. Veuillez lui demander de plus amples informations. − Le correspondant a bloqué la transmission de son numéro d’appel. Le répondeur ne prend pas de messages − Assurez−vous que le répondeur est correctement raccordé et branché. − Contrôlez si la mémoire du répondeur est pleine. Le cas échéant, effacez des messages de la mémoire page 53.
Caractéristiques techniques Réglages usine Combiné Les paramétrages usine sont rétablis via le menu. La page 52 vous donnera la position dans le menu. Volume Sonnerie Niveau 3 Volume d’écoute Niveau 3 Sonnerie Externe Mélodie 1 Vol. H−parleur Niveau 3 Sonnerie Interne Mélodie 2 Contraste Niveau 3 Bip touches On Hors Portée On Batterie faible On Sonnerie 1 On Nom: DFT 8271 Langue Deutsch Base Les paramétrages usine sont rétablis via le menu.
Remarques d’entretien / Garantie 14 Remarques d’entretien / Garantie Remarques d’entretien Nettoyez les surfaces du boîtier avec un chiffon doux et non pelucheux. N’utilisez pas de produits d’entretien ou de solvants. Garantie Les appareils SWITEL sont fabriqués selon les procédés les plus modernes et sont contrôlés. Des matériels sélectionnés et des technologies de pointe ont pour effet un fonctionnement irréprochable et une longue durée de vie.
Notes Notes 60
Indicazioni di sicurezza 1 Indicazioni di sicurezza Leggere attentamente le presenti istruzioni per l’uso. Impiego conforme agli usi previsti Il presente telefono consente di svolgere telefonate all’interno di una rete telefonica. Qualsiasi altro impiego è considerato come non conforme agli usi previsti. Non sono consentite modifiche o trasformazioni non autorizzate. Non aprire per nessuna ragione l’apparecchio autonomamente, né compiere riparazioni di propria iniziativa.
Mettere in funzione il telefono 2 Mettere in funzione il telefono Indicazioni di sicurezza Attenzione: Prima della messa in funzione, leggere attentamente le indicazioni di sicurezza riportate al capitolo 1.
Mettere in funzione il telefono Collegare la stazione di carica1 Procedere al collegamento della stazione di carica seguendo la figura. Per motivi di sicurezza si prega di utilizzare soltanto l’alimentatore di rete fornito in dotazione. Presa elettrica Attenzione: Utilizzare per la stazione di carica l’alimentatore di rete modello no. SY−06020−GS, dati di output: 6 VDC, 200 mA. Inserire gli accumulatori Aprire il vano accumulatori. Inserire gli accumulatori nell’apposito vano accumulatori.
Elementi di comando Impostare la lingua di display La lingua di display è disponibile in tedesco, inglese, italiano e francese. La lingua è impostabile nel rispettivo menu. A pagina 82 è indicata la posizione da scorrere nel menu. Accettazione di chiamata automatica L’attivazione di questa funzione consente di ricevere automaticamente una chiamata estraendo semplicemente l’unità portatile dalla stazione base. L’accettazione di chiamata automatica è attivata o disattivata nel menu.
Informazioni introduttive Unità portatile 59 1 2 3 4 5 6 7 8 9 10 11 12 13 14 15 16 17 18 4 1 Ricevitore Display Tasto INT Tasto softkey di destra Funzione vivavoce Verso sopra Verso destra / Elenco chiamate Tasto di riaggancio Modalità di stand−by Tasti numerici Tasto # / Disattivare segnalazione di chiamata Microfono Tasto * / Blocco tastiera / Selezione a toni temporanea Tasto di chiamata Verso sotto / Ripetizione di chiamata Verso sinistra Tasto R (flash) Tasto softkey di sinistra Altopa
Informazioni introduttive Estrarre l’unità portatile dalla stazione base Riporre l’unità portatile nella stazione base Menu Rappresentazione di testi sul display Rappresentazione di simboli sul display Indiet Premere il tasto softkey pagina 65 Simboli e testi sul display dell’unità portatile Simbolo Descrizione Costante: Indicazione dello stato di carica delle batterie. Segmenti che scorrono: Gli accumulatori sono in fase di ricarica pagina 63. Costante: Funzione allarme attivata.
Informazioni introduttive Lampeggiante: Il collegamento con la stazione base si interrompe. Avvicinarsi alla stazione base. Segreteria telefonica inserita. Modalità di stand−by 60 In tutte le descrizioni del presente manuale di istruzioni si considera l’unità portatile in modalità di stand−by. Per passare alla modalità di stand−by, premere il tasto . Modalità di risparmio energetico Trascorso un breve intervallo di tempo in modalità di stand−by, l’unità portatile passa in modalità di risparmio energetico.
Compiere telefonate / Selez Selezionare il sottomenu desiderato Aprire il sottomenu / Selez Selezionare la funzione desiderata Aprire la funzione / Selezionare l’impostazione desiderata La tastiera consente di inserire numeri o lettere Selez Confermare le immissioni Indiet Tornare indietro di un livello Interrompere procedure di programmazione/memorizzazione, modalità di stand−by Ogni singolo processo si interrompe automaticamente se entro 30 secondi non si procede con una immissione.
Compiere telefonate 3 sec Disattivare l’unità portatile 2 sec Attivare l’unità portatile Compiere telefonate Immettere un numero di chiamata (max. 24 cifre) Canc In caso di immissione errata, cancellare l’ultima cifra Selezionare un numero di chiamata È altresì possibile premere prima il tasto di chiamata /tasto di vivavoce e ottenere così il segnale di linea libera. Le cifre immesse per la composizione del numero di chiamata desiderato sono immediatamente selezionate.
Compiere telefonate UP1 / UP2: Concludere la chiamata interna Trasferire internamente chiamate esterne UP1: , o , Selez Selezionare con chiamata esterna in corso il numero interno UP2: Accettare una telefonata interna presso l’altra unità portatile UP1: Trasferire la chiamata Riscontro / Chiamata in attesa Durante lo svolgimento di una chiamata esterna è possibile chiamare un’altra unità portatile allo scopo di consultarsi o eseguire un riscontro.
Rubrica telefonica/Elenco chiamate Disattivare la funzione vivavoce Silenziamento del microfono nell’unità portatile 66 È possibile attivare e disattivare il microfono dell’unità portatile con chiamata telefonica in corso. MicOff Disattivare il microfono (silenziamento) Mic ON Attivare il microfono Blocco tastiera 67 Il blocco tastiera impedisce di premere accidentalmente dei tasti.
Rubrica telefonica/Elenco chiamate Immettere nomi I tasti numerici riportano altresì delle lettere. Premendo ripetutamente il relativo tasto si ha modo di selezionare lettere e cifre. Immettere spazi vuoti Canc tenere Cancellare un carattere Canc Cancellare tutti i caratteri Per immettere la stessa lettera una seconda volta, premere la rispettiva lettera. Attendere fino a quando il cursore si sia spostato di una posizione. Immettere quindi la lettera una seconda volta.
Rubrica telefonica/Elenco chiamate Cancellare numeri di chiamata dall’elenco chiamate Cancellare singoli numeri di chiamata , / , Selez Aprire l’elenco chiamate e selezionare una voce / Menu , Cancella , Selez Attivare la procedura di cancellazione OK Confermare o interrompere la procedura di cancellazione o Indiet Cancellare tutti i numeri di chiamata , Selez Menu , Aprire l’elenco chiamate / Cancella tutto , Selez Attivare la procedura di cancellazione OK Confermare o interrompere la
Segreteria telefonica Menu , / Cancella , Selez Attivare la procedura di cancellazione OK Confermare o interrompere la procedura di cancellazione o Indiet Cancellare tutti i numeri di chiamata , Selez Menu , 7 Aprire l’elenco di ripetizione di chiamata / Cancella tutto , Selez Attivare la procedura di cancellazione OK Confermare o interrompere la procedura di cancellazione o Indiet Segreteria telefonica Esercizio dall’unità portatile Aprire il menu impostazioni Le impostazioni della seg
Segreteria telefonica Intercettare chiamate in arrivo Con segreteria telefonica inserita è possibile intercettare le chiamate in arrivo tramite altoparlante senza bisogno di sganciare il ricevitore. OK Attivare l’intercettazione Indiet Disattivare l’intercettazione Accettare una chiamata Anche se la segreteria telefonica ha già risposto ad una chiamata è comunque possibile riprendere la telefonata. La registrazione del messaggio viene in tal caso interrotta.
Segreteria telefonica propria unità portatile. A conclusione dell’annuncio, questo è ripetuto ad alta voce. Riattivare l’annuncio standard Si prega di osservare che il messaggio di annuncio registrato è in tal caso automaticamente cancellato.
Segreteria telefonica Funzioni a tasti nel menu messaggi 72 La seguente tabella offre una panoramica delle funzioni e dei rispettivi tasti all’interno del menu messaggi.
Segreteria telefonica Interrogazione a distanza 74 È dato modo di chiamare la propria segreteria telefonica per ascoltare messaggi ricevuti e compiere una serie di funzioni accessorie. Requisito per questa operazione è un telefono abilitato alla selezione a toni. L’interrogazione a distanza deve essere stata precedentemente attivata pagina 25. Codice PIN per l’interrogazione a distanza La configurazione iniziale del codice PIN è "0000". Si consiglia di modificare il codice PIN 0000" immesso in fabbrica.
Segreteria telefonica ' ) Riprodurre il messaggio successivo Attivare la segreteria telefonica Riprodurre il messaggio precedente + Interrompere la riproduzione del messaggio attuale * Disattivare la segreteria telefonica ( Concludere l’interrogazione a distanza Concludere l’interrogazione a distanza Esercizio sulla base Attivare / Disattivare la segreteria telefonica Attivare / Disattivare la segreteria telefonica Impostare il volume Il volume è impostabile in 8 livelli.
Impianti telefonici interni / Servizi addizionali In presenza di nuovi messaggi, l’indicazione relativa ai messaggi memorizzati lampeggia. LA Visualizzato nel caso in cui un’unità portatile svolga delle impostazioni sulla segreteria telefonica. Visualizzato un messaggio in corso di registrazione (l’indicazione passa al numero totale di messaggi, ad esempio: 03).
Struttura di menu A condizione che il collegamento telefonico disponga di questa funzione, l’apparecchio visualizza il numero telefonico del chiamante non appena il telefono squilla. Nel caso in cui il chiamante abbia soppresso la trasmissione del proprio numero di chiamata, appare un’apposita indicazione. Se il numero di chiamata non è visualizzabile, questo non sarà memorizzato nell’elenco chiamate.
Struttura di menu Stato Rubr Copia rubrica Microtel 1−6 80 Oro/Alarme Data e ora Formato data DD−MM−YYYY MM−DD−YYYY Formato Ora 12 ore 24 ore Sveglia Imposta Data Imposta Ora ( / AM/PM) Sveglia SI ( / AM/PM) Melodia sveglia Melodia 1 Sveglia NO Melodia 2 Melodia 3 81 Imposta PT Imposta Audio Imposta Suoneria Volume altoparl 1−5 Volume auric 1−5 Suoneria Interno Melodi 1−15 Suoneria esterna Melodi 1−15 Suoneria Vol.
Struttura di menu Contrasto Livello 1−5 Risp. Auto Off/On Blocco Chiam. PIN: Num. Emergenza PIN: Selezione Base Base Reset PT PIN: Bloccco Off/On Bloc. Numeri Numero 1−4 Numero1 Numero2 Numero3 OK/Indiet 82 Imposta base Cancella PT PIN: Microtel 1−6 Imposta Suoneria Suoneria Mel. Melodi 1−5 Suoneria Vol.
Funzioni speciali 84 Segreteria Ascolta Cancella tutto Memo TAM On/Off On/Off Imposta Segr Modo risposta Risp & Registra Solo risposta Lingua segr.
Ampliamento del sistema telefonico Blocco di numeri di chiamata Il blocco di numeri di chiamata impedisce a unità portatili di selezionare determinati numeri di chiamata precedentemente memorizzati. L’apparecchio consente la memorizzazione di 4 numeri di chiamata da bloccare composti da rispettivamente 4 cifre. A pagina 82 è indicata la posizione da scorrere nel menu. Numeri SOS È possibile memorizzare fino a 3 numeri di chiamata selezionabili nonostante l’attivazione del blocco di numeri di chiamata.
In presenza di problemi Registrazione di unità portatili Prima di registrare un’unità portatile, passare con la stazione base alla modalità di registrazione. tenere La modalità di registrazione è avviata Procedere a questo punto con la registrazione dell’unità portatile pagina 83. Utilizzare per la registrazione il codice PIN attualmente impostato pagina 83. Una volta eseguita la selezione, all’unità portatile è assegnato un numero di chiamata interno.
In presenza di problemi Non è possibile condurre una chiamata telefonica − Il telefono non è collegato correttamente oppure presenta un guasto. Utilizzare esclusivamente il cavo di collegamento telefonico fornito. − Provare con un altro telefono se l’allacciamento telefonico in questione è funzionante. − L’alimentatore di rete non è inserito oppure si è in presenza di una caduta di tensione totale. − Le batterie sono scariche o difettose. − La distanza dalla stazione base è troppo grande.
Specifiche tecniche 13 Specifiche tecniche Specifiche tecniche Caratteristica Valore Standard DECT1−GAP2 Alimentazione elettrica (stazione base) Ingresso: 230 VCA, 50 Hz Uscita: 6 VCC, 600 mA Alimentazione elettrica (stazione di carica) Ingresso: 230 VCA, 50 Hz Uscita: 6 VCC, 200 mA Portata Esterno: ca. 300 m Interno: ca. 50 m Stand−by fino a 100 ore Max.
Specifiche tecniche Stazione base La configurazione iniziale è ripristinata nel menu. A pagina 83 è indicata la posizione da scorrere nel menu. Modo Composiz Toni PIN: Tempo flash Breve Risp. Auto 0000 On Suoneria Mel. Melodia 1 Suoneria Vol. Livello 3 On Tempo registraz 120 s Anrufbeantworter Segreteria Modo risposta Risp & Registra Ritardo risp 6 squillo Lingua segr.
Consigli per la cura / Garanzia 14 Consigli per la cura / Garanzia Consigli per la cura Pulire le superfici degli apparecchi con un panno morbido e antipilling. Non utilizzare mai detergenti o solventi. Garanzia Gli apparecchi SWITEL sono costruiti e collaudati in osservanza dei processi di produzione più moderni. L’impiego di materiali selezionati e tecnologie altamente sviluppate sono garanti di una perfetta funzionalità e lunga durata in vita.
Safety Information 1 Safety Information Please read this operating instruction manual thoroughly. Intended use The telephone is suitable for telephoning within a public telephone network system. Any other use is considered unintended use. Unauthorised modification or reconstruction is not permitted. Under no circumstances open the device or complete any repair work yourself. Installation location Prevent excessive exposure to smoke, dust, vibration, chemicals, moisture, heat and direct sunlight.
Putting the Telephone into Operation 2 Putting the Telephone into Operation Safety information Attention: It is essential to read the Safety Information in Chapter 1 before starting up.
Putting the Telephone into Operation Connecting the charging station 2 Connect the charging station as illustrated in the diagram. For safety reasons, only use the power adapter plug supplied. Mains power outlet Attention: For the charging station: use power adapter plug model no. SY−06020−GS, output data: 6 VDC, 200 mA. Inserting the batteries Open the battery compartment cover. Insert the batteries in the battery compartment. Only use the batteries supplied. Close the battery compartment cover.
Operating Elements Automatic answering If this function is activated, an incoming call is taken when the handset is removed from the base station. The automatic answering function is activated and deactivated using the menu. Refer to Page 111 for the Auto Answer" menu option. Low−radiation operation (ECO mode) In Call mode, the handset radiation is reduced considerably as compared to standard, cordless DECT telephones.
Preliminary Information Handset 87 1 2 3 4 5 6 7 8 9 10 11 12 13 14 15 16 17 18 4 1 Earpiece Display INT button Softkey, right Handsfree Scroll up Scroll right / Call list On−hook button Standby mode Digit keys # button / Ringing tone off Microphone * button / Key lock / Temporary tone dialling Call button (off−hook) Scroll down / Redialling Scroll left R−button (Flash) Softkey, left Loudspeaker (rear of the handset) Preliminary Information This chapter provides basic information on using t
Preliminary Information Remove the handset from the base station Place the handset in the base station Menu Depicts text in the display Depicts icons in the display Back Press the softkey, Page 95 Icons and texts in the handset display Icon Description On: Indicates the battery charge status. Run−through segments: The batteries are being charged, Page 93. On: Flashing: dd/mm hh:mm The alarm function is activated. The alarm is ringing. Display of date and time, Page 111.
Preliminary Information Standby mode 88 All descriptions in this operating manual assume that the handset is in Standby mode. The system switches to Standby mode by pressing the button. Energy−save mode When the handset has been in Standby mode for some time, it automatically switches to energy−save mode. The display no longer lights up. Press any button to reactivate Standby mode. Navigation buttons The softkeys (4) and (17) are assigned different functions in the different menus.
Telephoning Use the digit keys to enter numbers or letters Select Confirm the input Back Move one level back Cancel the programming/saving processes, activate Standby mode Every process is automatically cancelled if there is no input within 30 seconds. Creating phone book entries − example 90 Proceed as in this example for all the settings.
Telephoning It is also possible to press the Call button /Handsfree button first and wait for the dialling tone. The digits then entered are dialled immediately. It is not possible to correct wrong digits individually using this dialling procedure. Redialling The telephone stores the last 20 numbers dialled in a redialling list. For further information, Page 102.
Telephoning HS1: , Dial the internal call number during the or , Select HS2: HS1: conversation with the external caller Take the internal call on the other handset Switch between callers Making conference calls An external call can be transferred to another internal handset for a conference call.
Phone Book/Call List 2 sec. Activate the ringing melody Searching for the handset (Paging) If you have mislaid your handset, you can locate it again with the aid of a search tone. on the base Start the search tone or 6 or OK Stop the search tone Phone Book/Call List Phone Book You can use the phone book to store up to 100 phone numbers together with the associated names. Names can have a maximum of 12 characters and phone numbers a maximum of 24 digits.
Phone Book/Call List Storing a phone number in the call list in the phone book A phone number in the call list can be stored in the phone book directly.
Answering Machine , , Enter the name and continue Edit the number, if necessary, and continue / , OK Select the melody and confirm it Deleting phone numbers from the redialling list Deleting individual phone numbers , / , Select / Menu , Delete OK Open the redialling list and select the entry required , Select or Back Activate the deleting process Confirm the deleting process or cancel it Deleting all phone numbers , Select Menu , Delete All OK 7 Open the redialling list / , Sel
Answering Machine If new message have been recorded on your answering machine, your call is taken after maximally 2 rings. If no new message have been recorded on your answering machine, your call is taken after a minimum of 5 rings. Therefore, end the call before the 5th ring. This means that no charges ensue. Further information on remote access; Page 107. Screening incoming calls You can listen to an incoming call via the loudspeaker without actually taking the call.
Answering Machine ! or " Answer & Record / Answer Only , Select Select the required answering mode ! or " Record , Select Select the function and confirm it OK confirm it Speak your message loud and clear in the handset microphone. When the recording is finished, your message is played back loud. Reactivating the pre−recorded message Please note that your own message will be deleted automatically as a result .
Answering Machine Key function assignment, Playback menu 100 The following table provides an overview of the respective functions assigned to the individual buttons in the Playback menu.
Answering Machine Remote access 102 You can call your answering machine from another telephone to play messages or execute other functions. A condition is that you use a telephone which implements tone dialling. The remote access function must be activated; Page 25. PIN code for remote access The default setting of the PIN code is 0000". It is recommended to change the default PIN code 0000". Changing the PIN code; Page 25.
Answering Machine ' ) Play the next message Activate the answering machine + Play the previous message Stops playback of the current message * Switch off answering machine ( Stop the remote access function Stop the remote access function Operating via the base station Switching the answering machine on/off Switch the telephone answering machine on/off Setting the volume The volume can be set to one of 8 different volume levels.
PBX / Supplementary Services If new messages have been recorded, the recorded message indicator flashes. LA This appears when a handset is being used to adjust answering machine settings. This appears when a message is being recorded (number alternates with the total number of recorded messages, e.g.: 03).
Menu Structure Answering machine in the telephone network 104 An answering machine in the telephone network is a supplementary service offered by many telephone network providers. If your telephone network provider offers an answering machine in the telephone network for you, you are informed of new messages received by an icon (VMWI2). This function can only be used when your telephone network provider actually offers the service. Contact your network provider for further information.
Menu Structure PB Transfer Handset 1−6 108 Clock/Alarm Date & Time Date Format DD−MM−YYYY MM−DD−YYYY Time Format 12 Hours 24 Hours Alarm Set Date Set Time ( / AM/PM) Alarm On ( / AM/PM) Alarm Melody Melody 1 Alarm Off Melody 2 Melody 3 109 HS Settings Audio Setup Ring Setup Speaker Volume 1−5 Ear Volume 1−5 Internal Ring Melody 1−15 External Ring Melody 1−15 Ring Volume Tone Setup Language Off, 1−5 Key Tone Off/On Battery Low Off/On Out of Range Off/On Deutsch
Menu Structure Français Italiano English Rename HS Contrast Level 1−5 Auto Answer Off/On Call Barring PIN: SOS Number PIN: Select Base Base 1−4 HS Default PIN: Barring Mode Off/On Barring Number Number 1−4 Number1 Number2 Number3 OK/Back 110 Base Settings Delete HS PIN: Handset 1−6 Ring Setup Ring Melody Melody 1−5 Ring Volume Off, 1−5 Dial Mode Tone/Pulse Flash Time Short/Medium/Long Modify PIN Old PIN: New PIN: Confirm: First Ring Off/On BS Def
Menu Structure Registration Base PIN: Base PIN: Base PIN: Base PIN: 112 Answer Machine Playback Delete all Memo TAM On/Off On/Off TAM Settings Answer Mode Answer & Record Answer Only TAM Language Deutsch / Français OGM Settings Answer & Record Answer Only Answer Delay Time Saver, 2 Rings−9 Rings Recording Time 60 s / 120 s / 180 s / Unlimited Base Screening On/Off Remote Access On/Off Chg Remote PIN Old PIN: New PIN: Confirm: 113
Special Functions 10 Special Functions Dialling mode The telephone can be operated in analogue exchanges (PULSE mode) as well as new, digital exchanges (TONE/DTMF mode). The dialling mode is controlled via the menu. Refer to Page 112 for the sequence of menu option selections. Temporary tone dialling If you only operate the telephone using the PULSE dialling mode, you can still make use of the advantages of TONE dialling mode (e.g.: remote access of the answering machine in the telephone network).
Extending the Telephone System / , OK Select / Cancel Select the handset and confirm Confirm or cancel the action on the receiving handset 11 Extending the Telephone System The internationally approved GAP1 standard regulates the compatibility of handsets and base stations from different manufacturers. As a result, it is possible to integrate SWITEL devices and devices from other manufacturers together in one telephone system. It is possible, however, that some functions are not available.
In Case of Problems 12 In Case of Problems Service Hotline Should problems arise with the telephone, please refer to the following information first. In the case of technical problems, you can contact our hotline service, Tel. 0900 00 1675 within Switzerland (cost via Swisscom at time of going to print: CHF 2.00/min). In the case of claims under the terms of guarantee, contact your sales outlet. There is a 2 year period of guarantee.
Technical Properties The answering machine does not record any messages − Ensure that the answering machine is connected correctly and switched on. − Check whether the answering machine memory is full. Delete messages from the memory, if necessary Page 113. No remote access functions can be executed − Check that the correct security code has been entered for the remote access Page 113. − The telephone used for remote access must be set to Tone dialling mode.
Technical Properties Default settings Handset The default settings can be restored via the menu. Refer to Page 111 for the sequence of menu option selections. Ring Volume Level 3 Ear Volume Level 3 External Ring Melody 1 Speaker Volume Level 3 Internal Ring Melody 2 Contrast Level 3 Key Tone On Out of Range On Battery Low On First Ring On Name: DFT 8271 Language Deutsch Base station The default settings can be restored via the menu.
Maintenance / Guarantee 14 Maintenance / Guarantee Maintenance Clean the housing surfaces with a soft, fluff−free cloth. Do not use any cleaning agents or solvents. Guarantee SWITEL equipment is produced and tested according to the latest production methods. The implementation of carefully chosen materials and highly developed technologies ensure trouble−free functioning and a long service life.
Declaration of Conformity 113 Diese Anlage entspricht der europäischen R&TTE Richtlinie. Für die komplette Konformitätserklärung nutzen Sie bitte den kostenlosen Download von unserer Website www.switel.com. Cet équipement est conforme à la directive européenne R&TTE. Pour obtenir la déclaration de conformité intégrale, veuillez vous servir du téléchargement gratuit de notre site Internet www.switel.com. Quest’apparecchiatura è conforme alla direttiva europea R&TTE.