SM-900 USER GUIDE SWR • CORONA, CA • USA
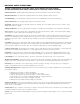
IMPORTANT SAFETY INSTRUCTIONS CAUTION: TO REDUCE RISK OF ELECTRIC SHOCK, DO NOT REMOVE THE COVER OR BACK. NO USER-SERVICEABLE PARTS INSIDE. PLEASE REFER TO A QUALIFIED SERVICE TECHNICIAN. A. Read Instructions: All safety and operation instructions should be read before the product is operated. B. Retain Instructions: The safety and operating instructions should be retained for future reference. C. Heed Warnings: All of the warnings on this product and in the operating instructions should be adhered to. D.
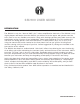
SM-900 USER GUIDE INTRODUCTION The SM-900 is truly the “State of SWR’s Art” in bass amplification electronics. The SM-900 is only slightly deeper and heavier than the SM-500, yet delivers twice the power and includes new features such as our very flexible tone section. Along with shelving-type Bass and Treble controls, the equalization section consists of two independent 3-band semi-parametric EQs.
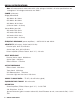
SM-900 SPECIFICATIONS Note: All measurements were taken with a line voltage of 120VAC. All noise specifications are “unweighted.” All voltages and watts are “RMS.
THERMAL PROTECTION: Both natural convection and thermostatically controled forced air (cooling fan). The internal fan is set to operate when the heatsink reaches 50 degrees centigrade and will automatically shut off upon cooling. This allows silent operation in the studio or other low volume conditions. COUPLING CAPACITORS IN SIGNAL PATH (input to output jacks): Quantity: 5 Type: High-grade metallized polyester, made in Germany TUBE COMPLEMENT: One (1) specially-selected 12AX7 vacuum tube (valve).
neither the preamp clip LED or the power amp clip LED are activated, try using the Active input jack. Note: If you would like to overdrive the first TUBE stage, this can be accomplished by using an external preamp between your instrument and the Passive input. To obtain optimum sound when trying this, make sure the preamp clip LED is not activated. If this occurs, turn down your Gain control. The first preamp tube stage is NOT monitored by the preamp clip circuit for this reason.
guitar, reduce certain frequencies that help mask the fundamentals, and enhance the high end transients. Basically a tone-shaping control, the Aural Enhancer is a passive R/C network that alters the frequency response throughout the bass spectrum. This pre-shaping is "blended" into the original signal via the Aural Enhancer Control. Exact frequencies affected are dependent on the characteristics of the instrument used.
drum! You want to wake up the guitar player who’s been drilling your ears with his Marshall all night! Turn to the FIRST band of the semi-parametric EQ. Set the frequency knob to approximately 60Hz (9 o’clock). Boost the Level control to about +6 dB (3 o’clock). This should provide the air and impact to carry the notes. To clean up the midrange, adjust the frequency control of the middle band on EQ 1 to 800 Hz (3 o’clock). Adjust the Level control to –8 dB (8:30).
BASS AND TREBLE CONTROLS The Bass control cuts or boosts the lower or bass frequencies. Starting at mid-position, turning the control counter-clockwise cuts the bass response and turning the control clockwise boosts the bass response. The Bass control is a “shelving” type tone control, with the shelving point set at about 120Hz. The Treble control is also a shelving tone control whose shelving point is about 2.5kHz.
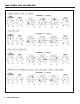
TONE CHARTS AND SUGGESTIONS 8 • SM-900 USER GUIDE
SM-900 USER GUIDE • 9
TONE CHARTS AND SUGGESTIONS The following two pages include suggested settings to get you acquainted with the limitless variety of tones possible with the SM-900. By setting EQ 1 to the “Acoustic 360” and EQ 2 to the “Grand Piano” settings, for example, you can switch back and forth with the footswitch and see the variety of diverse sounds available to you on the SM-900.
turn this control clockwise, more of the effect can be heard in the overall sound. When the Blend knob is fully clockwise (“wet”), no true or unaffected signal is heard other than what your effects unit provides. The Effects Blend circuit is similar to that used on recording consoles with the effects loop on a “side chain” to the normal circuit. Unless the control is set to the fully “wet” position, you will always get the full sound of your instrument and get the diversity that an effects unit offers.
SM-900 models with a serial number of 2706 and greater are compatible with Phantom Powerequipped mixing consoles. LINE/DIRECT SWITCH In the “Direct” position of this switch, the XLR is essentially an active tube direct box, and the signal is taken directly from the input jacks. Controls on the front panel DO NOT affect the sound, volume or content of the signal. In the “Line” position, ALL controls on the front panel (except the Effects Blend and Master Volume), affect the signal.
effects returns (i.e., one cable from the “High” out jack to the Left stereo effects return, and one cable from the “Low” out to the Right stereo effects return). In this configuration, connect your low end speakers (woofers) to the Right speaker output jacks, and your high end speakers (midrange/tweeters) to the Left speaker output jacks. Use the Balance control on the front panel to even out the highs and lows (see diagram on page 19). Note: The Effects Blend control must be in the fully “wet” position.
in mono, move the switch to the bottom “Bridge/Mono” position. Your speakers must then be plugged into the Speakon® jack marked “Bridge” (see diagram, page 17). We recommend using caution when connecting your system in “Bridge/Mono” mode. Because the SM-900 delivers 650 watts RMS minimum into 8 ohms and 900 watts minimum into 4 ohms, damage can result very quickly to speakers not capable of handling this much power.
and damage itself (and/or your speakers), and render the cables useless for any purpose. BRIDGE MODE SPEAKON® JACK The Speakon® jack located directly below the Power Amp Assign switch (in the center of the Speaker Output Section) is provided for use in the Bridge Mode only. A six foot speaker cable (Speakon-to- Speakon) is provided with the SM-900 for your convenience. Please make sure that all connections are complete before turning the SM-900’s power switch to the “On” position.
RACK MOUNTING YOUR SM-900 SWR’s SM-900 is rackmountable, requiring no additional parts or accessories, other than rack screws and the rack case itself. By installing your SM-900 in a rack case, you will help preserve its beauty and protect the amp from accidental physical damage. The SM-900 should be mounted as close to the bottom of the rack case as possible.
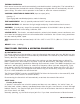
SM-900 Bridge Mode Operation Diagram Note: When the power amp assign switch is set to the Bridge/Mono position, only the center Speakon output jack may be used. The SM-900 delivers a minimum of 900 Watts RMS into a 4 ohm load, and 650 Watts RMS into an 8 ohm load. Please make sure that your speaker system is capable of handling this amount of power. Power Amp Assign Switch set to “Bridge Mono” position.
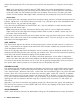
18 • SM-900 USER GUIDE SM-900 Stereo Mode Operation Diagram Note: When the power amp assign switch is set to the “Stereo” position, only the right and left Speakon output jacks or left and right 1/4” output jacks may be used. Do not use the center Speakon jack as it is provided for Bridge/Mono operation only. Power Amp Assign Switch set to “Stereo” position.
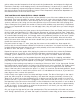
SM-900 Bi-Amp Operation Diagram For Bi-Amp operation, the power amp assign switch must be set to the “Stereo” position, only the right and left Speakon output jacks or left and right 1/4” output jacks may be used. Shielded Patch Cable from High X-Over Output to Left Stereo Effects Return Power Amp Assign Switch set to “Stereo” position.
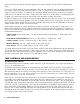
20 • SM-900 USER GUIDE SM-900 Stereo Effects Patching Diagram Shielded Patch Cable from Left Effects Out of Effects Unit to Left Stereo Effects Return Right Out Left Out Stereo Effects Unit Mono In Power Amp Assign Switch set to “Stereo” position.
SM-900 LIMITED WARRANTY The SM-900 from SWR is warranted to the original consumer purchaser for TWO YEARS from the date of purchase against defects in materials and workmanship, provided that it is purchased from an Authorized SWR dealer. This warranty applies only to products purchased in the USA or Canada.