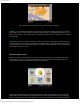
Sygic GPS navigation Overview Products Download About us Basics of Sygic Navigation Jobs Help | Useful function | Settings Sygic navigation is very easy to use and it takes you just few steps to understand how it works. There are also some new features in the latest version which we would like to show you and you may not already know. We hope this would be an useful reference for you. For any other questions please contact us.
Sygic GPS navigation * These information are showed only if you have already computed a route If you see only grey screen after launch instead of your current map position, you should probably check your GPS status first and wait for valid GPS signal. It takes some time to get valid signal from available satellites. First of all tap on the grey screen to open the Main menu and find GPS status button.
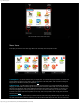
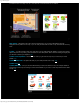
Sygic GPS navigation This is the first screen of the main menu. Menu Items In this part you will learn about each Sygic Menu item and briefly about its specific function. 1) Navigate to - you will be asked to enter your target point. You can write directly the address, or choose from several options like point on map, history, points of interests or enter GPS position. After successful entering the target point you will have to choose your departure.
Sygic GPS navigation with the route button, alternative route button is also available after you'll plan your main route. (up) 4) Settings - you can easily modify user interface with plenty of settings options – turn of/on the sounds, switch to night colors, swtich from 3D view to view from top, backlight settings, rotate display, set different languages, set keyboard or load other maps and many more.
Sygic GPS navigation how does the Navigate To function work using the Point on Map option. Step 2. Now it's just up to you which option to choose. (Step3) Find the Point on Map button and simply just click on it. Step 3. Click on the button with chosen option (in this case Point on Map). (Step4) You are turned on the browse map mode immediately and you are able to scroll the entire map by tapping on it. There's also a zoom in/out scroolbar on the right side of the screen for better view.
Sygic GPS navigation Step 4. Browse the map and find your target - POI, street name, location etc. (Step5) If you have already find the location or target where you want to be navigated, simply just tap on the Done button. Right now you are asked to select your departure place from where your navigation will get started. You can choose from three options - wait for valid signal, last valid position or select from map. In this case we use the Select from map option.
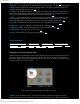
Sygic GPS navigation of selected location. Use Map cursor as a useful informer on selected street, POI or whatever. Map options - Map options menu offers several useful features. You can enter valid address and Sygic Navigation finds its position on the map, or you can easily set which POIs to show on map and which not and many more. 1) Find... - you will be asked to enter your target point.
Sygic GPS navigation Context menu - context menu contains several options for target that is currently selected by Map cursor. 1) Navigate there - tap this button if you want to be navigated to the selected target on map. Select your departure and Sygic navigation will compute your route.(up) 2) Travel via - function is available only if you have already computed a route. It's ideal for when you want to go to some specific locations which are not presented on your route yet.
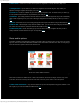
Sygic GPS navigation Show route instructions 2) Show route as images - another great tool that allows you to show the whole route in several image slides. Each turning point is viewed on its own image slide with detailed information - distance from the last turning point, street name. You can also use several different tools that makes this function even more useful. There is a zoom out/zoom in option available - tap the minus or plus icon on the top of the screen.
Sygic GPS navigation Show on map 4) Show route demo - demonstration allows you to simulate your own route. You can make route preview in full 3D view and see how does the route information change while driving. First of all click on the Show route demo button in the Route menu. Then you will see the Route demonstration screen with several options -demonstration speed, automatic replay, play/stop/pause functions. Set your optimum speed and simply tap on the Start demonstration button.
Sygic GPS navigation Show route summary 6) Cancel route - useful information about your route - distance, time left and other details.(up) How to plan a complex route using Itinerary function (Step 1) Itinerary is perfect tool to plan your complex route. Plan your business journey easily and effectively, choose prefered options - avoid toll roads, motorways, restricted areas etc. First of all click on the Itinerary button in the Main menu. Step 1.
Sygic GPS navigation Step 2. Click on the current route to start managing your Itinerary items - waypoints (Step 3) Manage itinerary allows you to insert waypoints into your Itinerary plan and also modify them using Itinerary options menu. First of all you should type a name of your first Itinerary. So tap the Options button in the Manage itinerary menu and then in the Itinerary options menu tap the Save itinerary buttion. Step 3.
Sygic GPS navigation (Step 5) In the next step you can choose type of your desired waypoint - it could be a specific street address, point of interest (POI), zip code, point on map, city center, exact GPS position or others. Choose for example Point on map option if you don't know exact street name and just define the target area. Step 5. Choose waypoint type (Step 6) When you successfully add your waypoint it should also appear in the Manage itinerary menu. Repeat the process to insert more waypoints.
Sygic GPS navigation 3) Add nearby POI - add to your waypoint nearby Points Of Interests - nearest hotel, restaurant, petrol station many others.(up) 4) Delete - if you don't want current waypoint in Itinerary just tap on Delete button.(up) 5) Move up - move selected waypoint up in the Itinerary sequence. Function works only if you have more than one itinerary item. (up) 6) Move down - move selected waypoint down in the Itinerary sequence.
Sygic GPS navigation Click on Manage POI icon in the Main menu to show up its options. Add POI - insert your personal POIs into map. Choose from several options - type exact street address, point on map, home location, history and so on. Very useful is while driving to memorize current position and then add this position as POI from History. Edit POI name - rename your own saved POIs. Delete POI - to erase your saved POIs individually.
Sygic GPS navigation Click on Manage POI icon in the Main menu to show up its options. While driving you can save all your current positions into History (memory of History is limited for 30 saved items). This is very helpful in the future when you will don't have to spend time searching this position on map or typing its exact street address while navigating.
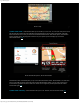
Sygic GPS navigation then select History option and search for your Memorized position in the list. GPS status GPS status screen informs you about available satellites and their validity. Satellites marked with green color are valid for computing your GPS position and, grey satellites are blocked or don't have any valid signal. Hardware settings Properly configured Hardware settings are necessary for proper running your GPS machine.
Sygic GPS navigation 1) COM port - set your COM port depending on your hardware configuration, if you don't know which COM port to use, contact your hardware manufacturer or local hardware dealer. COM port depends on your hardware device and not on navigation software. 2) Baud rate - configure your baud rate (transfer speed), default baud rates are 4800 or 9600. If you have problem with configuring your baud rate you should contact your hardware manufacturer or local hardware dealer.
Sygic GPS navigation This chapter is dedicated to Settings menu where you can modify Sygic Navigation and user's preferences. You will learn how to manage GPS, switch between day & night colors, set language and how to use many other useful functions and options. Click on the Settings icon in the Main menu. View from top - you will see the map from the air perspective. 3D view - switch from air view to full 3D perspective for better map details.
Sygic GPS navigation GPS Logs - you can record your GPS positions and play them again. Planning preferences you can set how your route will be computed - wheter to always plan the fastest route, avoid motorways etc. Toll charge settings set wheter to avoid toll roads everytime, never or to ask everytime. Set vehicle type select from 4 options - passenger car, taxi, transport truck or delivery truck.
Sygic GPS navigation Contacts \\ Activate my product \\ About Sygic \\ Copyright (c) 2002-2007 Sygic, s.r.o. All rights reserved. http://www.sygic.com/manuals/manual_en.