User Guide Sygic GPS Navigation v 12.1 (PND/InDash) © 2012 Sygic, a.s. All rights reserved.
I. Getting Started................................................................................................................ 3 Menu ...................................................................................................................................................4 Map browsing mode .....................................................................................................................4 Navigation Mode - Turn by Turn Navigation ..............................................
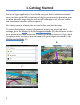
I. Getting Started Run your Sygic application. You should use your device outdoors to make sure you have good GPS reception and device can precisely determine your location (tunnels, large objects such as tall buildings, trees, electric cables can sometimes interfere with reception). For safety reasons, always plan a route before you start driving. To select destinations, review information about your route and alter settings, go to the Menu (A).
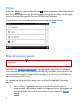
Menu Enter the Menu by tapping the list icon on the right side of the information bar. You can scroll between the menu pages using the scroll bar on the right side on Personal Navigation Devices (PNDs) and InDashes. If you want to return to the previous screen, tap the Back button. Map browsing mode Please note, that symbol connection. specify functionality available for devices with internet Switch to the map browsing mode by dragging the map with your fingers.
2. 3. 4. POI – choose any POI directly on the map and select what to do next Panoramio photo – you can choose any Panoramio photo by tapping on it directly on the map Friend - You can tap on friend’s avatar directly on the map and choose next action from Action menu After tapping on interactive objects on map, information bubble will appear above. When you tap information bubble, you can select desired action from Action menu.
In a map browsing mode you can use also following features: 1. Compass Use compass at the bottom of the screen to turn around and change direction of the view. Tap on the compass to return the map to the north-up position. 2. Quick Search Tap the Search icon in the middle of your map browsing bar and type the name of the object you want to search – searches amongst streets, cities, POIs, Google local search... 3.
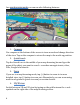
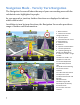
Navigation Mode - Turn by Turn Navigation The Navigation Screen will show the map of your surrounding area with the calculated route highlighted in purple. As you approach a junction, further directions are displayed to indicate which road to take. In addition to turn by turn directions, the Navigation Screen also provides a range of further useful information: 1. Next maneuver 2. Distance to the next change of direction 3. Current Speed 4. Estimated time of arrival at the destination 5.
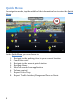
Quick Menu In navigation mode, tap the middle of the information bar to enter the Quick Menu. In the Quick Menu, you can choose to: 1. 2. 3. 4. 5. 6. 7. 8.
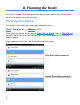
II. Planning the Route In order to reduce distractions and to ensure your own safety, always plan your route before you start driving. Entering an Address To set your destination by entering its address select: Menu > Navigate to… > Address or POI Then you can choose from options Select City or Postal Code or Select Street directly. Enter the first few letters of the City/Street name to see a list of similar names. Sygic supports City-first and Street-first address entry.
Then you can enter exact house number or select from additional options as listed bellow. The list also features explanatory icons left to the city/street name: City Street Capital city Street crossing City center Middle of street Select the desired city/street from the list. Tap on POI to see a list of all points of interest near selected address.
For more information about Action Menu, see the chapter Action Menu. To select a different address altogether, tap the Back button. Another possibility to select desired destination is to tap the street at exact place you want to navigate to directly on the map in a Map Browsing Mode. An information bubble will appear above the highlighted street. Tap on the informaton bubble and select desired action from Action Menu.
If your device can determine your current position, your route will be calculated immediately from that position. If your current position cannot be determined, you will be offered the following options: Wait for valid position (Recommended) Your route will be calculated from your current position as soon as a valid GPS signal is available (see the chapter Acquiring GPS Signal). Last valid position Your route will be calculated from your last known position (i.e.
Avoid toll roads, Avoid motorways, Avoid ferries; Avoid special area, Avoid unpaved roads, Avoid restricted area, Manage Traffic incidents on route (Availability of the traffic service depends on your product configuration and traffic providers.) See list of Important places Show all instructions Change start point Show on map Travel via Optimize route Weather forecast Save route To accept the route and start turn by turn navigation, tap Done. If you wish to return to planned route go to Menu > Route.
Drive to Set selected location as destination and calculate route for car navigation. Walk there Set selected location as destination, switches to walking mode and calculate pedestrian route. Travel via Insert a waypoint to an existing route. More actions Nearby POI Searches POIs near selected location or last valid position. Show on map Not available from Map Browsing Mode. Add to favourites Add selected location to the list of favorite destinations.
Acquiring GPS Position If there is no GPS signal, the GPS signal indicator on the left side of the screen will show empty bars. This can happen under any of the following conditions: ■ The device is in a tunnel or at a location where signals from the GPS satellites are obstructed by buildings, trees, electric cables or other objects. ■ Device system settings or Product Settings are set incorrectly.
Searching POI by Name Anytime during the search process, you can start typing the name of POI (tap the search icon to show the keyboard) to refine the results. Searching POI by Categories You can switch between List view (shows narrow list of POIs) and Groups view (shows POI categories and subcategories). To refine your search results, tap the search icon at the bottom of the screen and type the name of the POI you are looking for. You can also enter partial names. When finished, the Action Menu pops up.
POI groups POI list Search POI by name Navigating to POIs on route POI on route lets you know, how far available POIs on your route are from your current location. When you have your route calculated, or anytime during navigation, you can access available POI on route by tapping on the map in the Navigation Mode. Side Menu with available POIs on route will appear on the left side of the navigation screen.
Anytime during the navigation you can tap on the map to unhide the side menu with available POIs on route. Tap on the POI on route available in the side menu and list of POIs on your route, listed by proximity to your current location, will appear. Select a POI which you would like to add to your already calculated route as a waypoint. From the Action Menu choose the Travel via option. A waypoint has been added to your route.
POIs like petrol stations and rest areas are set as POIs on route by default. You can set your own POIs on route and choose from any POI category in: Menu > Settings > Map > POI on route > Select categories Here you can also disable this feature.
If you don’t enter any key words into the search bar, Google local search will provide a list of all POIs prioritised by proximity related to your location. To enhance your search results and make your POI search easier and more effective, enter the key words that describe POI you are searching for. Google local search will list results prioritised by proximity related to your location. Select the POI from search results and choose desired action from Action Menu.
Navigating to Photo You can also navigate to any Panoramio photo displayed on the map. This way you don’t need to enter the exact address, or street name. In a map browsing mode tap on the Panoramio photo of your interest directly on the map. Enlarged window with the selected photo will appear. After you tap on the photo, Action Menu will pop up and you can choose what to do next.
Panoramio photos are turned off by default. In order to see the Panoramio photos on the map, you must change this setting in the Settings menu: Settings > Map > Photos Turn the Photos button on. Panoramio photos are connected feature, so they can be viewed only in the online mode. Navigating Home To start using this feature, you need to set your home location first, select: Menu > Navigate to… > Home Once your home address is stored, you can navigate home from the same dialogue.
If you wish to change your Home address, tap the Set button. Navigating to Recent Destinations Sygic keeps track of your recent destinations, making it easy to return to a previously set location. When entering an address through: Menu > Navigate to…> ,Address or POI the last entered address is preselected. If you are selecting City or Street, the list of previous selections appears.
and start navigation by selecting a previous destination from the list shown. Tap on the item and select action. Navigating to Favourite Destinations To view a list of your favourite destinations, select: Menu > Navigate to…> Favourites You can start navigation by selecting a Favourite destination from the list shown.
Select the desired Favourite destination by tapping it and then select your next option from the Action Menu. Defining a new Favourite destination To add a new item to the list of your Favourite destinations, tap on Add, then set address by choosing from following options: - My current position, - Select from map, or - Enter address. Save your current position You can save your current position and get back to it later.
You can later get back to this saved position by tapping on the current position indicator again and tap on Navigate to saved position button. Action Menu will appear and you can choose your next action. This way you can also browse among nearby POIs, add this location to favourites, share location or add POI.
III. Altering the Route Route Summary You can access detailed information about the calculated route from the Route menu. Select Menu > Route: Cancel route Access Route options Access POI on route Avoid toll roads, Avoid motorways, Avoid ferries; Avoid special area, Avoid unpaved roads, Avoid restricted area, Manage Traffic incidents on route (Availability of the traffic service depends on your product configuration.) See list of Important places like waypoints, crossings and cities near the route.
In the section Important places you can see a list of important junctions and places along the route. To get a detailed list of all junctions and directions along the route, select Show all instructions. Tap on selected item on the list to view the junction on the map. Route options In Route options, you can perforom various actions and changes concerning your calculated route. To see the entire route on the map, select Route options > Show on map.
You can also check the entire calculated route instruction by instruction, by tapping on the little white arrows on the top left and right corners of the screen, before you tap on the Done button, during the route calculation. To see how far and in which direction is your destination point or a start point from your current location or from any point you tap on map, zoom in for more detailed view and you will see distance markers icons of your start point and destination point somewhere on the screen.
You can also quickly switch between start and end point of your route by clicking on these distance markers. Distance markers: 1. Start point 2. End point/destination To see detailed weather forecast for seven days, select Route options > Weather forecast. To see the calculated route as if you were driving along (fly over mode), select Route options >Demonstrate. To save the route, select: Menu > Route options > Save route. Application will suggest a name for this saved route.
To load any of your saved routes, you need to cancel any calculated route in the application.
Tap the Done button and previously saved route will load. If you won’t need any of the saved routes any more, you can choose to delete that particular route from your saved routes. In order to delete a previously saved route, you need to cancel any calculated route beforehand. Go to: Menu > Route > Cancel route Then go to: Menu > Route > Delete route Tap on the particular route you want to delete and confirm deletion.
Modifying the Route If you wish to travel through a certain place on your trip, choose from following options: - Travel via in Action Menu. (For more information, see the chapter Action Menu.) tap on Add waypoint in Route summary and set address by choosing from following options: o My current position, o Select from map, o or Enter address To optimize a route with multiple waypoints, select Optimize route. This option is only available if the route planned contains more than two waypoints.
You can modify those parts of the route that are listed as Important places. Tap on selected item and a variation of following menu will appear: Show on map Delete waypoint Avoid Avoid parts of the route with special attributes like toll roads, highways, ferries, special areas, unpaved roads or restricted areas. Manage Traffic incidents Change waypoint Move waypoint up Move waypoint down Change start point (This option is available only when the selected item is the start point.
Avoid toll roads, highways or ferries To Avoid toll roads, Avoid motorways, Avoid ferries, Avoid special area, Avoid unpaved roads, or Avoid restricted area, tap on the icons shown in the route summary.
Situations that change preferences of the route calculation, such as toll roads, ferries, restricted area etc. and can be avoided, will be listed amongst avoid items. E.g. you can either avoid all toll roads on the route, or just for selected area. Your route will get recalculated and this particular section will be avoided.
If you have added some waypoints to your route, you can avoid these sections for each waypoint separately. If your route is passing through several countries, you can also apply any of the avoid options (avoid toll roads, highways, ferries, special area, unpaved roads, restricted area or avoid the whole country) for each country separately. E.g. you can avoid all toll roads for the selected country.
Tap on the flag of the country and specify which avoid options to apply (e.g. toll roads). You can also avoid navigating through the whole country, unless it’s a country of your destination or start point. In such situation you can only avoid certain avoid points, if available.
Menu > Route > Cancel route 39
IV. Online features The entire chapter Online features applies only to devices with internet connectivity. Connection In order to use online services (e.g. Real-Time Traffic and safety camera alerts) you will need to connect your device to the internet. Select: Menu > Settings > Connection Enable Connection to go online. To connect automatically, enable option Sign me in automatically.
Reporting speed cameras and incidents If you observe a speed camera or traffic incident on route, tap the bottom bar of the Navigation Screen. Quick Menu will appear. Report the Police Trap by tapping on the Police Trap icon. Reported Police Trap will appear on the map instantly and can be viewed by other users. To report an incident or a dangerous place, tap on the incident icon. Reported incident/dangerous place will appear instantly.
For more information, visit www.policetraps.
Weather Information To check the weather information, select: Menu > Route > Route options > Weather forecast Other way to check the weather at your destination is to go to: Menu > Route Your destination is listed amongst important places as a last one and contains the weather information at your destination.
V. Community The entire chapter Community applies only to devices with internet connectivity. Friends To add friends go to: Menu > My community > Friends Tap on Add. To search for your friends among the growing Sygic community tap on Search by name or email and enter the name. The list of possible results will appear. Tap on chosen name and tap on Add to compose an invitation message. Tap on Send e-mail invitation to invite your friend by email. To add your Facebook friends tap on Match Facebook friends.
When you receive a friend request it will be displayed in: Menu > My community > Events Tap on event to accept or deny the request. Share your status To set your status and share it with friends go to Menu > My community > My status Tap on Status and choose one of the options. Tap on Status message to share your mood with other friends.
To edit or add details into your profile tap on My profile. Send messages To send, view and delete messages go to Menu > My community > Messages The screen will show the most recent messages grouped by sender. To view all messages from certain person tap on the name of the sender. To send a message to your friend, tap on Compose, choose a name of a receiver from your friends list and tap on Done button. On the following screen click on Messages, write your message and tap on Done button.
You can choose to Reply to a message or Remove message by taping on it. To delete all messages from this sender tap on Remove All. Quick Share Sygic enables you to share your current position or any other location with others via Quick share.
Enter the necessary information and tap on Share button.
IV. RDS-TMC Traffic alerts The entire chapter Traffic alerts applies only to PNDs with the RDS-TMC hardware support. Availability of the RDS-TMC Traffic is country specific and depends on providers.
To show its extent on the map tap on Show on map, to avoid it tap Avoid. Traffic info is displayed also on the Route Progress Bar. Route Progress is normally violet, but if there is a traffic incident on route or changed traffic flow, it will change color to green, yellow or red, depending on the impact of a traffic incident or congestion.
- Green traffic notification –indicates, that areas with usual traffic delays and congestions are at the moment without delays or with just insignificant delays - Yellow traffic notification – small to medium delays - Red traffic notification – heavy congestions, bigger delays - Hatched red and black traffic notification – permanently closed roads Acquiring TMC RDS messages If there is a hardware support for the reception of RDS TMC messages, the navigation software will automatically search for a TMC tr
When the TMC messages are received, they are automatically showed on a map and in the traffic dialogs (see the Chapter Real-Time Traffic and TMC RDS Traffic alerts): Menu > Info > Traffic Menu > Route > Traffic info You can check the status of your TMC reception in: Menu > Settings > Hardware – the section TMC hardware Menu > Settings > Hardware > Tuner Having the Automatic Search set on a receiving station is tuned automatically.
VI. Additional Information SOS/Help In a case of an emergency use the SOS / Help button, to indicate your precise location, or last known position if you don’t have a valid GPS signal. Menu > Info > SOS / Help You can view this position on a map or view a list of institutions which you may need in a case of an emergency.
Travel book To see traveled routes statistics and altitude profiles, go to Menu > Info > Travel book Tap on selected log to see overall statistics Scroll down for more actions.
Tap on Graphs and drag the blue marker to see logs marking altitude, distance, time, speed and acceleration. To see the log on map tap on Show on map. To add the log to favorites tap on Add to favourites.
VII. Settings IMPORTANT: Menu items marked with * are not available in all devices. To change factory settings, go to Menu > Settings. Notifications & Sounds Enable sounds or Disable sounds Voice instructions – set if street names, road numbers, traffic notifications should be transformed into spoken text (TTS feature if available) Volume settings* - set the sound intensity separately for low driving speed and for high speeds.
automatic switching between them. Map details Choose which Points of interest should be visible on map Buildings - you can set buildings to elevated mode or to footprint, or simply turn it off.
Connection Connect or Disconnect your device from internet Change password Create New Account Account options Clear login data Sign me in automatically Ask before connecting Enable data roaming Route planning Avoid toll roads - Set the preference of paid road segments: avoid them, do not avoid them, or always ask. Avoid unpaved roads - Set the preference of unpaved roads: avoid them, do not avoid them, or always ask.
avoid incidents automatically. Regional Voice - language of voice instructions Language - language of user interface. Distance units – switch between kilometers, Miles/Feet, Miles/Yards Time format – switch between various time formats Temperature – switch between various temperature formats GPS coordinates – switch between various GPS coordinates formats Battery management Set energy saving preferences for device On external power and On battery. Hardware Settings for advanced users only.
Travel book Set laps while in walking mode to be Stopwatch triggered, Distance triggered or on automatic Lap detection. For more information, see the chapter Travel book. Information bar Choose which parameters should be visible on which place on Information bar in driving or walking mode (ETA, Remaining distance, Speed, Signal level) Autoclose dialog Dialogs will be hidden automatically after specified time. About Information about version, device code and available application memory.
Disclaimer The information contained in this document is the property of Sygic a.s. and may be used only for the purposes of operating and supporting the relevant software created by Sygic a.s. Sygic a.s. reserves all rights concerning the information contained herein. This document or any part thereof may not be reproduced, distributed, or translated into other languages in any way or form except with the written approval of Sygic a.s. This document is provided to the user on an ‘as is’ basis.