
User manual


16.5 Install batteries
If an insulation strip is visible after unpacking, pull the strip to activate the battery. In this case battery installation is not
necessary. Install the battery as follows:
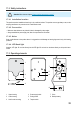
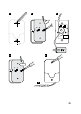
1. Turn the product over.
2. Push the battery carriage lock (5) to the right, then pull out the battery carriage (4).
3. Place a new battery onto the carriage with the (+) pole facing up (see + marking on carriage).
4. Slide the carriage back into the battery compartment until it locks.
5. The product is ready for operation.
16.6 Operation
16.6.1 Pairing
Follow section 9.7 Link a sensor to the gateway on page 11 to pair the product with the Gateway.
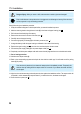
16.6.2 Trigger action
• Refer to the app manual and assign an action to an operation key (2). Assign up to four actions, one action per key.
• When you are within reception range to the gateway press an assigned key to trigger the action. The indicator
light (1) ashes.
16.7 Care and cleaning
Do not use any aggressive cleaning agents, rubbing alcohol or other chemical solutions as they can
cause damage to the housing and malfunctioning.
Clean product with a dry, bre-free cloth.
16.8 Technical data
Battery ..............................................................1x CR2025 button cell battery
Communication technology ..............................sub-G (868 MHz)
Transmission range ..........................................max. 100 m (line of sight)
Transmission power..........................................-8±2 dBm
Operating conditions .........................................-10 to 55 °C, 10 – 90 % RH (non-condensing)
Storage conditions ............................................-10 to 60 °C, 5 – 90 % RH (non-condensing)
Dimensions (W x H x D) ...................................31 x 12 x 58 mm
Weight ..............................................................approx. 16 g
31