
User manual


The home technology brand for the entire house. More information at www.sygonix.com
These operating instructions are a publication by Sygonix GmbH, Nordring 98a, 90409 Nürnberg (www.sygonix.com).
All rights including translation reserved. Reproduction by any method, e.g. photocopy, microfi lming, or the capture
in electronic data processing systems require the prior written approval by the editor. Reprinting, also in part, is
prohibited. These operating instructions represent the technical status at the time of printing. Changes in techno-
logy and equipment reserved. © Copyright 2012 by Sygonix GmbH.
Nr. 34338C - Version 06/12Legal notice
Installation and Connection
Pay attention to the information in the chapter "Preparation for
installation"!
• Think about the arrangement of the LED light e.g. in the room ceiling. Plan the instal-
lation location carefully, if you want to install more than one LED light (lighting the
entrance area or the like, for instance).
• Mark the opening required for installation (for diameter, see "Technical Data"). Use a
keyhole saw, for instance, to cut out the hole.
Our tip:
While installing the LED light in a ceiling panel check the correct hole diameter
at an offcut for safety reasons. It is very frustrating to drill a hole bigger than
the one needed in an expensive and high quality ceiling panel.
• For instance, put the ceiling panel in place and guide the power line through the
borehole.
• Connect the two power cables of the LED light to the mains supply. The red cable
must be connected to the positive pole (+), the black cable to the negative pole (-).
Use suitable terminals or plugs, so as to prevent any short circuit.
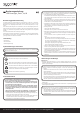
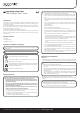
Caution!
The LED light can be operated only with a constant current source (also called
LED driver). Refer to chapter "Technical Data" for relevant details.
Never use a commercially available halogen transformer or power supply unit,
this will destroy the LED light!
In case of doubt, consult a specialist.
• Insert the LED light in the prepared installation hole.
To this end, bend the retaining bracket upwards and plug it, for example through the
hole in the ceiling panel.
Slide in the LED light until it is well-fi tted in the hole; in the process, the tilt the
brackets downwards and fi x the LED light in the installation hole.
Make sure the connection cables are not squeezed.
• Turn on the power supply to the LED driver (constant power supply) and check
whether the LED light is functioning properly.
If the LEDs do not light up, then turn off the power supply immediately.
Then, check the connection of the LED light (correct polarity, red cable of the LED
light = plus/+, black cable = minus/-).
Maintenance and Care
• The product does not require maintenance. The LEDs have a very long service life
and cannot be replaced.
• Prior to cleaning (e.g. to remove dust from the light-emitting opening), the LED light
should be turned off or the power supply disconnected. Then, allow the LED light to
cool down suffi ciently.
• The exterior of the LED light should only be wiped with a clean, soft, dry cloth. Do
not use aggressive cleaning agents or chemical solutions that could damage the
housing (discolouring) or impair operation.
Do not press too hard on the housing, as scratches might appear.
Dust can easily be removed using a clean, soft brush and a vacuum cleaner.
Disposal
Please dispose of the product, when it is no longer of use, according to the
current statutory requirements.
Technical Data
The LED light can be operated only with a constant current source. Never use a
commercial halogen transformer or a conventional power supply unit!
Constant current: 1000 mA
Power input: 24 W
Protection class: III
Protection type: IP20
Installation location: Only in dry, enclosed indoor spaces
LED type: Cold white
Colour temperature: 6,000 K
Luminous fl ux: 2050 lm
Illumination angle of the beam: 115°
Installation hole diameter: 139 mm
Installation depth: min. 55 mm
Spacing between light and insulating material: min. 90 mm
Dimensions (Ø x D): 160 x 58 mm
Weight: Approx. 649 g