
Instructions
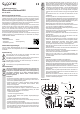
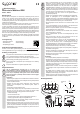

1 VOL+ button
2 VOL- button
3 Select button
4 On/off button
5 Battery compartment
6 Connection socket 12 V/DC 1 A
7 Radar sensor
8 Speaker
9 Indicator lamp POWER
10 Indicator lamp ARM
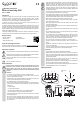
11 Signal LED
12 ON/OFF button
13 SELECT button
14 SOS button
15 Eyelet with snap hook
16 Battery compartment
16
12
11
15
13
14
Function of the alarm system
The integrated radar sensor (7) reacts to motions within its detection range with a detection
angle of 360°. Such is the case, for example, when a human being or animal enters the
detection range (0 - 10 m in open areas). If the device is turned on, the alarm will be activated
immediately.
Motions can be detected through wooden, plastic and stone walls etc. of max. 18 cm
in thickness. Detection through glass is also possible. The detection range varies
depending on the thickness of the wall.
Inserting batteries
Replace the batteries at least once a year in order to avoid leakage.
a) Remote control
• Open the battery compartment (16) of the remote control. Insert the included type CR2032
button cell with the positive terminal facing up into the battery compartment. Close the battery
compartment.
• Remove the battery when not using the device for a longer period of time.
b) Main device
• The batteries are intended for use as an alternative power supply, in case the supply to the
mains adapter gets disconnected or fails. Disconnect the mains adapter from the connection
socket 12 V/DC 1 A (6), in order to operate the device for a short period with batteries. Do not
consider batteries as a main power supply. The main unit must be connected to the provided
mains adapter during use.
The lifespan of the batteries can last for up to one week, as long as the device does
not activate the alarm periodically. Periodically activating the alarm can cause the
batteries to be exhausted after one day or even faster.
• Insert 8x 1.5 V AA batteries (not included) into the battery compartment (5). Observe correct
polarity (+/-) as indicated in the battery compartment. Close the battery compartment. We do
not recommend the use of rechargeable batteries, since those have a lower voltage.
• Once the main unit has been connected to the mains supply, the POWER indicator lamp (9)
and ARM indicator lamp (10) light up. The device is live and the alarm will be activated. For
that reason, press the On/Off button (4, 12) immediately after connecting the device to the
mains in order to deactivate alarm. The ARM indicator lamp turns off.
• Replace the batteries, once the POWER indicator lamp gets weaker or turns off.
• Remove the batteries when not using the device for a longer period of time.
Operation
The product is outtted with nonslip rubber feet. The rubber feet might leave traces on sensitive
surfaces. Protect such surfaces with a suitable padding, if needed.
The Select (3, 13) and On/Off (4, 12) buttons can be pressed both on the main unit and on
the remote control. The remote control also features an SOS button (14) for activating the
immediate alarm. Each time when pressing a button on the remote control, the signal LED (11)
will ash. The remote control is equipped with a snap hook (15), which can be used to attach a
key. The volume can only be adjusted using the main unit.
• Connect the round plug of the mains adapter to the 12 V/DC 1 A connection socket (6).
• Once the main unit has been connected to the mains, the POWER indicator lamp and
ARM indicator lamp light up. The device is live and the alarm will be activated after approx.
10 seconds. For that reason, press the On/Off button immediately after connecting the
device to the mains in order to deactivate the alarm. The ARM indicator lamp turns off.
The main unit must be connected to the provided mains adapter during use. If the
device is operated via batteries only and the mains supply gets disconnected for
a longer period of time, the device might activate a false alarm.
• Select the desired operating mode using the Select button on the device or the remote
control. The following modes are available: Bark, alarm, and doorbell. Adjust the volume
using the VOL+ (1) and VOL- (2) buttons. Select one of 8 different volume settings. The
sound turns off automatically after approx. 10 seconds.
• Press the On/Off button to activate the selected operating mode. Leave the detection range
within 10 seconds, as the alarm will get activated otherwise. The dogs barking and alarm
sound mode will last for approx. 60 seconds each time the alarm is activated. The doorbell
alarm rings one time once activated.
• Press the On/Off button to turn off the alarm. The alarm stops immediately, but the device is
still in activated mode. Press the On/Off button again to turn off the alarm mode. The ARM
indicator lamp turns off. When switching on again, the device will turn on the operating mode
selected last.
• Press the SOS button to activate an immediate alarm. For this function, the device must not
be in activated mode. Press the On/Off button to turn off the alarm.
Cleaning and care
• Turn off and disconnect the product from the mains before each cleaning.
• Under no circumstances use aggressive cleanings agents, cleaning alcohol or other chemical
solutions since these can penetrate the housing or impair functionality.
• Never submerge the product in water or other liquids.
• Clean the product with a dry, bre-free cloth.
Declaration of Conformity (DOC)
Conrad Electronic SE, Klaus-Conrad-Straße 1, D-92240 Hirschau hereby declares that this
product conforms to the 2014/53/EU directive.
Click on the following link to read the full text of the EU declaration of conformity:
www.conrad.com/downloads
Select a language by clicking on a ag symbol and enter the product order number
in the search box. You can then download the EU declaration of conformity in PDF
format.
Disposal
a) Product
Electronic devices are recyclable waste and must not be disposed of in the
household waste. At the end of its service life, dispose of the product in accordance
with applicable regulatory guidelines.
Remove any inserted batteries and dispose of them separately from the product.
b) Batteries
You as the end user are required by law (Battery Ordinance) to return all used
batteries. Disposing of them in the household waste is prohibited.
Contaminated batteries are labelled with this symbol to indicate that disposal in the
domestic waste is forbidden. The designations for the heavy metals involved are: Cd
= Cadmium, Hg = Mercury, Pb = Lead (name on batteries, e.g. below the trash icon
on the left).
Used batteries can be returned to collection points in your municipality, our stores or wherever
batteries are sold.
You thus fulll your statutory obligations and contribute to the protection of the environment.
Technical data
a) Main device
Input voltage / current .......................................... 12 V/DC, 1 A via power adapter
Battery operation ................................................. 8 x 1.5 V battery type AA
Power consumption ............................................. ≤ 6 W
Standby current consumption .............................. ≤ 7 mA
Dynamic current consumption ............................. ≤ 500 mA
Noise level range ................................................. 70 – 120 dB
Doorbell noise level range ................................... 90 – 113 dB
Dogs barking noise level range ........................... 70 – 115 dB
Alarm noise level range ....................................... 100 – 120 dB
Transmission frequency/power ............................ 5.8 GHz, 1 mW
Radar detection angle ......................................... 360°
Radar detection range (open area) ..................... 0 – 15 m (rear), 0 – 3,5 m (front),
0 – 7 m (side)
Operating conditions ............................................ 0 to +40 ºC, 20 % – 85 % RH
Storage conditions ............................................... 0 to +40 ºC, 20 % – 50 % RH
Dimensions (W x H x D) ...................................... 154 x 160 x 110 mm
Weight ................................................................. approx. 765 g
b) Power adapter
Input voltage / current .......................................... 100 – 240 V/AC, 50/60 Hz, max. 0.3 A
Output voltage / current ....................................... 12 V/DC, 1 A
Cable length ........................................................ 1.5 m
c) Remote control
Operating voltage ................................................ 1 x 3 V button cell, type CR2032
Range (open area) .............................................. max. 60 m
Transmission frequency/power ............................ 433 MHz, 0.1 mW
This is a publication by Conrad Electronic SE, Klaus-Conrad-Str. 1, D-92240 Hirschau (www.conrad.com).
All rights including translation reserved. Reproduction by any method, e.g. photocopy, microlming, or the capture in
electronic data processing systems require the prior written approval by the editor. Reprinting, also in part, is prohibited.
This publication represents the technical status at the time of printing.
Copyright 2017 by Conrad Electronic SE. 10272S1 *1493035_v4_0617_02_hk_m_en