
Instructions


Operation
The camera scans the environment continuously
and depending on the active mode, switches
either to a night vision mode, day vision mode,
begins or stops recording.
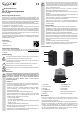
The camera features six infrared LEDs (2). As a
result it is possible to perform recordings in dark
environments (night vision). Recordings with
night vision are performed in black/white and are
possible up to a distance of 5-8 meters. If there
is sufcient light available, the recordings are
performed in colour.
a) Inserting and removing the Micro-SD card
• The product has no internal memory. It is therefore necessary to insert a memory card in
order to save recordings. A Micro-SD memory card is not included in the scope of delivery.
Micro-SD memory cards up to 32 GB are supported. The capacity of the Micro-SD card
should not be less than 8 GB.
• Before inserting or removing the memory card, make sure the camera is turned off and that
the product is not connected to a computer or to a USB cable and a power supply. This can
lead to damage to the memory card and/or the product.
• Before rst use, be sure that the Micro-SD card has been formatted. Then carefully insert the
Micro-SD card into the Micro-SD card slot (5) until it clicks into place. Do not use excessive
force when inserting the card.
• Remove the Micro-SD card by briey pressing it in and then releasing it. The memory card
can then be removed.
Regularly backup the memory contents of your Micro-SD card. A loss of data can
occur unexpectedly and at any time. Also remember to back up your data before
formatting.
b) Camera adjustment angle
• The camera head can be adjusted within 180 º angle. Adjust the camera head carefully. Do
not use force to adjust and do not overturn the camera head. When adjusting the angle take
care not to touch the camera sensor.
c) Setting the date and time
• Connect the camera to the USB cable and your computer. The yellow LED lights up to
indicate that the battery is charging.
• Press and hold the power button (10) for approx. 2 seconds. The blue and yellow LED lights
up while the red LED ashes. Your computer will recognize the camera as an external USB
drive and will assign it a drive letter.
• Open the drive. The le name SETTIME.TXT will appear in the main folder. The date and
time is shows in the following format:
yyyy-mm-dd (year-month-day) hh/mm/ss (hour-minute-seconds).
Change the date and time (type in the current time using a keyboard).
• Save your changes. Disconnect the camera from the computer. With some operating systems
the external drive must be ejected before the USB cable is disconnected from the USB port.
Disconnect the USB cable from the computer and the camera. The camera applies the set
date and time and uses these settings for recording.
• The camera uses the adjusted time as long as the battery supplies enough power.
If you do not nd the le SETTIME.TXT when you connect the product to the
computer, disconnect it from the computer. Record a short video to activate the
Micro-SD card inside the camera. Then try again to set the date and time after
connecting the product to your computer.
Do not add any blank spaces, characters or alter the le format in any way.
The power button (10) and the record button (9) does not work while camera is
connected to a computer.
d) Manual recording
• Press and hold the power button for 2 seconds to turn on the camera. The camera switches
to standby mode. The blue LED lights up.
• Press the record button (9). The blue LED ashes 3x and then turns off. The camera begins
recording a 10-minute video. The camera automatically detects night or day vision.
• After the rst video has been recorded, the camera scans the environment again, and, if the
movement has been detected, it begins recording a new 10-minute video.
• Briey press the record button during recording to end recording and save the video. The
blue LED lights up. The camera switches to a standby mode.
• To record audio together with the video, slide the Audio ON/OFF switch (7) to the
ON position.
• Press and hold the power button for 2 seconds to turn off the camera. The blue and red LEDs
light up briey to conrm.
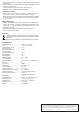
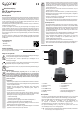
120 º camera
view angle
60 º detection angle
5-8 meters
When the Micro-SD card is full, by default the camera begins recording over the rst
recording (so called loop recording). All the old recordings are recorded over
subsequently. To disable this function, open the SETTIME.TXT le as described in
chapter “Setting the date and time” and change “yes” to “no”. Now the camera will
not start any new recordings - replace, free some space or format the Micro-SD card.
e) Recording with motion detection
The camera lens detects any movement in its view angle and begins recording automatically.
The camera stops when no movement is detected over a period of approx. 2 minutes. The
camera is then in a standby mode for the next movement. The video length for motion detection
mode is approx. 1 minute for the rst video (after rst trigger) and approx. 2 minutes for the
second and continuous videos (after second and continuous triggers).
• Press the mode button (11) to turn on the motion detection mode.
• The blue and red LEDs light up, then red ashes 3x and red LED stays lit to conrm the
setting.
• The camera will now begin recording when any motion is detected. Once the motion is
detected, the blue LED light ashes once and the red LED stay on.
• To record audio together with the video, slide the Audio ON/OFF switch (7) to the
ON position.
• Press the mode button to turn off the camera. Blue LED light up momentarily and then both
blue and red LED go off.
f) Copying recordings
• You can copy recordings or view them directly from the product when it is connected to a
computer via the USB cable.
• After connecting to the computer, the yellow LED lights up to indicate that the battery is
charging.
• Press and hold the power button for approx. 2 seconds. The blue LED remains lit and the red
LED ashes. Your computer will recognize the camera as an external USB drive.
Playback of video recordings directly from the camera may be slightly delayed or
jerky. It is therefore recommended to rst copy the video recordings to your computer
for playback.
• Go to the VIDEO folder and copy required video les using drag-and-drop or by pressing the
relevant keys.
• Eject the external storage device (camera) and disconnect the camera from your computer.
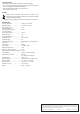
g) Overview of LED indicator light functions
LED indicator light Meaning
Blue remains lit. Standby mode. Micro-SD is inserted.
Blue ashes for approx. 5 seconds
and goes out.
Standby mode. Micro-SD is not inserted.
Red remains lit. Motion detection mode on standby.
Yellow remains lit. Battery is charging.
Yellow goes out. Battery is fully charged.
Blue and yellow remain lit. Red ashes.
Camera connected to a computer.
Battery is charging.
h) Resetting the camera
• Reset the camera if the product does not record any videos or respond to controls. The
camera must be in standby or motion detection mode.
• Briey press the reset button (6) with a suitable pointed tool to reset the camera.
• In motion detection mode, the camera switches back to motion detection mode after being
reset.
• In standby mode, the camera turns off after being reset.
• There is no need to adjust the time after the reset.
i) General information
• Disconnect the camera from your computer if it is not recognized for approx. 30 seconds. It is
recommended to then restart your computer and format the Micro-SD card.
• If you use the product as a PC camera, download and install a suitable camera driver such as
the ECap driver. The ECap driver is intended for Windows
®
7 and above.