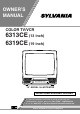
OWNER’S MANUAL COLOR TV/VCR 6313CE (13 inch) 6319CE (19 inch) Y X Y X PN b O a 19" MODEL ILLUSTRATED INSTRUCCIONES EN ESPAÑOL INCLUIDAS. If you need additional assistance for set-up or operating after reading owner’s manual, please call TOLL FREE : 1-800-968-3429. Or visit our WEB SITE at http://www.SylvaniaConsumerElectronics.
WARNING: TO REDUCE THE RISK OF FIRE OR ELECTRIC SHOCK, DO NOT EXPOSE THIS APPLIANCE TO RAIN OR MOISTURE. THIS SYMBOL INDICATES THAT DANGEROUS VOLTAGE CONSTITUTING A RISK OF ELECTRIC SHOCK IS PRESENT WITHIN THIS UNIT. CAUTION RISK OF ELECTRIC SHOCK DO NOT OPEN CAUTION: TO REDUCE THE RISK OF ELECTRIC SHOCK, DO NOT REMOVE COVER (OR BACK). NO USER SERVICEABLE PARTS INSIDE. REFER SERVICING TO QUALIFIED SERVICE PERSONNEL.
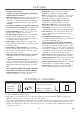
F IGURE A EXAMPLE OF ANTENNA GROUNDING AS PER NATIONAL ELECT RICAL CODE ANTE NNA L EAD I N WI RE GROUND CLAMP A NTENNA DI SCHARG E UN I T (NEC SECTION 8 10 -2 0) EL ECT RI C SE RV I CE EQ U I PM EN T G RO UNDI NG CO NDUCT ORS (NEC SECTION 8 10 -2 1) G RO UND CL AM PS NEC - NATI O NAL EL ECTRI CAL CO DE POWER SERVI C E G RO UNDI NG EL EC TR O DE SYST EM (NEC ART 2 50 , PART H) S2 8 9 8 A 13.
PRECAUTIONS LOCATION For safe operation and satisfactory performance of your unit, keep the following in mind when selecting a place for its installation: • Shield it from direct sunlight and keep it away from sources of intense heat. • Avoid dusty or humid places. • Avoid places with insufficient ventilation for proper heat dissipation. Do not block the ventilation holes at the top and bottom of the unit. Do not place the unit on a carpet because this will block the ventilation holes.
TABLE OF CONTENTS C IMPORTANT SAFEGUARDS . . . . . . . . . . . . .2 C PRECAUTIONS . . . . . . . . . . . . . . . . . . . . . . . .4 LOCATION . . . . . . . . . . . . . . . . . . . . . . . . . . . .4 AVOID THE HAZARDS OF ELECTRICAL SHOCK AND FIRE . . . . . . . . . . . . . . . . . . . . . .4 WARNING . . . . . . . . . . . . . . . . . . . . . . . . . . . .4 C TABLE OF CONTENTS . . . . . . . . . . . . . . . . . .5 C FEATURES . . . . . . . . . . . . . . . . . . . . . . . . . . . .6 C SUPPLIED ACCESSORIES . . . . .
FEATURES • Infrared remote control • Trilingual on screen menu display selectable in • • Zero Return–The tape returns to counter of 0:00:00 by rewinding or fast forwarding. • English, Spanish or French Real time counter–This shows the elapsed record- ing or playback time in hours, minutes and seconds. The “–” indication will appear when the tape is rewound further than the tape counter position “0:00:00”.
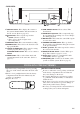
OPERATING CONTROLS AND FUNCTIONS This manual covers 13" and 19". The operation of the two models are exactly the same except the appearance. 19" model is illustrated in this manual. - TV/VCR FRONT PANEL - VIDEO AUDIO POWER VOLUME X Y 1 2 3 4 CHANNEL Y 5 X 6 - REMOTE CONTROL - EJECT 27 3 CHANNEL RETURN 15 16 17 8 1 2 3 4 5 6 7 8 9 0 +100 MENU DISPLAY MUTE VOLUME 4 25 9 REW F.
- REAR VIEW - ANT. 29 17 DISPLAY button– Hit to display the counter or the current channel number and current time on the TV screen. (Refer to page 25.) 18 STOP button– Hit to stop the tape motion. L button– (Remote control) • Hit to select a mode or figure from the setting menu. 19 RECORD button– Hit to start manual recording. 20 SPEED button– Hit to choose the desired recording speed:SP/SLP. 21 T-PROG. CLEAR button– Hit to cancel a setting of timer program. (Refer to page 24.
PREPARATION FOR USE ANTENNA/CABLE CONNECTIONS Plug the incoming cable into the ANT. jack on the rear of the unit. If your cable service supplies you with a converter box or if you use a satellite system, connect the box with this unit as shown below. Antenna Cable TV signal or Incoming cable from home Antenna / Cable Company (No Cable Box) ANT. Rear of the unit ANT.
USING FRONT A/V INPUT JACKS When you watch a program recorded on another source (VCR or video camera), use the AUDIO/VIDEO input jacks on the front of the unit. Connect the Audio/Video output jacks of another source to the AUDIO L/R and VIDEO jacks of this unit. Then press [CHANNEL K/L] until “AUX” appears on the screen. VIDEO AUDIO POWER VOLUME Y VIDEO (IN) X CHANNEL Y AUDIO (IN) X STOP/EJECT REW PLAY F.FWD PN b O a REC/OTR AUX EARPHONE ex. VCR or video camera, etc.
TO CANCEL THE GAME MODE PICTURE CONTROL The unit’s picture controls – BRIGHT, CONTRAST, COLOR, TINT and SHARPNESS – are preset to factory specifications. Although they are usually the best, you may need to make some further adjustments for a more natural looking image. NOTE: • When setting the Picture Control, the Game mode will be cancelled. Make sure ... • The unit power must be turned on. 1 Select “PICTURE CONTROL” Hit [MENU] on the remote control.
Make sure ... • The unit must be turned on. SLEEP TIMER The Sleep Timer function turns off the unit without using [POWER] after a desired period of time. NOTE: • This function does not work during Recording mode. 1 1 Hit [MENU]. Press [PLAY/K] or [STOP/L] to point to “CAPTION”.
5 3 After scanning The tuner stops on the lowest memorized channel. NOTES: • If there is no TV signal input, “NO TV SIGNALS” will appear on the display after the completion of channel scanning. • The unit may recognize TV channels to be CATV channels if reception condition is poor. In this case, check the antenna connection and try “AUTO CH PROGRAMMING” again when reception conditions are better. • Channel memory programming is NOT necessary when connected to a cable box or satellite box.
6 Select the hour Press [PLAY/K] or [STOP/L] until your desired hour appears. (Example: “5”, “PM”) Then hit [F.FWD/ B]. 7 Select the minute Press [PLAY/K] or [STOP/L] until the desired minute appears. (Example: “40”) – MANUAL CLOCK SET – MONTH DAY 05 / 05 HOUR 2005 MINUTE 05 : –– PM – MANUAL CLOCK SET – MONTH DAY 05 / 05 HOUR YEAR THU 2005 Select “SETTING CLOCK” Hit [MENU]. Press [PLAY/K] or [STOP/L] to select “SETTING CLOCK”, then hit [F.FWD/ B].
DAYLIGHT-SAVING TIME When Daylight-Saving Time is ON, the clock will change automatically as follows: • First Sunday of April : At 2 AM the clock immediately changes to 3 AM. Any timer programming you have set to occur between 2 AM and 3 AM will not record. • Last Sunday of October : At 2 AM the clock immediately changes to 1 AM. Make sure ... • The unit must be turned on. 1 Select “SETTING CLOCK” Hit [MENU]. Press [PLAY/K] or [STOP/L] to point to “SETTING CLOCK”, then hit [F.FWD/ B].
V-CHIP SET UP This feature enables parents to prevent their children from watching inappropriate material on TV. When you try to access a program which is blocked, “PROTECTED PROGRAM by ...” message appears on the TV screen. V-CHIP SET UP Press [PLAY/K] or [STOP/L] to select a rating with sub-ratings you wish to block, then hit [F.FWD/ B] twice. Press [PLAY/K] or [STOP/L] to select a sub-rating, then hit [F.FWD/ B] to set it to [BLOCK] or [VIEW]. Make sure ... • The unit must be turned on.
VIDEO CASSETTE This unit will operate with any cassette that has the mark. For best results, we recommend the use of high-quality tapes. Do not use poor quality or damaged tapes. PRECAUTIONS INSERTING A CASSETTE • Insert the cassette in the direction as shown. Push in gently, but continuously, on the center-back of the cassette until it is drawn into the unit. The unit will automatically turn on. • • • Avoid moisture.
PLAYBACK NORMAL PLAYBACK STILL PICTURE Make sure ... • The unit must be turned on. 1 You can view a still picture on the TV screen during playback (the Still mode). Hit [PAUSE/STILL F] during playback. Only tapes recorded in the SLP mode will show the least amount of lines. Hit [PLAY/K] to return to playback. NOTES: • Usually there will be video “noise” lines (black and white streaks or dots) on the screen. This is normal.
SPECIAL PLAYBACK Make sure ... • The unit must be turned on. • Insert a prerecorded tape. AUTO REPEAT PLAYBACK The unit has the auto repeat function that allows you to repeat a tape indefinitely without hitting [PLAY/K]. ALL REPEAT: Repeat playback from the beginning to the end of the tape. BLANK REPEAT: Repeat playback from the beginning to a blank part, which is blank for more than 10 seconds.
SEARCH Make sure ... • The unit must be turned on. • Insert a tape. TIME SEARCH ZERO RETURN This function allows you to search easily a beginning point that you want to review by rewinding or fast forwarding. NOTE: • Zero Return WILL NOT work on a blank tape or a blank portion of a tape. 1 The Time Search function makes it possible to quickly advance the tape to your desired position simply by entering the exact amount of playback time you want to skip.
SPECIAL FEATURES REAL TIME TAPE COUNTER AUTO REWIND-EJECT This shows the elapsed recording or playback time in hours, minutes, and seconds. (The displayed time will not change on a blank tape or blank portions on the tape.) The “–” indication will appear when the tape has rewound further than “0:00:00” on the tape counter. • When the end of a tape is reached during record- • • ing, playback or fast-forward, the tape will automatically rewind to the beginning.
OTR (One Touch Recording) This function enables you to set a recording length simply by hitting [REC/OTR] on the unit. Make sure ... • The unit must be turned on. • Insert a cassette tape with its erase-prevention tab in place. (If necessary, rewind or fast forward the tape to the point at which you want to begin recording.) NOTES: • You cannot start OTR with the remote control. • Recording starts immediately when [REC/OTR] is hit.
TIMER RECORDING AUTOMATIC TIMER RECORDING 2 You may set the unit to start and end a recording while you are away. You can set 8 programs to record on specific days, daily or weekly within a 1 year period. In the example below, the timer is being set to record: DATE: July 4th, 2005 SETTING TIME: from 7:30PM to 8:50PM CHANNEL: CH61 TAPE SPEED: SP Make sure ...
8 Set end minute Press [PLAY/K] or [STOP/L] until the desired minute appears. (Example: “50” for 8:50PM) Then hit [F.FWD/ B]. 9 10 - - -/- - - - - - -/- - - - - - -/- - - - B 61 7/04 MON - - -/- - - - - - -/- - - - - - -/- - - - - - -/- - - - - Set the tape speed Press [PLAY/K] or [STOP/L] until the desired tape speed appears. (Example: “SP”) 4)Hit [POWER] to set automatic timer recording.
ON SCREEN DISPLAY To check the Counter, Clock and Channel number on the TV screen, hit [DISPLAY]. Each time you hit [DISPLAY], the TV screen will change as follows: When the Closed Caption mode is OFF: When the Closed Caption mode is ON: • Counter mode: After 5 seconds, only the counter • The On Screen Display disappear after 5 seconds. • This is true even if [MUTE] or [PAUSE/STILL • remains. To clear it, hit [DISPLAY]. Clock mode: After 5 seconds, only the clock and the channel number remain.
TROUBLESHOOTING GUIDE If you have followed the instructions contained in this manual and have difficulty in operating your unit, locate the PROBLEM in the left column below. Check the corresponding CORRECTIVE ACTION column to remedy the problem. PROBLEM No power. No picture or sound. No picture or poor picture on the unit. No sound or poor sound. Timer recording is not possible. Cannot go into Record mode. Playback picture is partially noisy. No picture but the audio is OK in playback.
SPECIFICATIONS GENERAL SPECIFICATIONS ELECTRICAL SPECIFICATIONS CRT : Video input level : Audio input level : Video S/N ratio : Audio S/N ratio : 13 or 19 inch in-line gun, 90˚ deflection tube Television system : NTSC-M Closed caption system :§15.119/FCC Video Heads : Rotary two-head Tape width : 1/2 inch Tape speed SP : 33.40mm/sec. LP : 16.67mm/sec. SLP : 11.12mm/sec.
CONTROLES DE OPERACIÓN Y SUS FUNCIONES Este manual sirve para los modelos de 13" y 19". A excepción de la apariencia, la operación de los dos modelos es exactamente la misma. En este manual se muestra el modelo de 19". NOTA: No recomendamos utilizar mandos a distancia universales. No todas las funciones pueden ser controladas mediante un mando a distancia universal.
- VISTA POSTERIOR - ANT. 29 11 Botón REC/OTR– Presione para iniciar la grabación manual. Presione repetidamente para empezar la grabación instantánea (OTR). 12 Indicador de grabación– Parpadea durante la grabación. Se enciende en el modo de espera de la grabación con temporizador. 13 Toma EARPHONE– Para conectar los auriculares (no suministrados) y escuchar en privado. La toma es mono y tiene un tamaño de 1/8" (3,5 mm).
PREPARACIÓN PARA LA UTILIZACIÓN CONEXIONES DE ANTENA/CABLE Señal de TV por cable o Antena Antena de varilla (Incluído) Trasera de la unidad Cable entrante desde Antena de Casa / Compañia de Cable (Sin Caja de Cable) o o (Caja de Cable o Caja de Satélite) IN OUT ANT. (SALIDA) ANT.
5 Seleccione el año Presione [PLAY/K] o [STOP/L] hasta que aparezca el año deseado. (Ejemplo: “2005”) Presione [F.FWD/ B]. 6 1 Inserte una cinta pregrabada. Si la lengüeta para evitar el borrado está rota, la unidad empezará a reproducir automáticamente. Seleccione los minutos 2 Presione [PLAY/K] o [STOP/L] hasta que aparezcan los minutos deseados. (Ejemplo: “40”) 8 Asegúrese ... • La unidad debe estar encendida.
LIMITED WARRANTY FUNAI CORP. will repair this SYLVANIA product, free of charge in the USA in the event of defect in materials or workmanship as follows: DURATION: PARTS: FUNAI CORP. will provide parts to replace defective parts without charge for one (1) year from the date of original retail purchase. Two (2) years for Picture Tube. Certain parts are excluded from this warranty. LABOR: FUNAI CORP.