32 inch Digital / Analog LCD TV Owner’s Manual 6632LG INPUT SLEEP SELECT POWER 1 2 3 4 5 6 7 8 9 - 0 AUDIO STILL SCREEN MODE SETUP ENTER INFO BACK CH RETURN VOL. STANDBY MUTE CH POWER ON HIGH-DEFINITION TELEVISION TO RECEIVE DIGITAL/ANALOG SIGNAL, YOU MUST CONNECT ANTENNA. IF YOU NEED ADDITIONAL ASSISTANCE WITH SET-UP OR OPERATING AFTER READING OWNER’S MANUAL, PLEASE CALL TOLL FREE 1-800-605-8453, OR VISIT OUR WEB SITE AT http://www.SylvaniaConsumerElectronics.
WARNING: TO REDUCE THE RISK OF FIRE OR ELECTRIC SHOCK, DO NOT EXPOSE THIS APPLIANCE TO RAIN OR MOISTURE. THIS SYMBOL INDICATES THAT DANGEROUS VOLTAGE CONSTITUTING A RISK OF ELECTRIC SHOCK IS PRESENT WITHIN THIS UNIT. CAUTION RISK OF ELECTRIC SHOCK DO NOT OPEN CAUTION: TO REDUCE THE RISK OF ELEC- THIS SYMBOL INDICATES THAT THERE ARE IMPORTANT OPERATING AND MAINTENANCE INSTRUCTIONS IN THE LITERATURE ACCOMPANYING THE APPLIANCE. TRIC SHOCK, DO NOT REMOVE COVER (OR BACK). NO USER SERVICEABLE PARTS INSIDE.
17. 18. 19. d. If the TV does not operate normally by following the operating instructions. Adjust only those controls that are covered by the operating instructions, as improper adjustment of other controls may result in damage and will often require extensive work by a qualified technician to restore the TV to its normal operation. e. If the TV has been dropped or damaged in any way. f. When the TV exhibits a distinct change in performance, this indicates a need for service. 20.
SUPPLIED ACCESSORIES • Owner’s Manual (1EMN21879) • Remote control unit (NF000UD: Black / Silver) or (NF006UD: Black) • Batteries (“AA” x 2) • If you need to replace these accessories, please refer to the PART NO, with the illustrations and call our help line mentioned on the front page. • Depending on your antenna system, you may need different types of Combiners (Mixer) or Separator (Splitter). Contact your local electronics store for these items.
IMPORTANT SAFEGUARDS PRECAUTIONS . . . . . . . . . . SUPPLIED ACCESSORIES . FEATURES . . . . . . . . . . . . . . . . . . . . . . . . . . . . . . . . . . . . . . . . . . . . . . . . . . . . . . . . . . . . . . . . . . . . . . . . . . . . . . . . . . . . . . . . . . . . . . . . . . . . . . . . . . . . . . . . . . . . . . . . . . . . . . . . . . . . . . . . . . . . . . . . . . . . . . . . . . . . . . . . . . . . . . . . . . . . . . . . . . . . . . . . . . . . . . .
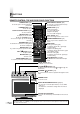
FUNCTIONS REMOTE CONTROL, TOP AND REAR PANEL FUNCTION SLEEP button (p23) To turn the power off automatically at preset time INPUT SLEEP SELECT POWER POWER button (p12) INPUT SELECT button (p20) To select TV or external input mode (to access DVD, VCR, etc.
ANT. IN jack Connect your antenna or cable box here. AUDIO OUT jacks Connect the supplied audio cable here through the audio in jacks of audio equipment. ANT. IN L HDMI IN jacks Connect HDMI cable and audio cable coming from the HDMI and audio out jack of external devices.
PREPARATION FOR USE CONNECTION This section describes how to connect this TV to reception and other sources. MAKE SURE YOU HAVE AN ANTENNA. As DTV is only available over the air, you need an antenna to receive digital signal. NOTE: Be sure that antenna or cable is connected properly before plugging the power cord. [ANTENNA CABLE CONNECTION] 1) When connecting TV to antenna Connect the RF cable or antenna cable on your home outlet to the ANT. IN jack of this TV.
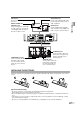
EXTERNAL CONNECTION PREPARATION FOR USE [HDMI CONNECTION] 1) This is the best method to connect this TV to video devices with the HDMI output jack, such as DVD player with HDMI output jack, etc. It can minimize the deterioration of image quality. Use the HDMI cable (commercially available) for connection. To HDMI INPUT jack HDMI OUT ANT.
[COMPONENT CONNECTION] 1) This is a better method to connect this TV to video devices with the Component output jack, such as DVD player, etc. Use the Component cable (commercially available) for connection. If you connect component output jack to COMPONENT1 input jack, connect an audio cable to AUDIO L/R jacks of COMPONENT1. If you connect component output jack to COMPONENT2 input jack, connect an audio cable to AUDIO L/R jacks of COMPONENT2.
[ANALOG AUDIO/VIDEO CONNECTION] 1) This is the general method to connect this TV to video devices with the video and audio output jacks, such as VCR, Camcorder, Video Game, etc.. When the audio jack of video devices is monaural, connect this TV to the Audio L jack.
INITIAL SETTINGS Hint: Before starting initial setup you must connect antenna. INITIAL SETTINGS 3 This section describes the initial settings when you first turn on the power after purchase. The initial setting items are shown below. Select your language using [K /L], press [ENTER]. When you first turn on the power, the following screen is displayed. Initial Setup • LANGUAGE SELECTION You can select the menu language displayed on the screen among English, Spanish and French.
CHANNEL SETTINGS AUTOSCAN If you switch wires (e.g. between antenna and CATV) or if you move the TV to a different area after the initial setting, you need to perform Autoscan again. This function lets you easily select the receivable channels with [CH K/L] and the TV memorizes them even if you switch wires. 3 For TV channels, using [K /L], select “Air”. For CATV channels, select “Cable”. Autoscan Cable Air Cable 1hour Cable Or ANT. IN SCREEN MODE ENTER INFO BACK • Press [ENTER].
CHANNEL LIST 3 The Channel List function lets you skip the unnecessary channels from the Channel registration list. Select the channel you want to skip. • Using [K/L], select the channel. Channel List STILL - Highlight channels for Ch Up/Down key selection. 0 SCREEN MODE SETUP DTV 6 DTV 8 DTV 48 DTV 67 9 27 58 ENTER Ch Select INFO BACK 1 MUTE Watch/Skip Back • Press [ENTER], and the highlight on the selected channel disappears, then the channel is set as skip.
MANUAL REGISTER 3 Select the channel you want to add. • Using Channel number buttons, select your desired channel. You can register remainder of channels that were not scanned by the Autoscan function due to the bad reception status at the initial setting. 11 INPUT SLEEP SELECT POWER 1 2 3 4 5 6 7 8 9 Manual Register For Analog channels, select a channel to register using number keys. For Digital channels, you must perform Autoscan function.
• If the channel is set to external input, you cannot confirm the antenna situation. ANTENNA CONFIRMATION You can verify the signal strength of each channel to get a clearer picture. Video1 Antenna Back INPUT SLEEP SELECT POWER Indicator is available for antenna signal only. 1 2 3 4 5 6 CH Ch Change AUDIO 7 8 - 0 9 4 STILL SCREEN MODE SETUP ENTER INFO BACK CH RETURN VOL. 1 CH MUTE Display the setup screen. • Press [SETUP]. The following setup screen is displayed.
LANGUAGE SELECTION You can choose your on screen language from one of the following English, Spanish or French. STILL - 0 SCREEN MODE SETUP ENTER INFO BACK 1 MUTE CHANNEL SETTINGS CH RETURN VOL. CH Display the setup screen. • Press [SETUP]. The following setup screen is displayed. 2 Select “LANGUAGE” and press [ENTER] to confirm. • Using [K /L], select “English”, “Español” or “Français”. Language Select the language for setup display. English Elija idioma de preparación.
WATCHING TV NTSC CHANNEL SELECTION CH4-1 No signal No signal You can select the channel by using either [CH K/L] or Channel number buttons. How to select the channel in each way is shown below. 18:30 CH4-1 CH4-2 CH4-3 19:00 CH4 INPUT SLEEP SELECT POWER ATSC 18:00 CH4-1 No signal CH4-3 19:30 1 2 3 4 5 6 7 8 9 CH4-1 AUDIO : changes automatically : change manually by pressing [CH on your remote control.
When the broadcasting has SAP and monaural audio... STILL MODE SAP / MONO You can freeze the image shown on the screen. 1 2 3 4 5 6 7 8 9 - 0 SAP / MONO When the broadcasting is having only monaural audio... MONO AUDIO (cannot be switched.) STILL 6 SCREEN MODE SETUP SAP / STEREO STEREO : Outputs stereo-audio SAP : Outputs second audio program MONO : Outputs mono-audio Pausing image. • Press [STILL], the image shown on the screen is paused.
SWITCHING EXTERNAL INPUT When you connect external devices including a video cassette recorder and home audio system, you can easily switch the input mode with the remote control. INPUT SLEEP SELECT POWER • When you press [INFO], the current external input mode, the type of resolutions for video signal, TV aspect ratio CC and TV rating will be displayed at the top-right of the screen.
CHANGING THE SCREEN DISPLAY MODE Each 4 types of display mode can be selected in the screen mode in both 4:3 and 16:9 TV aspect ratio. You can select your favorite screen mode and enjoy the program. AUDIO 7 8 - 0 9 Switch the Screen mode. • Every time you press [SCREEN MODE], the TV aspect ratio will be switched alternately. 2 To press [SCREEN MODE] repeatedly until the normal screen displays. NOTE: STILL You may not switch the display mode depending on the program.
DTV SCREEN INFORMATION You can display the currently selected channel number or other information such as the audio mode on the screen for checking. 1 AUDIO 7 8 9 - 0 SCREEN MODE • The following information is displayed. ENTER (1) Program title INFO BACK (2) Broadcast station CH RETURN VOL. MUTE Display the detailed information for the channel. • Press [INFO] on the remote control. The currently selected program details are displayed on the screen.
OPTIONAL SETTINGS SLEEP TIMER SETUP SCREEN The Sleep Timer function will automatically turn off the power of the unit at a preset time. This section describes the overview of the setup screen displayed when you press [SETUP]. For more details, see the reference page for each item. INPUT SLEEP SELECT 1 2 3 4 5 6 7 8 9 The setup screen consists of the function setting items below. AUDIO • To exit settings.
Contrast Using [s / B], adjust to increase or decrease contrast. s: To decrease contrast B: To increase contrast PICTURE ADJUSTMENT You can enjoy your favorite picture mode selecting from five picture default settings that will adjust colors to enhance your viewing experience. Also, the brightness, contrast, color, tint, sharpness color temperature, and energy saving setting can be changed. Contrast ENTER INFO BACK Color Display the setup screen.
CLOSED CAPTION 4 Closed Caption Text3 Text4 • Using [K /L], select the desired closed caption, then press [ENTER]. SCREEN MODE [Caption Mode] CC1 and Text1: are the primary caption and text services. The captioning or text is displayed in the same language as the program’s dialog. INFO CH RETURN 1 (up to 4 lines of script on the screen, where it does not obstruct relevant parts of the picture) CH MUTE CC2 Text2 ENTER VOL.
DTV CLOSED CAPTION DTV 1 CLOSED CAPTION STYLE 1 • Press [SETUP]. The following setup screen is displayed. Display the setup screen. • Press [SETUP]. The following setup screen is displayed. 2 2 Display the setup screen. Select “DETAIL” and press [ENTER] to confirm. • Using [K /L], select “Closed Caption” and press [ENTER] to confirm. Select “DETAIL” and press [ENTER] to confirm. • Using [K /L], select “Closed Caption” and press [ENTER] to confirm.
[Font Opacity] Font opacity of the displayed caption can be switched as below. Set each item. • When “User Setting” is set to “On”, you can set the following items. • CC style set by the broadcast station will be displayed. • CC style set by “User Setting” will be displayed. • Using [K /L], select the item you want to set. • You can switch the setting for each item with [K /L].
V-CHIP 3 You can set the viewing limitations to prevent your children from watching inappropriate programs including disagreeable expression and description. The viewing limitations set for the program can be released by entering the password. Enter the password. • Use Channel number buttons and enter the 4-digit number. V-Chip Enter password. INPUT SLEEP SELECT POWER BACK PIN Code 1 2 3 4 5 6 7 8 9 - 0 • When you have not set up your password, enter 0000.
Set “MPAA Rating”. • Using the [K /L], select the rating. • Press [ENTER] and set to “View” or “Block”. 5 • Press [ENTER] and set to “View” or “Block” for the rating without sub categories. V-Chip X NC-17 R PG-13 PG G NR Select 6 V-Chip FV V ENTER View/Block BACK PG-13 : PG : G: NR : Back Select V-Chip MPAA Rating TV Rating New Password • Press [ENTER].
C New Password 4 Display the “New Password” screen. • Using [K /L], select “New Password”. V-Chip MPAA Rating TV Rating New Password • Press [ENTER]. 5 Change the Password. • Use Channel number buttons on the remote control and enter the NEW 4-digit Password. • Enter Password again in “Confirm Password” box. V-Chip Enter password. Confirm password. PIN Code 6 BACK Back To exit the setup, press [SETUP].
HDMI AUDIO Set the method of sound input for HDMI jack. STILL - 0 SCREEN MODE SETUP ENTER INFO BACK 1 Display the setup screen. 2 OPTIONAL SETTINGS • Press [SETUP]. The following setup screen is displayed. Select “DETAIL” and press [ENTER] to confirm. • Using [K /L], select “HDMI Audio” and press [ENTER] to confirm. Detail Closed Caption V–chip HDMI Audio 3 Auto Switch the HDMI Audio. • Using [K /L], select the desired HDMI Audio, then press [ENTER].
MISCELLANEOUS TROUBLESHOOTING GUIDE Before calling for service, check the following chart again. Symptom 32 EN Remedy No power • Be sure the Power cord is connected to outlet. • If a power failure occurs, unplug the power cord for 30 minutes to allow the unit to reset itself. No picture or sound • Check if the power is on. • Check the outlet connection. • Check the antenna or cable connection to the main unit. • When the outside antenna is used, check the wire condition and connection.
Remedy Picture rolls vertically • When the outside antenna is used, check the wire condition and connection. • Electric waves may be interfered due to the electric appliances, etc. nearby. • Try to view other channels. It may be the problem on the broadcasting station. Different color marks on screen • Move the TV apart from electric appliances nearby. Turn off the power and wait for about 30 minutes, then turn it on again. • Try to view other channels. It may be the problem on the broadcasting station.
GLOSSARY ATSC Acronym that stands for Advanced Television Systems Committee and the name of the digital broadcasting standards. Aspect ratio The width of a TV screen relative to its height. Conventional TVs are 4:3 (in other words, the screen is almost square); widescreen models are 16:9 (the screen is almost twice as wide as it is high). Component video This is a video signal format that conveys each of three principal colors of light (red, blue and green) through different signal lines.
SPECIFICATIONS Closed Caption System: ATSC NTSC-M TV Standard §15.119/FCC (Analog CC) §15.
LIMITED WARRANTY FUNAI CORP. will repair this product, free of charge in the USA in the event of defect in materials or workmanship as follows: DURATION: PARTS: LABOR: FUNAI CORP. will provide parts to replace defective parts without charge for one (1) year from the date of original retail purchase. Certain parts and LCD image burn-in are excluded from this warranty. FUNAI CORP. will provide the labor without charge for a period of ninety (90) days from the date of original retail purchase.
Televisión con pantalla LCD digital/analógica de 32 pulgadas Manual del Usuariol 6632LG INPUT SLEEP SELECT POWER 1 2 3 4 5 6 7 8 9 - 0 AUDIO STILL SCREEN MODE SETUP ENTER INFO BACK CH RETURN VOL. STANDBY MUTE CH POWER ON HIGH-DEFINITION TELEVISION PARA RECIBIR SEÑAL DIGITAL ANALÓGICA DEBE CONECTAR LA ANTENA.
ADVERTENCIA: PARA REDUCIR EL RIESGO DE INCENDIO O CHOQUE ELÉCTRICO, NO EXPONGA ESTE EQUIPO A LA LLUVIA O HUMEDAD. ESTE SÍMBOLO INDICA QUE DENTRO DE ESTA UNIDAD SE ENCUENTRA PRESENTE VOLTAJE PELIGROSO QUE CONSTITUYE UN RIESGO DE CHOQUE ELÉCTRICO. CAUTION RISK OF ELECTRIC SHOCK DO NOT OPEN PRECAUCIÓN: PARA REDUCIR EL RIESGO DE ESTE SÍMBOLO INDICA QUE EXISTEN IMPORTANTES INSTRUCCIONES DE OPERACIÓN Y MANTENIMIENTO EN LA LITERATURA QUE ACOMPAÑA ESTE APARATO.
17. 18. 19. d. Si la unidad no opera normalmente al seguir las instruciones de operación. Ajuste sólo los controles que se cubren en las instrucciones de operación, ya que el ajuste incorrecto de otros controles podría resultar en daños y con frecuencia requerirá trabajo intensivo con un técnico calificado para restaurar la operación normal de la unidad. e. Si la unidad se ha caído o dañado de cualquier forma. f.
ACCESORIOS SUMINISTRADOS • Manual del usuario (1EMN21879) • Unidad de control remoto (NF000UD: Negro / Plata) o (NF006UD: Negro) • Pilas (“AA” x 2) • Si necesita cambiar estos accesorios, consulte el NO. de PIEZA encima de la figura y llame a nuestra línea de asistencia mencionado en la página delantera. • Dependiendo del sistema de su antena, es posible que necesite diferentes tipos de combinadores (mezcladora) o separadores (divisor).
IMPORTANTE PARA SU SEGURIDAD PRECAUCIONES . . . . . . . . . . . . . . . . ACCESORIOS SUMINISTRADOS . . . . CARACTERÍSTICAS . . . . . . . . . . . . . . . . . . . . . . . . . . . . . . . . . . . . . . . . . . . . . . . . . . . . . . . . . . . . . . . . . . . . . . . . . . . . . . . . . . . . . . . . . . . . . . . . . . . . . . . . . . . . . . . . . . . . . . . . . . . . . . . . . . . . . . . . . . . . . . . . . . . . . . . . . . . . . . . . . . . . . . . . . . . . . .
FUNCIONES FUNCIONES DEL MANDO A DISTANCIA Y DEL PANEL SUPERIOR Y TRASERO Botón SLEEP (pág.23) Para apagar automáticamente el aparato a la hora prefijada Botón POWER (pág.12) Para encender y apagar el TV Botón INPUT SELECT (pág.20) INPUT SLEEP SELECT POWER Para seleccionar el modo de TV o de entrada externa (acceso a DVD, VCR, etc.) Botón AUDIO (pág.19) Botones de Número de canal (pág.18) Para seleccionar canales Botón SETUP (pág.
Tomas AUDIO OUT Conecte aquí el cable de audio suministrado a través de las tomas de entrada de audio de un equipo de audio. Toma DIGITAL AUDIO OUT (COAXIAL) Conecte aquí un cable coaxial audio digital opcional a través de la toma de entrada coaxial audio digital de un descodificador o receptor de audio. ANT. IN L DIGITAL AUDIO OUT (COAXIAL) Tomas HDMI IN Conecte el cable HDMI y el cable de audio procedentes de la toma de salida de HDMI y audio de dispositivos externos.
PREPARACIÓN PARA EL USO CONEXIÓN En esta sección se describe cómo hay que conectar este TV a fuentes receptoras y otras. ASEGÚRESE DE TENER UNA ANTENA. Como el DTV sólo existe en ondas aéreas, necesita una antena para recibir señal digital. NOTA: Asegúrese de que la antena o el cable están correctamente conectados antes de enchufar el cable de la corriente. [CONEXIÓN DE CABLE DE ANTENA] 1) Cuando se conecta el TV a la antena Conecte el cable RF o cable de la antena de televisión de su casa a la toma ANT.
[CONEXIÓN HDMI] 1) Éste es el mejor método para conectar este TV a dispositivos de vídeo con la toma de salida HDMI, tales como un reproductor de DVD con toma de salida HDMI, etc. Puede minimizar el deterioro de la calidad de imagen. Utilice el cable HDMI (disponible en el mercado) para la conexión. Al conector HDMI INPUT HDMI OUT ANT.
[CONEXIÓN DE COMPONENTE] 1) Éste es un mejor método para conectar este TV a dispositivos de vídeo con la toma de salida de componente, tales como un reproductor de DVD, etc. Para la conexión utilice el cable del componente (comercialmente disponible). Si conecta la toma de salida componente a la toma de entrada COMPONENT1, conecte un cable de audio a las tomas AUDIO L/R (izquierda/derecha) de COMPONENT1.
[CONEXIÓN AUDIO/VIDEO ANALÓGICA] 1) Este es el método general para conectar el TV a aparatos de vídeo, como por ejemplo una videograbadora, mediante las tomas de salida de audio y vídeo. Cuando el conector audio de los equipos de vídeo sea monoaural, conecte el TV a la clavija Audio L.
PREAJUSTES INICIAL Sugerencia: Antes de iniciar el ajuste inicial, debe conectar la antena. PREAJUSTES INICIAL En esta sección se describen los ajustes iniciales cuando se enciende por primera vez el equipo tras su compra. Más abajo se muestran los elementos de dichos ajustes. • SELECCIÓN DE IDIOMA Puede seleccionar el idioma del menú que aparece en la pantalla entre inglés, español y francés. • Autoscan (Exploración automática) (TV/DTV) (Seleccione “Aire” cuando utilice antena.
AJSUTE DE LOS CANALES 3 Si cambia de cables (por ej., de cable de antena al cable CATV) o si mueve el TV a un área diferente después de completar el ajuste inicial, deberá realizar de nuevo Autoscan (exploración automática). Esta función permite seleccionar fácilmente los canales sintonizables con [CH K/L] y el TV los memoriza incluso si conmuta cables. STILL - 0 SCREEN MODE SETUP Para canales de TV, mediante [K /L], seleccione "Aire". Para canales CATV, seleccione "Cable".
LISTA DE CANALES 3 La función de lista de canales le permite omitir los canales innecesarios de la lista de registro de canales. Seleccione el canal que desea añadir. • Con [K/L], seleccione el canal. Lista Canales Subraye canales para selección Ch Up/Down. DTV - 8 DTV 27 DTV 48 DTV 58 9 0 SCREEN MODE SETUP 6 DTV STILL 67 BACK Selección Ca ENTRE Ver/Saltar Atrás ENTER • Presione [ENTER], y el resalte del canal seleccionado desaparece. Luego, este canal será omitido.
REGISTRO MANUAL 3 Seleccione el canal que desea añadir. • Mediante los botones de Número de canal, seleccione el canal deseado. Puede registrar la ausencia de canales que no fueron explorados por la función Autoscan debido a su estado de recepción deficiente en el ajuste inicial. 11 INPUT SLEEP SELECT POWER 1 2 3 4 5 6 7 8 9 Registro Manual Seleccione canal a registrar con tecla numérica.
• Si el canal es puesto a la entrada externa, usted no puede confirmar la situación de antena. CONFIRMACIÓN DE ANTENA Puede verificar la intensidad de señal de cada canal para obtener una imagen más clara. Video1 Antena INPUT SLEEP SELECT POWER Atrás 1 2 3 4 5 6 7 8 9 Indicador disponible sólo para señal antena. AUDIO CH Cambia Ca STILL - 0 4 SCREEN MODE SETUP ENTER INFO BACK CH RETURN VOL. 1 CH MUTE Visualización de la pantalla de instalación. • Presione [SETUP].
SELECCIÓN DE IDIOMA Puede elegir su idioma de pantalla entre los siguientes: "Inglés", "Español" o "Francés". STILL - 0 SCREEN MODE SETUP ENTER INFO BACK 1 MUTE AJSUTE DE LOS CANALES CH RETURN VOL. CH Visualización de la pantalla de instalación. • Presione [SETUP]. Se mostrará la siguiente pantalla de instalación. 2 Selección de "IDIOMA" y presione [ENTER] para confirmar su selección. • Con [K/L], seleccione "English", "Español" o "Français". Idioma Select the language for setup display.
PARA MIRAR TV Sobre la emisión de subcanales: Puede haber diferentes programas emitidos en subcanales a través de un único canal procedente de ATSC. Puede ver cada programa de subcanal emitido seleccionando uno de los subcanales. SELECCIÓN DE CANAL Puede seleccionar el canal usando bien [CH K/L] o los botones de Número de canal. A continuación se muestran los dos modos de hacerlo.
Cuando la emisión contiene SAP y audio monoaural... MODO DE IMAGEN FIJA SAP / MONO SAP / MONO Puede congelar la imagen mostrada en la pantalla. Cuando la emisión contiene solamente audio monoaural... 1 2 3 4 5 6 MONO (no puede cambiarse.) AUDIO 8 - 0 9 STILL SETUP 1 SAP / ESTÉREO ESTÉREO : Emite audio estéreo. SAP : Emite durante un segundo un programa de audio. MONO : audio monoaural. Para poner en pausa la imagen.
SELECCIÓN DE LA ENTRADA EXTERNA Si se conectan equipos externos, incluyendo grabadores de vídeo y sistemas de cine en casa, se podrá seleccionar fácilmente el modo de entrada con el mando a distancia. • Si presiona [INFO], se mostrará el modo de entrada externa actual en la parte superior derecha de la pantalla.
CAMBIO DEL MODO DE VISUALIZACIÓN DE PANTALLA Cada uno de los 4 tipos de modo de visualización se puede seleccionar en el modo de pantalla, con las relaciones de aspecto del televisor 4:3 y 16:9. Puede seleccionar su modo de pantalla favorito y disfrutar de los programas. AUDIO 7 8 - 0 9 1 Cambie el modo de pantalla. • Cada vez que presione [SCREEN MODE], la relación de aspecto del televisor cambiará de forma alterna. 2 Presion [SCREEN MODE] repetidamente hasta que aparezca la pantalla normal.
DTV INFORMACIÓN DE PANTALLA Con esta función se puede visualizar en la pantalla el número de canal seleccionado u otra información como el modo de audio para su comprobación. 1 AUDIO 7 8 9 - 0 SCREEN MODE • Se muestra la siguiente información: ENTER (1) Título del programa INFO BACK (2) Emisora CH RETURN VOL. MUTE Visualización de la información detallada para el canal. • Presione [INFO] en el mando a distancia.
AJUSTES OPCIONALES TEMPORIZADOR DE APAGADO AUTOMÁTICO PANTALLA DE INSTALACIÓN La función Temporizador de Apagado Automático apagará automáticamente la corriente de la unidad a una hora determinada. Esta sección describe el resumen de la pantalla de instalación que se muestra al presionar [SETUP]. Para más detalles, vea la página de referencia de cada elemento. INPUT SLEEP SELECT 1 2 3 4 5 6 La pantalla de instalación está formada por los elementos que se muestran a continuación.
Contraste Mediante [s / B], ajuste para aumentar o reducir el contraste. s: Para disminuir el contraste B: Para aumentar el contraste AJUSTE DE LA IMAGEN Puede disfrutar de su modo de imagen preferido seleccionando entre las cinco configuraciones predeterminadas de imagen que ajustarán los colores para mejorar su experiencia de visión. Además, pueden variarse los ajustes de brillo, contraste, color, matiz, nitidez, temperatura de color y ahorro eléctrico.
4 SUBTÍTULOS Cambie el modo de Subtítulo Cerrado. Subtítulo Cerrado Podrá ver películas, noticias, programas de TV, etc. especialmente identificados (cc) ya sea con subtítulos del diálogo o con visualización de texto agregados al programa. Texto2 Texto3 Texto4 • Mediante [K /L], seleccione el subtítulo cerrado deseado. STILL [MODO DE TÍTULO] INFO CH RETURN 1 CH MUTE Visualización de la pantalla de instalación. • Presione [SETUP]. Se visualizará la siguiente pantalla de instalación.
SUBTÍTULOS DE DTV DTV 1 ESTILO DE SUBTÍTULO CERRADO 1 • Presione [SETUP]. Se visualizará la siguiente pantalla de instalación. Visualización de la pantalla de instalación. • Presione [SETUP]. Se visualizará la siguiente pantalla de instalación. 2 2 Visualización de la pantalla de instalación. Seleccione "DETALLE" y presione [ENTER] para confirmar su selección. • Mediante [K /L], seleccione "Subtítulo Cerrado" y presione [ENTER] para confirmar su selección.
Ajuste cada elemento. • Cuando "Config. Usuarid" esté ajustado en "On", puede ajustar los elementos siguientes. Estilo S.C. Subtítulo Cerrado Config. Usuarid Estilo Fuente Tamaño Fuente • Aparece el estilo CC ajustado por la emisora. Color Fuenter • Aparece el estilo CC ajustado en “Config. Usuarid”. • Con [K/L], seleccione el elemento que desee ajustar.
V-CHIP 3 Introduzca la contraseña. • Con los botones de Número de canal introduzca el número de 4 dígitos. Permite que los padres eviten que sus niños vean programas de televisión que contienen material inapropiado, incluyendo expresiones y descripciones desagradables. Se pueden cancelar las limitaciones de programas establecidas introduciendo la contraseña. V-Chip Introduzca contrasena.
Ajuste de "Clase de MPAA". • Con [K/L], seleccione la clase. 5 • Presione [ENTER] y ajuste "Mirar" o "Bloq.". Ajuste de "Clase de TV". • Con [K/L], seleccione la clase. • Presione [ENTER] y ajuste "Mirar" o "Bloq." para la clase sin subcategorías. V-Chip V-Chip X NC-17 R PG-13 PG G NR Seleccionar FV V ENTER Mirar / Bloque BACK Atrás Seleccionar 6 Para salir del instalación, presione [SETUP].
C Contraseña Nueva 4 Visualización de la pantalla "Contraseña Nueva". • Con [K/L], seleccione "Contraseña Nueva". V-Chip Clase de MPAA Clase de TV Contraseña Nueva • Presione [ENTER]. 5 Cambie la contraseña. • Use los botones de Número de canal del mando a distancia e introduzca la NUEVA contraseña de 4 dígitos. • Introduzca de nuevo la contraseña en la casilla "Confirme contraseña". V-Chip Introduzca contraseña. Confirme contraseña. Código Id. 6 BACK Atrás Para salir del menú, presione [SETUP].
AUDIO HDMI Ajuste el método de entrada de sonido para la toma HDMI. SCREEN MODE SETUP ENTER INFO BACK 1 Active la pantalla de configuración. 2 AJUSTES OPCIONALES • Presione [SETUP]. Se muestra la siguiente pantalla de configuración. Seleccione "DETALLE" y presione [ENTER] para confirmar su selección. • Mediante [K /L], seleccione "Audio HDMI" y presione [ENTER] para confirmar su selección. Detalle Subtítulo Cerrado V–chip Audio HDMI 3 Automático Cambie a Audio HDMI.
VARIOS GUÍA DE LOCALIZACIÓN DE PROBLEMAS Antes de llamar al servicio técnico, compruebe una vez más el siguiente cuadro. Síntoma Solución No hay corriente • Asegúrese de que el cable de alimentación está enchufado en el tomacorriente. • Si se produce un fallo de corriente, desenchufe el cable de alimentación durante 30 minutos para permitir que la unidad se reinicie por sí misma. No hay imagen o sonido • Compruebe que está encendida la corriente. • Compruebe la conexión del tomacorriente.
Síntoma La imagen se desplaza verticalmente Solución • Si está usando una antena exterior, compruebe el estado del cable así como el de la conexión. • Las ondas eléctricas pueden verse interferidas debido a la excesiva proximidad de algún electrodoméstico. • Trate de ver otros canales. Puede que sea un problema de la emisora que está sintonizando. Recepción defectuosa de algunos canales • Compruebe la antena o la conexión del cable que va a la unidad principal.
GLOSARIO ATSC Acrónimo de Advanced Television Systems Commitee y nombre del estándar de radiodifusión digital. Contraseña: Un número almacenado de cuatro dígitos que usted debe proporcionar para realizar ajustes para V-CHIP. Dolby Digital El sistema desarrollado por Dolby Laboratories para comprimir el sonido digital. Le ofrece un sonido de audio estéreo (2 canales) o de audio multicanal (hasta 5,1 canales).
ESPECIFICACIONES ESPECIFICACIONES ELÉCTRICAS Salida de sonido: 5W, 8 ohmios x 2 OTRAS ESPECIFICACIONES Mando a distancia: Sistema de infrarrojos con codificación digital Temperatura de funcionamiento: 5°C a 40°C (41°F a 104°F) Requisitos eléctricos: CA de 120V, 60Hz Consumo eléctrico (máximo): 160W LCD: Panel XGA de 32 pulgadas de ancho (1366 x 768 píxeles) Dimensiones: Al : 23-7/16 pulg. (595mm) An : 32-3/16 pulg. (818mm) Prof : 4-9/16 pulg. (115mm) Al : 25-3/8 pulg.
GARANTIA LIMITADA FUNAI CORP. reparará este producto libre de cargos en los EE.UU. de América, en caso de defectos en los materiales u obra de mano, de la siguiente manera: DURACION: Partes: FUNAI CORP. proveerá las partes necesarias para reemplazar las piezas defectuosas sin ningún cargo durante un (1) año a partir de la fecha de la compra original al minorista. Ciertas partes quedan excluídas de esta garantía. Mano de obra: FUNAI CORP.