,_'VLIw_,.._ _ TV/DVD/VHS _oOC (19 (27 inch inchl D _F'_ ==._.o. DB_ _ D , G, T A L TruSurround/YIP3 by SRS(4)) _ wner's Manual is _f recycled paper. _ _ _/, ¸ _ ,_ _ ACCESSORIES RUCCIONES EN ESPANOL INCLUIDAS, I Remote Conm}l Uni_ Ba*:mries "_ _ _ - _ a _ _ PART NO.
WARNING: TO REDUCE THE RISK OF FIRE OR ELECTRIC SHOCK, DO NOT EXPOSE THIS APPLIANCE TO RAIN OR MOISTURE. THIS SYMBOL GEROUS INDICATES VOLTAGE THAT RISK OF ELECTRIC SHOCK WITHIN THIS UNIT. CAUTION: TO REDUCE THE RISK THIS OF ELECTRIC SYMBOL INDICATES SHOCK, DO NOT REMOVE COVER (OR BACK). NO USER SERVICEABLE PARTS INSIDE. REFER ARE IMPORTANT SERVICING NEL.
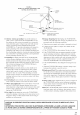
FIGURE EXAMPLE OF ANTENNA NATIONAL A GROUNDING ELECTRICAL AS PER CODE LEADIN WIRE GROUND CLAMP_, ANTENNA DISCHARGE UNIT (NEC SECTION 810-20) ELECTRIC SERVICE GROUNDING CONDUCTORS (NEC SECTION 810 21) NED NATIONAL ELECTRICAL CODE -.-_--111-_* S2898A POWER SERVICE GROUNDING ELECTRODE SYSTEM (NEC ART 250 13.
IMPORTANT COPYRIGHT LASER INFORMATION Unaufl_ofized copying, broadcasting, public performance and lending of discs are prohibited. FCC WARNING- This equipment may generate or use radio frequency energy. Changes or modifications to this equipment may cause harmful interference unless the modifications CAUTION: USE OF CONTROLS OR ADJUSTMENTS OR PERFORMANCE OF PROCEDURES OTHER THAN THOSE SPECIFIED HEREIN MAY RESULT IN HAZARDOUS RADIATION EXPOSURE, are expressly approved in the instruction manual.
For safe operation mid satisfactory performance of your TV/DVD/VHS, keep the following in mind when selecting a place for its installation: ® Shield it from direct sunlight and keep it away from sources of intense heat. ® Avoid dusty or humid places. ,, Avoid places with insufficient ventilation for proper heat dissipation. Do not block the ventilation holes at the top mid bottom of the unit. Do not place the unit on a carpet because this will block the ventilation holes.
ABLE m IMPORTANT SAFEGUARDS m PRECAUTIONS ..... 2 ................ LOCATION 4 ................... 5 ))4 C )N SLOW MOTION )i]N S .............. PICTURE SEARCH STILL PICTURE ............ .............. VERTICAL HOLD CONTROL .5 WARNING 5 RENTAL PLAYBACK 7 AUTO REPEAT PLAYBACK m FEATURES .................... .................... m OPERATING FUNCTIONS CONTROLS ................... m PREPARATION 9 FOR USE ....... 11 11 CONNECTING TO EXTERNAL 1NPT JACKS .................
[ TVNCB ] ® Hi-Fi system-The Hi-Fi stereo recordh_g system offers you excellent sound quality with a dynamic range of 80dB, frequency response from 20Hz to 20kHz, and (I.(105% wow and fluttm: * Rotary 4-head Record/Playback System-Four heads ensure excellent picture quality and special effects playback. ,, Index Search-Fast-forwards to start of next recording. * Slow Motion-View recorded than normal speed.
[ DVD ] • Dolby Digital surround This player can handle Dolby Digital surround having 5.1 channels when connected to a Dolby decoder. • Sleep timer Allows you to have the TV/DVD/VHS automatically turn off at a desired time. sound Digital • Still/fast/slow/step playback Various playback modes are available irrcluding still pictures, fast forwardh'everse, slow motion arrd step frames. = Random playback for audio CD and MP3 This player can shuffle tire oMer of tracks to play them in random order.
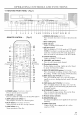
(..... )PERA -TV/DVD/VHS I IN(= C()NTR()I,S ANI) 'I LNC li I I )NS ..... ' FRONT PANEL - [Fig.l] ...... oooooooooooooooooo ...... oooooooooooooooo_:_o I ...... ........... oooooo,,_,_,,_oo TV,LVCP,buttons u ooo 2 3 4 - REMOTE CONTROL - 3 5 6 7 8910 11121314 4 15 16171819 6. OPEN/CLOSE button [DVD R371 Press to insert discs into or remove [Fig. 2] tray. 7. Disc loading ......... (TVA/CR) T[TL£ CLEAR from the DVD mode. I0. TV/VCR indicator Lights on during TV/VCR 11.
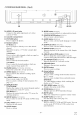
- TV/DVD/VHS REAR PANEL - [Fig.3] 46 20. AUDIO L/R input jacks Connect to the audio output jacks of a video 31. MODE button [DVD P.411 Activates program playback or random playback mode. camera or VCR. 32. SEARCH MODE button [DVD R>)I Press to locate a desired point. 21. Cassette compartment 22. PICTURE button Press to adjust the picture. 23. Number buttons 33. AUDIO button [DVD 12441 Press to select a desired audio language mode. 34.
46. ANT. in jack Connect to an mltenna, cable system, or satellite system. 47. Power cord Com_ect to a stmadard AC outlet (120V/60Hz). NOTE: Remove the power cord from the hook to avoid breaking a wire before you connect to a standard AC outlet. 48. COAXIAL digital audio out jack Connect to the digital input of gm external amplifier or decoder. 49. AUDIO L/R output jack Connect to the analog audio amplifier or decoder.
TO RECORD A SCRAMBLED/UNSCRAMBLED CHANNEL 1. Set the TV/DVD/VHS channel selector to the output channel of tile Cable Converter Box or Satellite Box. (E×. CH3) 1)()pen the battery compmlment cover by pressing the cover on the remote unit in the direction of the 2.Select the channel to record from your Cable Converter Box or Satellite Box. 2)Instal 2 "AA" penlight batteries into the battery compartment in the direction indicated by the polarity (+/-) markings. 3)Replace the covel: afro w.
Stereo system @ @ FoANALOG AUDIO INPUT jacks ® To Right (red) and Left (white) AUDIO OUT jacks (only DVD AUDIO OUT) [Fig. 6] NOTES: • Be sum to turn off tile power to all components in the system before connecting another component. • Refer to the Owner's Manuals for your, stereo system and any other components to be connected to the TV/DVD/VHS. Use an audio coaxial digital cables (not included) for tile audio connections.
If using this TV/DVD/VHS to play back a TV/DVD/VHS in a 5.1 channel Dolby Digital surround, DTS surround, or MPEG surround format, the TV/DVD/VHS outputs a Dolby Digital, DTS, or MPEG data stream from its COAXIAL DIGITAL AUDIO OUT jack. By hooking the player up to a Dolby Digital or DTS decoder, you can enjoy a morn convincing, realistic ambience with powerful and high-quality surround sound of a professional standard such as can be heard in movie theaters.
You can program the tuner to scan all the channels you NOTE: Channel memo U programming is NOT needed select the TV/DVD/VHS chmmel selector to the output Then select the channel to be viewed on the Cable Box lug [_ e The channels you no longer receive or seldom watch can be deleted from the memory. (Of course, you can add the deleted channel into the memory again.) '_'Vi}V[)!VP _ powe c>d Plug the TV/DVD/VHS power cord into a standard AC outlet. NOTE: f 9elec CI.
NOTE: If Spgufish or French is selected accidentally, press the SETUP button on the remote control, press the Arrow _ button to point to "IDIOMA [ESPAlqOLI" or "LANGAGE" [FRAN(;AIS], then press the Arrow _'_ button, then press the SETUP button on the remote control. Make sure ... ,, Press tile POWER button to turn on the TV/DVD/VHS. Seec C}, ANNEL SET UP Press the SETUP button on the remote control. Press the Arrow _. or V button to point to "CHANNEL SET UP". Then, press tile Arrow- _ button.
x1 Set the clock accurately for proper automatic timer recording. If the Public Broadcasting Station (PBS) is available in your area, follow "AUTO CLOCK SETTING". If it is not, follow "MANUAL CLOCK SETTING". X [/TY) C ©C£ S£TTIi_< d'¢/' oz"#'* Press the Arrow _ or "9 button repeatedly until [ONI appears. ,_ AUTOO_O_K tt&:: AUTO CLOCK OH MANUAL CLOCK [AbT(_] SET DST (_ Etch* tfe c _<;_ _
"_ 4 _Y : _ ¸'_ _¸ %,_,'x 7 _ s _¸¸,_ , ? _ _ Make sure ... In the example below, the clock is to be set to: DATE May 7th, 2002 SETTING TIME 5:40PM ® TV/DVD/VHS power must be turned on. 'f S ec SETTtr,£}_CLO©K Press tlle SETUP button on the remote control. Press the Arrow _, or V button to point to "SETTING CLOCK". Then, press the Arrow _ button.
FV OPERATION "7 _'_ _or Press tile POWER TV/DVD/VHS. Seect The TV/DVD/VHS's picture controls - BRIGHT, CONTRAST, COLOR, TINT and SHARPNESS are preset to factory specifications. Although they are usually the best, you may need to make some further adjustments for a natural looking image. NOTES: + Procedures must be followed within 5 seconds or the Picture Control mode will be cancelled.
Fele;_ CA>7 ON Press the SETUP button on the remote control, You can view specially labeled (co) TV programs, movies, news, pre-recorded tapes with either a dialogue caption or text display. 2 TEXT mode: By choosing the text mode, you can watch half screen text information if you w_mt. NOTE: Not all programs are bloadcast with closed captions. Your television is designed to provide error free closed captions from high quality tmtenna, cable mid VCR signals.
® When you select the rating category _md turn it [BLOCKI, the higher rating will turn [BLOCKI automatically. Also, the lower rating will turn [VIEWI automatically. ,, When you turn "TV-Y" to [VIEWI, tile all ratings will turn to [VIEW] automatically. V-CHIP enables parents to prevent their children from watching inappropriate material on TV.
M:_4A £ _'_i_ "¸__ ......... } H,¢ i_,{;,h74 L'('.'£SS Make sure ... To change access code, follow the steps. • TV/DVD/VHS power must be turned on. "£ Se_sc_ '_,Cf P SF/} UF TV/VCR Press the SETUP button on the SETTING remote control. CLOCK V CHIP Then, press the Arrow SET LANGUAGE CAPTION UP IENGLIBH] OFF] ZEIqORET[_RN TV,VOR INDEX SEARCH TIMESEARCH Press the Arrow A or T button to point t( V-CHIP SET UP . Then, press the Arrow D_ button. D_ button. ACCESS Use the number code.
_ "9 "3 _ _ _" _ 9 _ _ _ , _1 " __ 9 You cgm record or listen to a program in MTS stereo. When you play a VHS tape, or receive a broadcast on the TV/DVD/VHS tuner channel you are watching, the status shown below will appear when you press the DISPLAY button on the remote control.
70 SELEC? i Make sure ... ® TV/DVD/VHS power must be turned on. ?Y} S/T ,:_C7 TIMER 1) Press the SETUP button on the remote control. Press the Arrow A or V button to point to "USER'S SET UP".Then, press the Arrow button. PROGRAMMING SETTING CLOCK CHANNEL SET UP USERS reHiote You can chgmge the selection to "MONO" if you want to listen to HIFI tapes in normal audio playback. #_Y:'I MOD,h/ Press the SETUP button on the corltrol, _ Press the Arrow A or V button to point to "USER'S SET UP".
7IDa,, {).....(.,,ASS[,, _ _ i__F_1 E This TV/DVD/VHS will operate with any cassette that has the _ mark. For best results, we recommend the use of high-quality tapes. Do not use poor quality or damaged tapes. /NS;Y{kq U'¢OA CA5S/'_7V7) ® Avoid moisture. Moisture condensation may occur on the tape if it is moved from a cold place to a warm place or visa versa.
Make sure ... ® TV/DVD/VHS power must be turned on. t _sev'/s p s aybsck [ / f sron Press the STOP button when pitt},- [ back is completed. / NOTES: ® If you press the TV/VCR side PLAY button in tile DVD mode, you can start the VCR playback. " If you press the SELECT button in the VCR playback, it will stop and the mode will change to the DVD mode.
PI.AYBA( B SPE( IAL Make sure ... • TV/DVD/VHS power must be turned on. • lnsel a prerecorded tape. • Before playback, follow The TV/DVD/VHS has the auto repeat function allows you to repeat a tape indefinitely without touching the PLAY button. steps below. ALl_ REPEAT: Repeat playback to the end of the tape. This function enables quality when playing rented tapes.
Make sure ... * TV/DVD/VHS power must be turned on. * Insert a tape. ® This function will not operate in recording mode. ,, This function is not operative when a cassette tape is not inserted in the TV/DVD/VHS. This function allows you to search easily a beginning point that you want to review by rewinding or fast forwarding. NOTE: In the example below: To watch a program after 2 hour 50 minutes from the present position, in either direction.
¢7 ;' Press the SETUP This feature provides a method of indexing the starting point so that it can be easily returned to in either fast forward or rewind mode. re[note CURRENT PLAYBACK PROGRAM Beginning of tape r4 3 2 INDEX MARK ! 1 2 3 _, or T but on to point to "INDEX SEARCH press the Arrow _button I T'MER PROO_'NO [ CHANNELsETSET UPvUSERScHIP SET upUP | ZERoCAPTONRETuRNO#F LANGUAGE ENGLISH INDEX / the number of programs TV,VOR SETUP SETTING CLOCK '. Then, 1,.
Make sure ... * TV/DVD/VHS power must be turned on. o Insert a cassette tape with its erase prevention tab in place. (If necessary, rewind or fast forward the tape to the point at which you want to begin recording.) NOTES: ,, This unit will ONLY record grad view the same chmmel. ® This unit cannot record the contents from the built-in DVD. You can ONLY watch the same TV program that is being recorded. ¢ Sect/he csa'_ne o Press the PAUSE button to temporarily stop recording.
Push(es) I push 2 pushes 3 pushes This function enables you to set a recording length simply by pressing the REC/OTR button on the TV/DVD/VHS. Make sure ... ® TV/DVD/VHS power must be turned oil. - Insert a cassette tape with its erase prevention tab in place. (If necessary, rewind or fast forward tile tape to the point at which you want to begin recording.) NOTES: ® This function CANNOT be done from tile remote control.
pressing button. the Arrow A button. And press tile Arrow ® If you have not yet set tile clock. You may set tile TV/DVD/VHS to start recording while you are away. You can grams to record on specific days, daily within a 1 year period.
To shift the time schedule of an automatic timer recording. 1 )Press the POWER Then, press the Arrow _ button. 2)Repeat step [ll on page 32. 3)Press the RECORD button and select the desired program using the Arrow _, or V button. Press the Arrow _, or T button untd| :: 2: ::: ::: ::: ::| the desired mhmte appears. /[,.;i ;:;;_,: _i;_ : l| (Example: "30" for 7:30PM) _ !! !!!!!!! ii/ Then, press the Arrow _ button. " ....
T# C W,:C£ 7 HX /{f,:G N//,:N/9 77/!47; 3 Auto Reb,{u w l)Press the POWER button so tha the REC indicator goes off. 2)Press the SETUP button on the remote control. 3)Confiml "TIMER PROGRAMMING" is pointed. 4)Press the Arrow _ button. The details of programs appear on the TV screen. 5)Press the SETUP button on the remote control to return to TV mode. ,, Make sure the channel erly set in advance. * I/is not necessary timer recording.
ON S< RE .N D SP .AY To check the Counter, Clock and Chmmel number on the TV screen, press the DISPLAY button on the remote control. Each time you press the DISPLAY button on the remote control, the TV screen will change as follows: ® Counter mode: After 5 seconds, only the counter remains. To clear it, press the DISPLAY button. ® The On Screen * Clock mode: After 5 seconds, only the clock and the channel number remain. To clear them, press the DISPLAY button.
...... l)7 The following player. discs can be played back on T this DVD Logl, Contents Disc Size Playback Time A _prox. 4 h (s ng _--sc,x ) 12 cm A _ _rox. VIDEO DVD Vkleo Sound ((otlb and Pictures (stag _i_ mnn_auDm Sound [DVD] _ ec ) A >prox. 80 nfin 8 cm Audio CD 811 c-s J¸ Data on a DVD is divided into sections called "titles", and then into subsections called "chapters", each of which is given a title or chapter number.
TurnonthepoweroftheTV,amplifierandtulyother components whichareconnected totheDVDplayel: (Change tileinputsystem to suittileDVDplayer, and checkthatthesoundvolumeiscorrect.) • If a disc is dhly or has scratches, the pictures may appear distorted and tile playback operation may stop. In such cases, cletm the disc and unplug the power cord guld then plug it again before resuming playback.
J pHOnS ¸' _ _°_,,*_ ,:_,, , • Playback muted. o Playback will stop, and then appear the resuming message at the center. 2 will pause, with sound /q'P%s1/'e_,q,., Pr.,_ tse P/,A' b tto_, F sysac_ w sat/ o'_" be so _ w_®_>//'e/';_'÷,, :us :)aybac( ,, :;.,>:_ ...... W_';!S_ 1:k _[)i9(00 : esu/'® _lsyb ¢/4, Notes • Resuming playback is not available with some discs. ® It is possible to switch from the DVD play mode to the TV mode.
• sei_©_d w/_e paybacR s paused _e/'_@ _ s sr_u ed } • Slow motion mode will be activated. (Sou_ ® Pressing and holding the _ button for more than I second cycles the playback speed in three steps. Select an appropriate speed while referring to the speed indication on the screen. 2 t _"_;ecourt • Example: 1 hour, 23 minutes 30 seconds J_iN] 11" P_'ess the hi, rser c butt®_s:s to set he des _ed and 1 -+2-+3-+3-+(I --oo o........... 1 Notes ®In the case of DVD, Time Search in Title is effective.
You can define a section to be played back repeatedly. For DVDs • A single title or chapter • Pressing the REPEAT the screen as follows. is played back repeatedly. button cycles the display Tile current ( h lpter is phyed repe aedl 5, blck Tile ctlrrellt Title is phyed repe aedl 5, blck on * The starqng selected, _:__: po point (A) will then be t _>ft'edes o The selected section played back repeatedly. For audio will [ (_ ed secto . be (_ CDs oTIle whole repeatedly.
Youctmdefinetheparttobecalledback, Setthemarker • Usingthecursor (_1/_) button,position thecursor ontothemarker number shown as"NOTSET". Press theENTERbuttonwhenthescreen tobe reviewed appears. Themarked timewill bedisplayed. Upto5 pointscanbemarked. • The progranl s; screen ll'®I_!_ I]I; 5">A _:t • 50 programs ()liCe on tile will appear. I%1111®1i(I ,,_.:_"_':...................
P_ess the h:J©<)Eb_Ao_ n sop >_ode • The program setting menu screen will appear. Note ®Zooming ffmction does not work while disc menu is I 8TaRT:_ w shown. EXlT:_] hes s¢:s;'_ Note • Program playback is not available during random playback. set a/' _'4P:3f }e-,_e_':_xe< d}s¢, ®The MP3 menu screen shows up. "ALBUMS" and files are referred to as "TRACKS". ........ "+" appears at the beginning of the album name.
Notes e,:.> t'_: _L/:W • Playback ® During play, a desired track can be directly searched. Just type in the TRACK number with the numerical buttons. will start. ® If the typed TRACK number is not available, the °°disable" symbol appears and the direct search mode is cancelled. • Playback cannot be started from a desired 3 ?"_' _"" "> time count, The information checked. on an MP3 disc • The TRACK currently in play will be highlighted. in play gOLOERNAME can be .*es ? _.
Pess e_i©©Eb_,t • The random setting ®;_wee menu screen will appear. START: _ • Random sg3©Pmode EXIT play starts. Both right and left channels are active (stereo)• Tile DVD player has a function select the desired audio language Only the left channel is active. which allows you to mid sound mode.
oft may selected take time language. * The screen seconds. display to display will the subtitles disappear after in the about 5 ®When "SUBTITLE NOT AVAILABLE" appears onscreen, it means no subtitle is recorded on the Tile DVD player select the desired sw_ has a function which language for subtitles. I"*,e? !:>few; "_e 9_:_??'TL, E bu • The subtitle l_mguage can be changed are recorded in multiple languages being played. o The subtitle language subtitles are recorded DVD being played.
AI: Current track number / the number of total tracks. You can check the informatkm about the disc by pressing tile DISPLAY button on the remote control, L=_TIME: current disk and remaining timeof of lapsed time the the current disc. j For DVDs ®Use the number button to start from a desired track ,% OH 7,49 0:01:46 0:03:27 L M "_ CH{Chapter): Current chapter number / the number of total _H i 3 Elapsed time of the current chapter and chapter.
# 1 LANGUAGE I]i ;P! AS 3/4J 0 PARI N xd l'l SET: _ I _SC.ENU I _AN_MA_E CO_E 4_ SET-UP s#_ } u/¢ "_¢ ii'i¢ 1:>9, r', od Press/he ........ Ai"g ' b_At®';s to seect al', tern / / SUF, P bul'to ' back in selected language.) Language Setting for Audio trod Subtitle is not available with some discs. Then use the Audio and Subtitle I 'ANGM E°°N °'SI ORIGINAL <:/l:: ORIG 4/,, and the ordinary Be sure to press the SETUP button, or the setting will not work.
AUTO POWER OFF (Default : ON) Set or not set to turn off after the screen saver is started and no keys are pressed for 30 minutes. ::_e_s :_eSE UP b to _'_SlOPho_e, I DISPLAY CONTROLS 1IV /OE_ 2 A'/GI ICO' 3.AUTO POWEROFF 4 BACKGRO %) I SET-UP • The setup screen will appear, _:'_ ON ON PACK _.t_>.... 1 , E×,T:SE_"°':[]D'..... ,,:,::_"_°_,,,_,_ sE,:0_,c_i I BACKGROUND COLOR Select blue or hlack. _s I BOX ........... _®. E/!TER (Default : BLACK) butt®n f I 2.
Pess oThe t e SEYUP DTS (Default : OFF) On : Output DTS sound Set to On when the unit is connected to DTS Decnder. b trois _'_ S/'%3P mode setup screen will (I ..... appear, ] I AUDIO CONTROLS :£: .... / s ; 22,tl /r Peg9 It/® Ni'_g _ b/It henpess he OrS _(i_ _;e®C; ENtERbu _\_!do ;{?rid i, (j EXIT: /hes b'es9 u[o SET-UP I I SELECT: _/i'2 SET: _I EXIT: I,_ CANCEL: r_armI Sampling (Default : AUTO) ? • Press £e/£i_g I( Set the output for the DVD recorded in PCM 96kH
When "_ARENTAL Press the _/V :_esss/-,j, S/:Y[JP k,t ®_ LEVEL" is selected buttons to select _m item from "ALL" or 8 to 1 and then press the ENTER ® The setup screen will appear. I SET-UP I button. I PARENTAL CONTROLS I PAaE.TA_ _EVa I I ALL 8 1 .LANGUAGE ) Pl, _/,/J ) o ',sl I Q [1 5 • J I SETO I SEL£CT:VqiIF'I SET: EXIT: CANCEL:_ _ I When SELECT: EXIT: "CHANGE" _/_"_ _ SET: CANCEL: is seleeted ®Press the numeric buttons tn enter the 4 digits word.
' No.
[TVNCR ] Sometimes a performance problem can be easily solved by checking seemingly apparent but often overlooked )ussibilities. Before ammging for service, check these items. It could save your time and money. PROBLEM No power. Remote Control Doesn't Work No picture and sound. No picture or poor picture on TV/DVD/VHS. No sound or poor sound. CORRECTIVE ACTION ®Make sure the AC cord is connected to an AC outlet. ,, Make sum the power is turned on.
PROBLEM Playback picture No picture playback. CORRECTIVE is partially noisy. but the audio is OK in No operation by infrared Remote • Adjust tracking control for a better picture or T button on the TV/DVD/VHS, • Head cleaning may be necessary. CLEANING" on page 53. • Check batteries Video or color fades in and out when making a copy of a video tape. • You can not copy a copyrighted copy guard protection.
If the TV/DVD does not perform properly when operated as instructed in this Owner's Manual, check the player, consulting the following checklist. Symptom No power. The player does not respond to the remote control. No picture Disc c_umot be played No sound Distorted (_Ruse • Loose power plug. ®The remote control is not aimed at the sensor on the TV/DVD. ,, Obstacles present between the remote control and the sensor. ,, The remote control is too far away from the TV/DVD. ,, Dead batteries.
• Wipe the front panel tuld other exterior surfaces of the TV/DVD with a soft cloth immersed in lukewarm water tuld wrung dry, • Never use a solvent or alcohol, Do not spray insecticide liquid near the TV/DVD, Such chemicals may cause damage and discoloration to the exposed surfaces. l.Please visit your local Audio/Video store m_d purchase a good quality VHS Video Head Clemler. 2.
I; I< ?7_I(TA S?g( Sound output: /77_;4'71?#_ 2 speakers, IW. 8 ohm [ TV/VCR J CRT [19 inch model]: 19 inch in-line gun, 90 ° deflection tube [27 inch model]: 27 inch in-line gun, 110° deflection tube NTSC-M Television system : :§15.119/FCC Closed caption system Video Heads : Rotary four-head 1/2 inch Tape width : Tape speed SP: 33.40mm/sec. LP: 16.67mm/sec. SLP : 11.12mm/sec.
- 57 - EN 01AI 1
• CONTROLES DE OPERACION Y FUNCIONES ..... 58 PANEL FRONTAL DEL televisoHDVD/VHS ......... 58 MANDO A DISTANCIA ......................... 58 VISTA POSTERIOR ............................ 58 • PREPARACION PARA LA UTILIZACION .......... 60 CONEXIONES DE ANTENA/TELEVISION POR CABLE .................................. 60 INSTALACION DE LAS PILAS................... 60 CONEXION A TOMAS DE ENTRADA EXTERNA .... 60 MODE DE ENTRADA EXTERNA ................. 60 CONEXION A UN SISTEMA ESTI_REO (Para DVD) ..
23. Botones de ndmeros Mode del televisor: Pulse dos dfgitos para tener acceso al canal deseado. directanlente Recuerde pulsar "()" antes de elegir un canal de un solo dfgito. Botdn +1 O0 Pdlselo para seleccionar canales de televisidn per cable cuyo ndmero sea igual o superior al 100. Mode DVD: Pdlselo para introducir el ndmero deseado. Botdn +10 Pdlselo para introducir los ndmeros deseados cuyo ndmero sea igual o superior al 10. 24. Botdn PAUSE Hace una pausa en la operacidn del disco o la cinta. 25.
p PRERARAC ON PARA LA fnente alas tomas AUDIO L/R y VIDEO de este televisor/DVD/VHS. Y luego pulse el bot6n SELECT hasta que TVIDEO TT al mezca en la pantalla. NOTA: I Consulte la figura VHF/g!HF A/V_£s A.S 3£_%RADAS DE En algnnas exterior.
NOTAS: ,, Lafuentedeaudiodeundiscodelformato de sonido ambiental DolbyDigitalde5,1canales no puede sergrabada comosonidodigitalporuna platinaMDoDAT. ,, Asegfirese dedesconectar laalimentaci6n detodos loscomponentes delsistema antesdehacer la conexi6n aotrocomponente. ,, Consulte losmanuales delpmpietario deloscomponentes quevayaaconectar al televi soffDVD/VHS. ,, Ponga DOLBYDIGITALy DTSenOFFparala salidadeaudioenelmododepreparaci6n.
p PRER&RAC ON Cerci6rese... PARA LA • La alimentaci6n del televisor/videogmbadora deber5 estar conectada. E_ el ejemplo de abajo, el reloj va a ajustarse asf: FECHA: 1 de mayo de 2001 HORA: 5:40 PM Pulse el bot6n SETUP en el mando a distancia. Conecte el cable de alimentaci6n convencional. NOTA: a una toma de CA Pulse el botdn PLAY/A o STOP/V para indicar "AJUSTE RELOJ". Luego, pulse el botdn F.FWD/II_.
REPR DE [!N Pars empezar Conecte la alimentaci6n del televisor, amplificador y cualquier otro componente que est_ conectado al reproductor DVD. (Cambie el sistema de entrada para adaptarlo al reproductor DVD, y compmebe volumen del sonido sea correcto.) que el 7 P@seel bot6s POWEB • La alimentaci6n se conectar4. 2 P@se e_ Ibet6_ ORE[H/CLOSE • La btmdeja de carga del disco se abrir4.
SYLVANIA LIMITED FUNAI CORE will repair this SYLVANIA workmanship as follows: product, WARRANTY free of charge in the USA in the event of defect in materials or DURATION: PARTS: F-UNAI CORP. will provide _arts to replace defective parts without charge for one (1) year fl'om the date of original retail purchase. Two (2) years for Picture Tube. Certain parts are excluded from this warranty. LABOR: FUNAI original LIMITS CORE will provide retail purchase.