ST201UB.qxd 04.3.9 4:04 PM Page 1 OWNER S MANUAL ATSC/NTSC STB 6900DTD As an ENERGY STAR® Partner, our company has determined that this product meets the ENERGY STAR® guidelines for energy efficiency. ENERGY STAR® is a U.S. registered mark. INSTRUCCIONES EN ESPAÑOL INCLUIDAS. If you need additional assistance for set-up or operating after reading owner’s manual, please call TOLL FREE : 1- 800 - 968-3429 Please read before using this equipment.
ST201UB.qxd 04.3.9 4:04 PM Page 2 Table of Contents 1 Before Using . . . . . . . . . . . . . . . . . 3 Important Safeguards. . . . . . . . . . . . . . . 3 Precautions . . . . . . . . . . . . . . . . . . . . . . 5 Information on digital broadcasting . . . . 6 Major features of STB . . . . . . . . . . . . . . 7 Location of controls. . . . . . . . . . . . . . . . 8 Accessories . . . . . . . . . . . . . . . . . . . . . . 11 Installing batteries . . . . . . . . . . . . . . . . . 11 Reference to SETUP menu .
ST201UB.qxd 04.3.9 4:04 PM Page 3 WARNING: TO REDUCE THE RISK OF FIRE OR ELECTRIC SHOCK, DO NOT EXPOSE THIS APPLIANCE TO RAIN OR MOISTURE. CAUTION: TO REDUCE THE RISK OF ELECTRIC SHOCK, DO NOT REMOVE COVER (OR BACK). NO USER SERVICEABLE PARTS INSIDE. REFER SERVICING TO QUALIFIED SERVICE PERSONNEL. THIS SYMBOL INDICATES THAT THERE ARE IMPORTANT OPERATING AND MAINTENANCE INSTRUCTIONS IN THE LITERATURE ACCOMPANYING THE APPLIANCE.
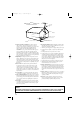
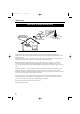
ST201UB.qxd 04.3.9 4:04 PM Page 4 F IGURE A EXAMPLE OF ANTENNA GROUNDING AS PER NATIONAL ELECT RICAL CODE ANTE NNA L EAD I N WI RE GROUND CLAMP A NTENNA DI SCHARG E UN I T (NEC SECTION 8 10 -2 0) EL ECT RI C SE RV I CE EQ U I PM EN T G RO UNDI NG CO NDUCT ORS (NEC SECTION 8 10 -2 1) G RO UND CL AM PS NEC - NATI O NAL EL ECTRI CAL CO DE S2 8 9 8 A 13.
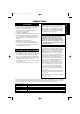
ST201UB.qxd 04.3.9 4:04 PM Page 5 PRECAUTIONS For safe operation and satisfactory performance of your this product, keep the following in mind when selecting a place for its installation: • Shield it from direct sunlight and keep it away from sources of intense heat. • Avoid dusty or humid places. • Avoid places with insufficient ventilation for proper heat dissipation. Do not block the ventilation holes at the top and bottom of the unit.
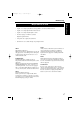
ST201UB.qxd 04.3.9 4:04 PM Page 6 Before Using Information on digital broadcasting ATSC NTSC Receives both ATSC and NTSC Analog/digital terrestrial antenna STB Analog/digital terrestrial signals TV Digital broadcasting is the most advanced format of broadcasting, employing a new technology for compression of audio and video signals which allows broadcasters to transmit digital signals using existing terrestrial systems.
ST201UB.qxd 04.3.9 4:04 PM Page 7 Before Using 1 Before Using Major features of STB • Capable of receiving digital (ATSC*), analog (NTSC*), and cable (NTSC) broadcasts • Capable of receiving High Definition TV broadcasts • Capable of receiving Dolby® digital 5.1 audio • Alternate languages for OSD are available. (English, Spanish, French) • Component video output jacks (Y/ Pb/ Pr) • Sub-channels* are available through a single digital channel.
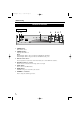
ST201UB.qxd 04.3.9 4:04 PM Page 8 Before Using Location of controls FRONT PANEL 1 2 3 4 5 6 7 1 POWER button: Turns STB on and off. 2 POWER indicator: Lights up while STB is on. NOTE: When turning the STB on, the power indicator will blink first and light up. When turning the STB off, the power indicator will blink first and go off. 3 Remote control sensor: Receives signals from your remote control and enables you to control STB from a distance.
ST201UB.qxd 04.3.9 4:04 PM Page 9 Before Using 1 Before Using REAR PANEL 1 2 3 4 5 6 8 7 1 ANT. IN Jack: Use to connect an antenna to STB. 2 DIGITAL AUDIO (COAXIAL) Jack: Use to connect a decoder or an amplifier to STB with a digital coaxial cable. NOTE: You must use this jack and a Dolby® Digital receiver for Dolby® Digital 5.1 playback. 3 AUDIO R/ L Jacks: (2 pairs) Use to connect your TV, a stereo system or a VCR to STB with standard audio cables.
ST201UB.qxd 04.3.9 4:04 PM Page 10 Before Using REMOTE CONTROL 1 6 7 8 5 2 Number buttons: Use to input channel numbers and passwords, and to set time. 3 ENTER button: In SETUP menu, press to determine your selection. 2 3 4 1 POWER button: Turns STB on and off. 9 10 11 4 CH o / p buttons: Press to change the channels up or down. 5 Navigation buttons o / p / s / B: Press to move the highlight up, down, left or right.
ST201UB.qxd 04.3.9 4:04 PM Page 11 Before Using You will find STB and the following accessories when unpacking the carton box of STB: Installing batteries 1 Unsnap the battery cover from the back of the remote control. STB 6900DTD Remote controller unit and AA batteries (x2) (PART No.: NE120UD) 2 Install two AA batteries making sure the polarity (+ / -) direction is correct. Owners manual (PART No.: 0EMN02308) NOTE: When replacing batteries, make sure to replace them in pairs.
ST201UB.qxd 04.3.9 4:04 PM Page 12 Before Using Reference to SETUP menu SETUP WIZARD ( Refer to page 25 through page 29. ) SETUP WIZARD SETUP WIZARD guides you through initial setup. "SETUP" : "Create new setup" "QUIT" : "Keep old setup" QUIT SETUP Setting the clock (Manual) (5/8) Language for screen (1/8) ( Refer to page 25. ) ( Refer to page 27. ) SETUP WIZARD 1/8 SETUP WIZARD 5/8 Enter current time.
ST201UB.qxd 04.3.9 4:04 PM Page 13 Before Using DISPLAY ( Refer to page 43, 46, 49, 51.) ( Refer to page 54, 56.) CHANNEL QUIT CHANNEL DISPLAY 1 Before Using CHANNEL DISPLAY QUIT ADD/DELETE ANTENNA CHANNEL AUTOSCAN SCREEN RATIO 4:3 DISPLAY MODE LETTERBOX DISPLAY CLOCK CLOCK DETAIL DETAIL Adding channels / Deleting channels Selecting screen formats (Screen ratio) ( Refer to page 43, 46. ) ( Refer to page 54.
ST201UB.qxd 04.3.9 4:04 PM Page 14 Before Using CLOCK ( Refer to page 59, 60, 62, 64. ) CLOCK QUIT CHANNEL 2002/ 1/31( THU ) 2 50PM DST ON TIME ZONE CENTRAL MANUAL DISPLAY AUTO OFF CLOCK DETAIL Setting the clock (Daylight Savings Time) ( Refer to page 60. ) CLOCK QUIT CHANNEL DISPLAY Do you observe daylight saving time (DST)? CLOCK ON OFF DETAIL Setting the clock (Time Zone) ( Refer to page 60. ) CLOCK Select your time zone.
ST201UB.qxd 04.3.9 4:04 PM Page 15 Before Using 1 Before Using DETAIL ( Refer to page 66, 69, 70, 71, 73, 77, 81, 84. ) DETAIL QUIT CHANNEL V-CHIP / CC MENU LANGUAGE ENGLISH DISPLAY CLOCK DETAIL Setting for V-CHIP/CC Setting for V-CHIP/CC ( Refer to page 69. ) ( Refer to page 71. ) V-CHIP / CC V-CHIP / CC QUIT CHANNEL DISPLAY V-CHIP / CC CHANNEL TV RATING CC SELECTION CLOCK QUIT STB MPAA RATING DISPLAY OFF CLOCK NEW PASSWORD Choose either STB or TV for V-CHIP/CC setting.
ST201UB.qxd 04.3.9 4:04 PM Page 16 Connections Connections to antenna Use a standard antenna cable to connect the wall jack to the ANT IN Jack on STB. STB connection to the antenna NOTE: Antenna and antenna cable are not included. To the antenna Rear panel of STB WHEN CONNECTING TO CABLE BOX ALSO: Incoming cable signals CABLE BOX To the antenna ANT ANT IN OUT NOTE: Antenna, antenna cable and Cable box are not included. TV ANT-IN Jack Antenna cable STB ANT.
ST201UB.qxd 04.3.9 4:04 PM Page 17 Connections CAUTION When you connect the antenna cable to another device, be sure to use a splitter as shown below. NOTE: Antenna, antenna cable and Splitter are not included. Right 2 Connections Antenna cable Splitter e.g.: Connection to VCR RF-IN Antenna cables RF-OUT STB ANT. IN Wrong e.g.: Connection to VCR Antenna cables RF-IN RF-OUT STB ANT.
ST201UB.qxd 04.3.9 4:04 PM Page 18 Connections Connections to other devices There will be various ways of connecting STB to other devices. Make your connection according to your choice of devices, screen format, and sound format. You will find some sample connections in the following pages. All jacks on STB will not need to be connected. When you change the connections, all devices should be turned off. Refer to each owner’s manual for further information on other devices.
ST201UB.qxd 04.3.9 4:04 PM Page 19 Connections 1 Use a standard antenna cable to connect the wall jack to the ANT IN jack on STB. 2 Use a standard audio cable to connect the audio output jacks (L, R) of STB to the audio input jacks (L, R) on the TV. NOTE: If your TV is monaural (MONO) and has only one audio jack, use a standard audio cable (white) to connect the audio output jack (white) on STB to the audio input jack (white) on the TV. The red cable and jack will not be used.
ST201UB.qxd 04.3.9 4:04 PM Page 20 Connections STB connection using S-VIDEO output to SDTV NOTE: S-video cable and audio cable are not included. Rear panel of STB Audio cable To audio input jacks (L, R) S-video cable To S-video input jack 1 Use a standard antenna cable to connect the wall jack to the ANT IN jack on STB. 2 Use a standard audio cable to connect the audio output jacks (L, R) of STB to the audio input jacks (L, R) on the TV.
ST201UB.qxd 04.3.9 4:04 PM Page 21 Connections STB connection using VIDEO output to SDTV NOTE: Audio cable and video cable are not included. Rear panel of STB 2 Connections Audio cable Video cable To audio input jacks (L, R) To a video input jacks 1 Use a standard antenna cable to connect the wall jack to the ANT. IN jack on STB. 2 Use a standard audio cable to connect the audio output jacks (L, R) of STB to the audio input jacks (L, R) on the TV.
ST201UB.qxd 04.3.9 4:04 PM Page 22 Connections STB connection to a standard stereo system NOTE: Component video cable and audio cable are not included. Rear panel of STB Component video cable STEREO COMPONENT Audio cable To component video input jacks (Y/ Pb/ Pr) To audio input jacks (L, R) 1 Use a standard antenna cable to connect the wall jack to the ANT. IN jack on STB. 2 Use a standard audio cable to connect the audio output jacks (L, R) on STB to the audio input jacks (L, R) on the stereo.
ST201UB.qxd 04.3.9 4:04 PM Page 23 Connections STB connection to a decoder with Dolby Digital NOTE: Coaxial digital audio cable and component video cable are not included. Rear panel of STB 2 Connections Digital Decoder To component video input jacks (Y/ Pb/ Pr) Coaxial digital audio cable To Coaxial digital audio input jack Component video cable 1 Use a standard antenna cable to connect the wall jack to the ANT. IN jack on STB.
ST201UB.qxd 04.3.9 4:04 PM Page 24 Connections STB connection to TV and Video devices (VCR, DVD recorder, etc) NOTE: Audio cables and video cables are not included. e.g.: Connection to VCR Rear panel of STB To audio input jacks (L, R) Audio cable Audio cable VCR Video cable To video input jack Video cable 1 Use a standard antenna cable to connect the wall jack to the ANT IN jack on STB.
ST201UB.qxd 04.3.9 4:04 PM Page 25 Initial Setups (Setup Wizard) Initial setup 1 SETUP WIZARD will appear. SETUP WIZARD Screen: SETUP WIZARD is the very convenient menu for you to make the initial settings of STB. SETUP WIZARD When STB is turned on for the first time after connecting the AC power cord, SETUP WIZARD is displayed on the screen automatically. You can complete the following items for the initial Setups through this menu.
ST201UB.qxd 04.3.9 4:04 PM Page 26 Initial Setups (Setup Wizard) 3 Select a desired language using o / p navigation buttons, then press ENTER. • • 5 SETUP WIZARD 3/8 will appear. The selected language will be activated. SETUP WIZARD 2/8 will appear. SETUP WIZARD 3/8 Do you observe daylight saving time (DST)? ON OFF Now the system is scanning for channels. 0% 6 Select ON or OFF for Daylight Savings Time (DST) using s / B navigation buttons, then press ENTER.
ST201UB.qxd 04.3.9 4:04 PM Page 27 Initial Setups (Setup Wizard) 7 Select the desired time zone using o / p / s / B navigation buttons, then press ENTER. • SETUP WIZARD 5/8 will appear. 8 Enter YEAR, DATE and TIME using o / p / s / B navigation buttons or number buttons. • • Every time you enter a number, press ENTER to move the cursor. When going back and forth, press s / B navigation buttons to move the cursor. SETUP WIZARD 5/8 Enter current time.
ST201UB.qxd 04.3.9 4:04 PM Page 28 Initial Setups (Setup Wizard) 9 Press ENTER when the cursor is on SET. • • Your settings will be activated. SETUP WIZARD 6/8 will appear, then STB will start searching channels with Automatic Clock Adjustments to keep the time correct. 10 Select the desired channel to search from the channel map using o / p navigation buttons. SETUP WIZARD 6/8 Select a channel for auto clock setting. SETUP WIZARD 6/8 Searching. 3 Select a channel for auto clock setting.
ST201UB.qxd 04.3.9 4:04 PM Page 29 Initial Setups (Setup Wizard) NOTE: 11 Press ENTER. • SETUP WIZARD 7/8 will appear. Refer to “Selecting screen formats” on page 54 for further information. 13 Select the desired display mode using o / p navigation buttons, then press ENTER. • SETUP WIZARD is completed. STB will now start receiving broadcasts. SETUP WIZARD 7/8 Select screen ratio.
ST201UB.qxd 04.3.9 4:04 PM Page 30 Basic Operation Watching TV STB is capable of receiving analog (NTSC format) and digital (ATSC format) broadcasts. All available channels from any of these broadcast sources can be tuned in using the CH o/p buttons and number buttons on your remote control. Each channel number consists of a main channel number and a sub-channel number. 1 Turn the TV on and select the input to which the STB is connected to. 2 Turn the STB on.
ST201UB.qxd 04.3.9 4:04 PM Page 31 Basic Operation When using number buttons (E.g., entering 26-1): 2. Press ENTER. • STB will tune in channel 26-1, and the program being broadcast will be displayed. 1. Enter the main channel number, press the “–” button, then enter the sub-channel number. NOTE: Sub-channel numbers from NTSC are always 0. NOTE: Every channel number consists of a main channel and a sub-channel. When selecting only with a main channel number (E.g.
ST201UB.qxd 04.3.9 4:04 PM Page 32 Basic Operation When returning to the channel you were last watching: About sub-channel broadcasting: There may be different programs being broadcast on sub-channels through a single channel from ATSC. You can watch each sub-channel program being broadcast by selecting one of the sub-channels. NTSC ATSC 18:00 CH4-1 • 18:30 STB will tune back in the channel you were last watching.
ST201UB.qxd 04.3.9 4:04 PM Page 33 Basic Operation Channel banner The channel banner provides you with information on the channel you have selected. 1 Press INFO to display a channel banner. • Channel information will appear in the channel banner. Remote: 1,2 Screen: Puffy the Vampire Slayer TV-Y WWOR ENGLISH STEREO 26-1 2:00PM- 3:00PM Doublement Palace: Puffy takes a new job at a fast food restaurant to make ends meet.
ST201UB.qxd 04.3.9 4:04 PM Page 34 Basic Operation Components of Channel Banner Logo for broadcast source : Indicates whether the channel is a digital broadcast or an analog broadcast. Puffy the Vampire Slayer Program title Program rating 26-1 WWOR TV-Y ENGLISH MONAURAL Channel number : Indicates the current channel number. 2:00PM- 3:00PM Program description Doublement Palace: Puffy takes a new job at a fast food restaurant to make ends meet.
ST201UB.qxd 04.3.9 4:04 PM Page 35 Basic Operation Choosing audio and language When the channel you are tuning in provides alternate audio formats and languages, you can change to any alternate. When you are tuning in ATSC, language and format can be set at the same time through an audio-map. 1 Audio map: (Only when tuning in ATSC) Audio format and language outputs from a broadcasting station are stored in an audio-map.
ST201UB.qxd 04.3.9 4:04 PM Page 36 Basic Operation When tuning in ATSC: The sequence will repeat according to audio-map when the AUDIO button is pressed. 1 Press AUDIO button. Remote: No description provided. CAT0001 ENGLISH 1/3 STEREO 77-1 When tuning in NTSC: The sequence will repeat as shown below when available. Screen: EPG not provided.
ST201UB.qxd 04.3.9 4:04 PM Page 37 Basic Operation Picture Still You can stop the picture on the screen anytime by pressing STILL o button. 1 Press STILL o button while watching TV. • STILL will be indicated on the lower left while the picture is displayed. Remote: Screen: 1 STILL NOTE: 2 Press any button to quit. • The picture currently being broadcast will appear. NOTE: If the TV is left on STILL for a long period of time, the still image may cause a burn-in effect damaging the TV screen.
ST201UB.qxd 04.3.9 4:04 PM Page 38 Basic Operation On screen messages Some messages are displayed on the screen during channel changing or during programs. NO SIGNAL RESTRICTED PROGRAM When you have set V-CHIP and you receive a program that meets any setting of yours, the whole screen becomes gray, then RESTRICTED PROGRAM appears in the center. Please refer to “Setting for V-CHIP/CC” on page 69 for further information.
ST201UB.qxd 04.3.9 4:04 PM Page 39 Advanced Operation Electronic Program Guide (EPG) Electronic Program Guide (EPG) is an application for digital channels that lists current and scheduled programs that are or will be available on each channel and a short summary or commentary for each program. 1 Press EPG button while watching TV. • EPG will appear on the screen. Remote: EPG is the electronic equivalent of a printed television program guide.
ST201UB.qxd 04.3.9 4:04 PM Page 40 Advanced Operation 2 Select the desired program using o / p / s / B navigation buttons. • The cursor will move as you press any navigation button. 3 Press ENTER. When selecting a program being broadcast: • The selected program will appear. State the Union 3:00PM 22- 0 NTSC EPG not provided. NTSC EPG not provided.
ST201UB.qxd 04.3.9 4:04 PM Page 41 Advanced Operation Components of Electronic Program Guide (EPG) Current bar : Indicates the current time (so you can see how close you are to the start or end time of the program). CURRENT TIME: EPG Day of broadcasting Channel numbers and digital broadcasting station : * "NTSC" programs are from NTSC service. 1 / 31 (THU) 3 : 01PM TODAY (THU) 3:00PM 22- 0 NTSC EPG not provided. 23- 0 NTSC EPG not provided.
ST201UB.qxd 04.3.9 4:04 PM Page 42 Advanced Operation Setup menu for preference includes: • ADD / DELETE: • ANTENNA: • AUTOSCAN: You can add or delete channels in the channel map. You can verify and adjust the signal strength of each channel to get a clearer picture. You can get available channels automatically into the channel map by completing AUTOSCAN. includes: • SCREEN RATIO: • DISPLAY MODE: You can fit the screen ratio to your TV screen. You can choose the display mode as you prefer.
ST201UB.qxd 04.3.9 4:04 PM Page 43 Advanced Operation E.g., When adding the digital channel 26-1. Adding channels 1 Press SETUP to display SETUP menu. • ADD/ DELETE You can add channels in the channel map. SETUP menu will appear. Remote: ADD: You can add desired channels to the channel map. Once you add channels to a channel map, you will be allowed to select the channels in order using CH o / p buttons.
ST201UB.qxd 04.3.9 4:04 PM Page 44 Advanced Operation 2 Select CHANNEL using o / p navigation buttons, then press ENTER. • 4 To add, first enter the digital channel number 26-1. CHANNEL menu will appear. ADD/DELETE 26-1 CHANNEL QUIT QUIT CHANNEL DISPLAY CHANNEL ADD/DELETE ANTENNA DISPLAY AUTOSCAN ADD DELETE 13 22 23 55 CLOCK CLOCK DETAIL DETAIL TIP: 3 Select ADD/ DELETE using o / p navigation buttons, then press ENTER. • ADD/ DELETE menu will appear.
ST201UB.qxd 04.3.9 4:04 PM Page 45 Advanced Operation 5 Select ADD using o / p navigation buttons, then press ENTER. • INFORMATION on Channel Map ADD/DELETE 26-1 will be added to the channel map. QUIT CHANNEL DISPLAY 26-1 ADD DELETE 13 22 23 26 CLOCK DETAIL ADD/DELETE QUIT CHANNEL 26-1 Channel map : Indicates an analog channel. ADD 13 22 23 26 DELETE DISPLAY : Indicates a digital channel. CLOCK DETAIL Added NOTE: Digital channels can be added only with main channel numbers.
ST201UB.qxd 04.3.9 4:04 PM Page 46 Advanced Operation E.g., To delete the digital channel 26-1. Deleting channels 1 Press SETUP to display SETUP menu. • ADD/ DELETE You can add and delete channels in the channel map. SETUP menu will appear. Remote: DELETE : You can delete channels from the channel-map. NOTE: When you delete digital and analog channels with the same main channel number, you will need to delete each channel.
ST201UB.qxd 04.3.9 4:04 PM Page 47 Advanced Operation 3 Select ADD/DELETE using o / p navigation buttons, then press ENTER. • ADD/ DELETE menu will appear. ADD/DELETE QUIT CHANNEL DISPLAY • 13-0 The cursor will move to the channel map. ADD/DELETE QUIT ADD DELETE 4 Select DELETE using o / p navigation buttons, then press ENTER.
ST201UB.qxd 04.3.9 4:04 PM Page 48 Advanced Operation 5 Select the digital channel number 26 using o / p navigation buttons. • 26-1 will be indicated in the box at the top of the screen. 6 Press ENTER when the cursor is on the digital channel 26. • The digital channel number 26 will be deleted.
ST201UB.qxd 04.3.9 4:04 PM Page 49 Advanced Operation E.g., when adjusting the digital channel 26-1. Adjusting antenna 1 Select channel 26-1 to adjust using number button or CH o / p buttons. ANTENNA You can verify the signal strength of each channel to get a clearer picture for both digital and analog broadcasts. • Channel 26-1 will be tuned in.
ST201UB.qxd 04.3.9 4:04 PM Page 50 Advanced Operation • 2 Press SETUP to display SETUP menu. • ANTENNA menu will appear, then STB starts receiving the signal strength of the channel. SETUP menu will appear. ANTENNA 26-1 SETUP QUIT QUIT CHANNEL CHANNEL DISPLAY WEAK STRONG NOW 56 75 PEAK DISPLAY CLOCK PREVIOUS CLOCK DETAIL DETAIL 3 Select CHANNEL using o / p navigation buttons, then press ENTER. • 5 Adjust the antenna direction to get the best reception. • CHANNEL menu will appear.
ST201UB.qxd 04.3.9 4:04 PM Page 51 Advanced Operation Receiving channels 1 Press SETUP to display SETUP menu. • SETUP menu will appear. AUTOSCAN Remote: STB has the convenient function to get available channels automatically. AUTOSCAN is capable of receiving available channels, both analog and digital, and storing those channels in a channel map. Channels once stored in a channel map can be selected using CH o / p buttons.
ST201UB.qxd 04.3.9 4:04 PM Page 52 Advanced Operation 3 Select AUTOSCAN using o / p navigation buttons, then press ENTER. • AUTOSCAN menu will appear. 4 Select NEXT using s / B navigation buttons, then press ENTER. • Scanning window will appear, then STB will start scanning for all available channels. AUTOSCAN AUTOSCAN QUIT CHANNEL Now the system is scanning for channels. AutoScan will rescan all channels. This may take a while to complete.
ST201UB.qxd 04.3.9 4:04 PM Page 53 Advanced Operation To cancel AUTOSCAN during scanning: Press SETUP or ENTER to cancel. • AUTOSCAN CANCELLED will appear on the screen. 5 AUTOSCAN is complete. • • SETUP menu will go off automatically. STB will receive broadcasts right after AUTOSCAN is complete. AUTOSCAN Now the system is scanning for channels. or 100% Analog QUIT 2-0 AUTOSCAN CANCELLED Digital EPG not provided.
ST201UB.qxd 04.3.9 4:04 PM Page 54 Advanced Operation Selecting screen formats STB allows you to select a screen ratio and a display mode (aspect ratio) to match the formats of the program being broadcast and your TV screen. You can also change to aspect ratios you prefer to watch. 1 Press SETUP to display SETUP menu. • SETUP menu will appear. Remote: SCREEN RATIO There are two screen ratios used in manufacturing TVs. These are standard TV format (4:3), and widescreen format (16:9).
ST201UB.qxd 04.3.9 4:04 PM Page 55 Advanced Operation 3 Select SCREEN RATIO using o / p navigation buttons, then press ENTER. • 5 Press ENTER to exit SETUP menu. Screen ratio options will appear. NOTE: The screen ratio should be selected to fit your TV screen. Refer to the TV owner’s manual for further information DISPLAY QUIT CHANNEL SCREEN Select screen ratio. DISPLAY 16:9 DISPLAY 4:3 CLOCK DETAIL 4 Select the desired screen ratio using o / p navigation buttons, then press ENTER.
ST201UB.qxd 04.3.9 4:04 PM Page 56 Advanced Operation DISPLAY MODE 1 Press SETUP to display SETUP menu. • SETUP menu will appear. Remote: 1,5 2,3,4 Screen: SETUP 2,3,4 QUIT CHANNEL DISPLAY CLOCK DETAIL 2 Select DISPLAY using o / p navigation buttons, then press ENTER. • DISPLAY menu will appear.
ST201UB.qxd 04.3.9 4:04 PM Page 57 Advanced Operation NOTE: 3 Select DISPLAY MODE, using o / p navigation buttons , then press ENTER. • Display mode options will appear. You can choose the display mode as you prefer. Refer to “INFORMATION on Screen Ratio and Display Mode” on page 58 for further information. 5 Press SETUP to exit SETUP menu. CAUTION: If the TV is left in LETTERBOX or SIDEBAR for a long period of time, the still image may cause a burnin effect damaging the TV screen.
ST201UB.qxd 04.3.9 4:04 PM Page 58 Advanced Operation INFORMATION on Screen Ratio and Display Mode For standard 4:3 TVs displaying widescreen 16:9 broadcasts, your choices are: 4:3 TV screen 16:9 broadcast Letter Box Displays the entire picture image while fitting the picture to the screen by applying gray bars to the top and bottom of the screen. No information will be lost. Zoom Expands the picture image to fill the screen while cropping some images on the left and right.
ST201UB.qxd 04.3.9 4:04 PM Page 59 Advanced Operation Setting the clock To get the EPG (Electronic Program Guide) and Channel banner, you need to set the CLOCK correctly. 1 Press SETUP to display SETUP menu. • SETUP menu will appear. Remote: NOTE: The clock function is featured for displaying EPG so there may be 5 minute-time lag a day at the maximum. Therefore we recommend to set the Auto clock setting to ON to use the clock function effectively.
ST201UB.qxd 04.3.9 4:04 PM Page 60 Advanced Operation 3 Select Daylight Savings Time (DST) using o / p navigation buttons, then press ENTER. • 5 Select TIME ZONE using o / p navigation buttons, then press ENTER. • TIME ZONE setting menu will appear. Daylight savings time setting menu will appear. CLOCK CLOCK Select your time zone.
ST201UB.qxd 04.3.9 4:04 PM Page 61 Advanced Operation INFORMATION on Time Zones ALASKA: 6 Select the desired time zone using o / p/ s / B navigation buttons, then press ENTER. • ALASKA The TIME ZONE will be set, then CLOCK menu will appear.
ST201UB.qxd 04.3.9 4:04 PM Page 62 Advanced Operation 7 Select MANUAL using o / p navigation buttons, then press ENTER. • The current time setting menu will appear. 8 Enter YEAR, DATE, and TIME using o / p / s / B navigation buttons or number buttons. • • Press ENTER to set each value, then the cursor will move to the next. When going back and forth, press s / B navigation buttons to move the cursor. CLOCK Enter current time.
ST201UB.qxd 04.3.9 4:04 PM Page 63 Advanced Operation 9 Press ENTER when the cursor is on SET. • Your settings will be activated. Activated CLOCK QUIT CHANNEL 2002/ 3/31( SUN ) 1 52PM DST ON TIME ZONE CENTRAL MANUAL DISPLAY AUTO OFF CLOCK DETAIL 10 Press SETUP to exit SETUP menu.
ST201UB.qxd 04.3.9 4:04 PM Page 64 Advanced Operation Adjusting the clock automatically 1 Press SETUP to display SETUP menu. • STB is capable of adjusting the clock automatically using the channel clock data included in the signal from digital broadcast sources. SETUP menu will appear. Remote: In this menu, STB will search for channels with clock data, then select a channel to adjust the clock. STB will then adjust the clock using the channel selected.
ST201UB.qxd 04.3.9 4:04 PM Page 65 Advanced Operation 3 Select AUTO using o / p navigation buttons, then press ENTER. • Auto clock setting menu will appear, then STB will start searching for channels with clock data. 5 Select the desired channel using o / p navigation buttons, then press ENTER. • The selected channel will be set, then the clock of STB will be activated. CLOCK CLOCK 2002/ 1/31( THU ) 2 50PM Select a channel for auto clock setting. QUIT QUIT Searching.
ST201UB.qxd 04.3.9 4:04 PM Page 66 Advanced Operation Setting a new password You will need to change the 4-digit password to protect your V-CHIP/CC setting. “0000” has been stored as the default password. 1 Press SETUP to display SETUP menu. • SETUP menu will appear. Remote: NOTE: Once the power supply is stopped due to the power failure or the unplugging AC power cord for approx. 5 seconds, the password will go back to the default password “0000.” NOTE: Screen: Don’t forget your password.
ST201UB.qxd 04.3.9 4:04 PM Page 67 Advanced Operation 3 Select V-CHIP/CC using o / p navigation button, then press ENTER. • 4 Enter the default password “0000.” • “ * ” will appear for each digit. V-CHIP/CC password window will appear. V-CHIP / CC V-CHIP / CC QUIT Enter password. CHANNEL QUIT Enter password. CHANNEL DISPLAY DISPLAY CLOCK CLOCK DETAIL DETAIL After entering the default password, V-CHIP/CC menu will appear.
ST201UB.qxd 04.3.9 4:04 PM Page 68 Advanced Operation 5 Select NEW PASSWORD using o / p navigation buttons, then press ENTER. • Password setting menu will appear. 6 Enter a new 4-digit password in the upper space, then enter again in the lower space to confirm. V-CHIP / CC QUIT V-CHIP / CC Enter password. CHANNEL DISPLAY QUIT Confirm password. Enter password. CHANNEL CLOCK DISPLAY DETAIL Confirm password. CLOCK DETAIL 7 V-CHIP/CC menu will appear. • Your new password is stored.
ST201UB.qxd 04.3.9 4:04 PM Page 69 Advanced Operation Setting for V-CHIP/CC V-CHIP/CC In V-CHIP/CC menu, you will make some important settings for the viewing programs you select. First of all, you will need to set your 4-digit password for your V-CHIP setting. Then you can proceed with making your settings. 1,7 STB incorporates V-CHIP technology to block the viewing of movies and television programs according to their rating categories.
ST201UB.qxd 04.3.9 4:04 PM Page 70 Advanced Operation 1 Press SETUP to display SETUP menu. • SETUP menu will appear. 3 Select V-CHIP/CC using o / p navigation buttons, then press ENTER. • V-CHIP/CC password window will appear. Remote: Screen: V-CHIP / CC SETUP QUIT QUIT Enter password. CHANNEL CHANNEL DISPLAY DISPLAY CLOCK CLOCK DETAIL DETAIL 2 Select DETAIL using o / p navigation buttons, then press ENTER. • DETAIL menu will appear.
ST201UB.qxd 04.3.9 4:04 PM Page 71 Advanced Operation 4 Enter your 4-digit password. • “ * ” will appear for each digit. 5 Select V-CHIP/CC using o / p navigation buttons, then press ENTER. • V-CHIP/CC setting menu will appear. V-CHIP / CC V-CHIP / CC QUIT CHANNEL QUIT Enter password. DISPLAY CHANNEL CLOCK DISPLAY Choose either STB or TV for V-CHIP/CC setting. If you choose "TV", V-CHIP/CC functions are processed in TV, not in STB.
ST201UB.qxd 04.3.9 4:04 PM Page 72 Advanced Operation 6 Select STB or TV using s / B navigation buttons, then press ENTER. V-CHIP / CC QUIT CHANNEL DISPLAY V-CHIP / CC TV RATING CC SELECTION CLOCK STB MPAA RATING OFF NEW PASSWORD DETAIL 7 Press SETUP to exit SETUP menu.
ST201UB.qxd 04.3.9 4:04 PM Page 73 Advanced Operation Setting MPAA rating MPAA RATING The MPAA (Motion Picture Association of America) uses the standard movie ratings. Age Label 1,7 Description NR Not Rated by MPAA G General Audience PG Parental Guidance Suggested. Some material may not be suitable for children. PG-13 Parents Strongly Cautioned. Some material may be inappropriate for children under 13. R Restricted. Under 17 requires accompanying parent or guardian.
ST201UB.qxd 04.3.9 4:04 PM Page 74 Advanced Operation 1 Press SETUP to display SETUP menu. • SETUP menu will appear. 3 Select V-CHIP/CC using o / p navigation buttons, then press ENTER. • V-CHIP/CC password window will appear. Remote: Screen: V-CHIP / CC SETUP QUIT QUIT Enter password. CHANNEL CHANNEL DISPLAY DISPLAY CLOCK CLOCK DETAIL DETAIL 2 Select DETAIL using o / p navigation buttons, then press ENTER. • DETAIL menu will appear.
ST201UB.qxd 04.3.9 4:04 PM Page 75 Advanced Operation 4 Enter your 4-digit password. • “ * ” will appear for each digit. 5 Select MPAA RATING using o / p navigation buttons, then press ENTER. • MPAA rating setting menu will appear. V-CHIP / CC Set MPAA rating V-CHIP / CC QUIT CHANNEL QUIT X NC-17 R Enter password. DISPLAY CHANNEL PG-13 PG CLOCK DISPLAY DETAIL CLOCK G NR DETAIL After entering the correct password, V-CHIP/CC menu will appear.
ST201UB.qxd 04.3.9 4:04 PM Page 76 Advanced Operation 6 Select PG-13 using o / p navigation buttons, then press ENTER. E.g., when you want to block all PG-13 movies: • Lock indicators will be added to programs rated PG-13 and above. V-CHIP / CC Set MPAA rating QUIT CHANNEL X NC-17 R DISPLAY PG-13 PG CLOCK DETAIL G NR NOTE: All movie programs rated PG-13 and above will be blocked.
ST201UB.qxd 04.3.9 4:04 PM Page 77 Advanced Operation Setting TV rating TV RATING (TV Parental Guidelines) TV rating allows parents to block out programs they don’t want their children to see. TV rating consists of the age labels and the content labels. The following are the descriptions for each label: Description Age Label TV-MA Mature Audience Only : Specifically designed to be viewed by adults and therefore may be unsuitable for children under 17.
ST201UB.qxd 04.3.9 4:04 PM Page 78 Advanced Operation 1 Press SETUP to display SETUP menu. • SETUP menu will appear. 3 Select V-CHIP/CC using o / p navigation buttons, then press ENTER. • V-CHIP/CC password window will appear. Remote: Screen: V-CHIP / CC SETUP QUIT QUIT Enter password. CHANNEL CHANNEL DISPLAY DISPLAY CLOCK CLOCK DETAIL DETAIL 2 Select DETAIL using o / p navigation buttons, then press ENTER. • DETAIL menu will appear.
ST201UB.qxd 04.3.9 4:04 PM Page 79 Advanced Operation 4 Enter your 4-digit password. • “ * ” will appear for each digit. 5 Select TV RATING using o / p navigation buttons, then press ENTER. • TV rating setting menu will appear. V-CHIP / CC Set TV rating V-CHIP / CC QUIT CHANNEL QUIT FV V S L D TV-MA TV-14 Enter password. CHANNEL DISPLAY DISPLAY CLOCK CLOCK DETAIL TV-PG TV-G TV-Y7 TV-Y DETAIL After the correct password is entered, V-CHIP/CC menu will appear.
ST201UB.qxd 04.3.9 4:04 PM Page 80 Advanced Operation To set age-based ratings: To set content-based ratings: E.g., when you want to block all TV-14 programs E.g., when you want to block only TV-14 programs that contain higher levels of violence 1. Select TV-14 using o / p navigation buttons, then press ENTER. • Lock indicators will be added to all TV-14 and higher categories. 1. Select TV-14-V using o / p / s / B navigation buttons, then press ENTER.
ST201UB.qxd 04.3.9 4:04 PM Page 81 Advanced Operation Selecting CC options 1 Press SETUP to display SETUP menu. • SETUP menu will appear. Remote: CC SELECTION Closed Caption (CC) provides you with on-screen text versions of the audio content for the program being broadcast. In this menu, you are allowed to turn Closed Caption signal On or Off, to set a language for the closed caption and to choose a format for the closed caption.
ST201UB.qxd 04.3.9 4:04 PM Page 82 Advanced Operation 3 Select V-CHIP/CC using o / p navigation buttons, then press ENTER. • 4 Enter your 4-digit password. • “ * ” will appear for each digit. V-CHIP/CC password window will appear. V-CHIP / CC V-CHIP / CC QUIT Enter password. CHANNEL QUIT DISPLAY CHANNEL CLOCK DISPLAY DETAIL CLOCK Enter password. DETAIL After the correct password is entered, V-CHIP/CC menu will appear.
ST201UB.qxd 04.3.9 4:04 PM Page 83 Advanced Operation 5 Select CC SELECTION using o / p navigation buttons, then press ENTER. • 7 Press SETUP to exit SETUP menu. CC options menu will appear. Use when Closed Caption is not desired. V-CHIP / CC Select CC.
ST201UB.qxd 04.3.9 4:04 PM Page 84 Advanced Operation Choosing the screen language 1 Press SETUP to display SETUP menu. • MENU LANGUAGE SETUP menu will appear. Remote: English, French, and Spanish are available for the screen menu. You can choose the language you prefer. NOTE: ENGLISH has been selected as the default before purchase. Screen: 1,5 SETUP QUIT CHANNEL DISPLAY CLOCK 2,3,4 2,3,4 DETAIL 2 Select DETAIL using o / p navigation buttons, then press ENTER. • DETAIL menu will appear.
ST201UB.qxd 04.3.9 4:04 PM Page 85 Advanced Operation 3 Select MENU LANGUAGE using o / p navigation buttons, then press ENTER. • Language menu will appear. 4 Select the desired language using o / p navigation buttons (E.g., select French), then press ENTER. • The selected language will be set, and the selected language will be indicated on screen. DETAIL QUIT CHANNEL V-CHIP / CC Select menu language. MENU LANGUAGE DISPLAY CLOCK DETAIL 5 Press SETUP to exit SETUP menu.
ST201UB.qxd 04.3.9 4:04 PM Page 86 Appendix Troubleshooting Before requesting service for this unit, check the table below for a possible cause of the problem you are experiencing. Some simple checks or a minor adjustment on your part may eliminate the problem and restore proper operation. Symptom Remedy No power • Make sure that the AC power cord is securely plugged into the power outlet. • Make sure that STB is turned on.
ST201UB.qxd 04.3.9 4:04 PM Page 87 Appendix Symptom Remedy No sound • Make sure that the audio cable is correctly connected. • Make sure that audio devices (stereo, TV, decoder) are turned on. • Make sure that audio devices (stereo, decoder) are correctly set to STB audio output channel. • Check the audio cable. Either a standard audio cable or a coaxial digital audio cable is required. Do not connect them at the same time.
ST201UB.qxd 04.3.9 4:04 PM Page 88 Appendix Specifications Product STB for ATSC/NTSC Connecting Jacks ANT IN F connector (75 ohm) Video Output (component) Glossary and Acronyms ATSC: ATSC (Advanced Television Systems Committee) is the group that has been working to establish the standards for digital television broadcasting and digital television equipment - including both SDTV and HDTV.
ST201UB.qxd 04.3.9 4:04 PM Page 89 Appendix Digital audio (coaxial) output jack: Digital audio (coaxial) output jack send digital audio data to audio devices equipped with a digital audio (coaxial) input jack. Dolby® Digital: Dolby® Digital (when available) provides 6 independent soundtrack channels through the coaxial output jack. STB has a Dolby Digital output (labeled DIGITAL AUDIO (COAXIAL)) that can be connected to an external Digital Audio receiver/ decoder equipped with a coaxial input.
ST201UB.qxd 04.3.9 4:04 PM Page 90 Guía para rápida consulta Ubicación de los controles PANEL FRONTAL 1 2 PANEL TRASERO 3 4 5 6 7 1 2 3 4 5 6 8 7 1 Botón POWER: Para encender y apagar el STB. 1 Toma ANT. IN: Use esta toma para conectar una antena al STB. 2 Indicador POWER: Se ilumina cuando el STB está encendido. 2 Toma DIGITAL AUDIO (COAXIAL): Use esta toma para conectar un decodificador o amplificador al STB mediante un cable coaxial digital.
ST201UB.qxd 04.3.9 4:04 PM Page 91 Guía para rápida consulta 1 6 7 8 2 3 4 5 9 10 11 5 Botones de navegación o / p / s / B: Presione estos botones para mover el cursor hacia arriba, hacia abajo, hacia la izquierda o hacia la derecha. Para hacer una pausa en el vídeo y seguir escuchando el programa de audio, presione el botón STILL o. 6 Botón SETUP: Presione este botón para entrar en el menú SETUP o para salir de él.
ST201UB.qxd 04.3.9 4:04 PM Page 92 Guía para rápida consulta Conexiones de antena Use un cable de antena estándar para conectar la toma mural a la toma ANT IN del STB. Conexión del STB a la antena NOTA: La antena y el cable de antena no vienen incluidos con el producto. A la antena Panel trasero del STB AL CONECTAR EL EQUIPO A UNA CAJA PARA CABLE: NOTA: La antena, el cable de antena y la caja para cable no vienen incluidos con el equipo.
ST201UB.qxd 04.3.9 4:04 PM Page 93 Guía para rápida consulta 7 Guía para rápida consulta Conexión del STB a un SDTV utilizando la salida VIDEO NOTA: El cable de audio y el cable vídeo no vienen incluidos con el producto. Panel trasero del STB Cable de audio Cable de vídeo A las tomas de entrada de audio (L, R) A la toma de entrada de vídeo 1 Use un cable de antena estándar para conectar la toma mural a la toma ANT IN del STB.
ST201UB.qxd 04.3.9 4:04 PM Page 94 Guía para rápida consulta Configuración inicial ASISTENTE PARA LA CONFIGURACIÓN (SETUP WIZARD) El SETUP WIZARD es un práctico menú que le ayuda hacer los ajustes iniciales del STB. Cuando se enciende el STB por primera vez después de conectar el cable de alimentación de CA, el SETUP WIZARD aparece automáticamente en la pantalla. En este menú se pueden configurar los siguientes ítems para el ajuste inicial del equipo.
ST201UB.qxd 04.3.9 4:04 PM Page 95 Guía para rápida consulta • • Cada vez que introduzca un número, presione ENTER para mover el cursor. Si desea retroceder o avanzar, presione los botones de navegación s / B para mover el cursor. NOTA: Una vez que haya introducido toda la información, el cursor se moverá a SET. RECOMENDACIÓN: Para ajustar el año (YEAR), introduzca los 2 últimos dígitos del año. El año quedará registrado.
ST201UB.qxd 04.3.9 4:04 PM Page 96 LIMITED WARRANTY FUNAI CORP. will repair this SYLVANIA product, free of charge in the USA in the event of defect in materials or workmanship as follows: DURATION: PARTS: FUNAI CORP. will provide parts to replace defective parts without charge for one (1) year from the date of original retail purchase. Two (2) years for Picture Tube. Certain parts are excluded from this warranty. LABOR: FUNAI CORP.