SYLVANIA 26" Digital / Analog LCD TV Owner's Manual LC260SS8 / HE_HDEnNmONTE_EWSI_ H_m|'! ou_ D|G|TAL .... I YOU TO RECEIVE MUST CONNECT DIGITAL/ANALOG ANTENNA.SIGNAL, I _) 2007 Funai Electric Co.
WARNING:TO REDUCE THE RISK OF FIRE OR ELECTRIC SHOCK, DO NOT EXPOSE THIS APPLIANCE TO RAIN OR MOISTURE. CAUTION/ A THIS SYMBOL INDICATES THAT DANGEROUS VOLTAGE CONSTITUTING A RISK OF ELECTRIC SHOCK IS PRESENT WITHIN THIS UNIT. CAUTION: TO REDUCE THE RISK OF ELECTRIC THIS SYMBOL INDICATES THAT THERE ARE SHOCK, DO NOT REMOVE COVER (OR BACK). NO USER SERVICEABLE PARTS INSIDE. REFER SERVICING TO IMPORTANT QUALIFIED ACCOMPANYING OPERATING AND MAINTENANCE INSTRUCTIONS SERVICE PERSONNEL.
Never spill liquid of any kind on the TV. 8 SERVICING - Do not attempt to service this TV yourself as opening or removing covers may expose you to dangerous voltage or other hazards. Refer all servicing to qualified service personnel. _9o DAMAGE REQUIRING SERVICE - Unplug this TV from the wall outlet and refer servicing to qualified service personnel under the following conditions: a. When the power supply cord or plug is damaged or frayed. b. If liquid has been spilled, or objects have fallen into the TV.
LOCATION For safe operation and satisfactory performance of the unit, keep the following sources of intense in rnind when selecting • • Shield it from direct sunlight and keep it away from Avoid dusty or humid places. • Avoid places with insufficient ventilation for proper heat dissipation. Do not block the ventilation unit. Do not place the unit on a carpet because this will block the ventilation holes. • Install the unit in a horizontal • • Avoid locations subject to strong vibration.
_Features [] Contents • DTV/TV/CATV - You can use your remote control to select channels which are broadcast in digital format and conventional analog format. Also, cable subscribers can access their cable TV channels. • Program Information Display (DTV only) - You can display the title, contents and other information of the current DTV program on the TV screen. • Auto Channel Scan - This unit automatically channels available setup procedures.
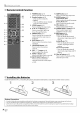
[] Remote Control Function 1. 2. POWER button (pl3) Press to turn the unit on and off. 11. SLEEP button Number buttons (pl6) • Press to select channels. - button 12. AUDIO button (p18) Digital Mode (DTV) Press to select the audio language. Analog Mode (TV) Press to select the audio mode, • Press to shift the minor channel 3. from the major channel. SETUP button (p14) 13, STILL button 3 5. 5 6 through 6. 8 the items.
[] Control Panel side of this unit 1. POWER button (p13) Press to turn the unit on and off, 2, INPUT SELECT button (p17) • Press to access connected an external 1 DVD player or VCR, Press to decide the command 2 3 of setting when menu is displayed. CHANNEL--IV buttons (p16) Press to select channels or move up/clown 3. '4 '5 device _ike a main menu 4. the through VOLUME_/buttons (p16) Press to adjust the volume or move right ( _)/left 5. through the main menu items. SETUP button (p14) 6.
[] Basic Connection Thissectiondescribes howto connectthe unit toan antenna,cable/satellitebox,etc. I Note: • Besureyourantennaorotherdeviceisconnectedproperlybeforeplugginginthepowercord. [Antenna When Cable Connection] connectinq Connect the unit to an antenna the RF coaxial cable or cable on your home outlet TV company (without to the antenna cable/satellite box) input jack of this unit. e.g.
[] External [HDMI Device Connection Connection] HDMI (High single cable. Definition Multimedia It ensures that Interface) the content sent transports from high the source definition video to TV is of the and multi-channel highest possible digital audio through a resolution. rear of this unit To HDMI 1qN or HDMI 2qN jack e.g.) HDMI cable DVD player with the HDMI output jack Note: • This unit accepts 480i/480p / 720p / 1080i video signals, and 32kHz/44.
[Component Component Video Cable Connection] video connection Use a component offers better video cable to connect picture quality for video devices connected the unit to external video devices equipped to the unit. with component video output jacks. If you connect to the unit's COMPONENT 1 video COMPONENT 1. input jack, connect RCA audio cables to the audio L/R jacks of If you connect to the unit's COMPONENT 2 video COMPONENT 2.
[Video Connection] Video connection offers standard picture quality for video devices connected to the unit. If you connect to the unit's VIDEO I video input jack, connect RCA audio cables to the audio L/R jacks of VIDEO I. If you connect to the unit's VIDEO 2 video input jack, connect RCA audio cables to the audio L/R jacks of VIDEO 2. When the audio jack of the video device is monaural, connect the RCA audio cable to the audio L input jack. rear of this unit e.g.
[PC Connection] This unit is equipped with a PC-IN jack, If you connect VGA cable should ferrite core. this unit to your PC, you can use this unit as a computer monitor. be with To monitor jack rear of this unit To PC-IN jack VGA cable e.g.) mini-plug PC To audio line out jack Note: • Pleasepurchase the VGAthat has a ferrite core.
[] Initial Note: Setup Thissectionwill guideyouthroughtheunit'sinitialsettingwhichincludes selectinga languageforyour on-screenmenuandautochannelscan, whichautomaticallyscansandmemorizesviewable channels, Before you begin: Makesureif the unit is connectedto antenna or cable. After making all the necessary connections, press [POWER] to turn on the unit. POWER • This operation 2 maytake • Ifyou connect the cable system directly, contact the CATV installer.
[] Main Menu []Auto Thissectiondescribes theoverviewofthe mainmenudisplayedwhenyou press[SETUP].Formoredetails,seethereferencepagefor eachitem. Themainmenuconsists ofthe function settingitemsbelow. Channel Scan If youswitchwires(e,g,,betweenantennaand CATV)or if youmovethe unitto a differentareaafter the initial setting,or if yourestorethe DTV channelyoudeleted,youwill needto performauto channelscan, Before you begin: Makesureif the unitisconnectedto antennaorcable, Press [SETUP].
Note: • Ifyou connect the cable system directly, contact the CATV installer • lfyou press [POWER] or [SETUP] during auto channel scan, the setting will be canceled. • Channel settings will be saved even if the power fails. • Ifyou need the English menus instead of the Spanish or French menus you are having, press [SETUP]. Use [Cursor A/V] to select "IDIOMA"or "LANGAGE"then press [ENTER]. Use [Cursor A/V] to select "English", then press [ENTER]. Press [SETUP] to exit the main menu.
[] Channel Selection Selectchannelsby pressing[OH•/V] • To select the memorized [the Number buttons]. channels, • To select the non-memorized [the Number [] Volume or [the Numberbuttons], use [CH •Iv] channels, Adjustment Thissectiondescribes howto adjustthe volume,Themutefunction,which turnsthesoundoff andon,isalsodescribed, or Use[VOL. I ]toadjusttheaudiovolume. use buttons].
i ,?i; [] Still Mode [] Switching Youcanfreezethe imageshownontheTVscreen, Youcaneasilyswitchwith the remotecontrolto the DTV(ATSC)andTV (NTSC)orto accessan external devicewhentheyare connectedtothe unit, Press [STILL] to pause the image shown on the screen. Each Mode Press [INPUT SELECT] or [CH A] repeatedly to cycle through the input modes. i ic) iy I " TV/DTV channel 1 • The sound output will not be paused.
[] Switching Audio Mode Thissectiondescribes howto switchthe audiolanguage, 1 Press [AUDIO] to display the currently audio mode. While receiving selected 1 Press [AUDIO] to displaythe currently language and the number of available 2 Press [AUDIO] an MTS broadcast, press repeatedly to cycle through channel. the available selected languages. audio i %i available When all audio are available • Available When stereo and monaural audio are available broadcast.
[] Screen i ,?i_ Information Youcandisplay thecurrently selected channelor other information suchas the audio modeon the TVscreen. Inthe analog mode,the current channelnumberand the audio modeare displayed. In the digital mode,the detailed broadcastinginformation for the current channelsuchas programtitle, programguidesare displayed. Press [INFO] to display the details of the currently selected program. Press [INFO].
[]TV Screen Display Mode 4 types ofdisplaymodescanbeselectedwhen the broadcasting station issending4:3 or 16:9video signal.And3 typesofdisplaymodescanbe selectedfor PCinputsignal. Press [SCREEN MODE _] aspect repeatedly to switch the TV For 16:9 video signal ratio. 'A(_i)i!! Full (normal) Zoom Expand Cinema For 4:3 video signal Full Sidebar (normal) [Fulll Display a 16:9 picture at its original [Zoom] size.
[ (b [] Sleep Timer Thesleeptimer canbe setto automatically turnoff the unitafter an incremental periodof time. 1 Press [SLEEP] to set the sleep timer. • Sleep timer display 2 i(b appears on the TV screen. Press [SLEEP] repeatedly until shut off. to change the amount of time • You can set your unit to turn off after a set period time (from 30 to 120 minutes). of • Each press of [SLEEP] will increase the time by 30 minutes.
[] Channel List Thechannellist functionletsyouremoveundesiredchannelsfromthe channelregistrationlist, Press [SETUP] to display 2 Use [Cursor [ENTER]. A/Y] the main menu. Press [SETUP] to exit. to select "CHANNEL", then press or 3 Use [CursorA/V] to select "Channel List", then press [ENTER]. or Use [Cursor A/V] to select the channel you want to remove, then press [ENTER]. or • The channel display for the removed channel darkens.
[] Manual [] Antenna Register Themanualregisterfunctionletsyouaddthechannelsthat werenot added bythe autochannelscanduetothe receptionconditionat theinitialsetting, Press [SETUP] to display 2 Use [Cursor [ENTER]. A/V] the main menu. Thisfunctionletsyoucheckthesignalstrengthofeachchannel, Press [SETUP] to display to select "CHANNEL", then press Use [Cursor A/V] [ENTER]. or 3 Use [Cursor A/r] i ,?i_ Confirmation the main menu.
[] Picture Adjustment Cursor_ Youcanadjustbrightness, contrast,color,tint andsharpness. I Cursor Brightness D_ to decrease to increase brightness brightness to decrease contrast to increase contrast to decrease color to brighten color to add red to add green to make soft to make clear Press [SETUP] to display the main menu. Contrast Color 2 Use [Cursor A/V] to select "PICTURE", then press [ENTER].
[] Sound i ,71_ Surround Adjustment Use [Cursor A/V] Youcanadjusttreble, bassandsurround, function, to turn on or off the surround then press [ENTER]. Press [SETUP] to display the main menu. or 2 Use [Cursor A/Y] to select "SOUND", then press [ENTER]. Reset Settings Use [Cursor A/V] to select "Reset", then press [ENTER] to restore the "Sound" settings to default. or Z or Use [Cursor A/V] to select the sound type you want to adjust, then press [ENTER].
[] Closed [Caption Mode] CC1 and Text1; Caption Youcanview closedcaptioning(co)forTVprograms,moviesandnews. Closedcaptionreferto text ofdialogueor descriptions displayedon-screen forthe hearingimpaired. are the primary caption and text services. The captioning or text is displayed in the same language as the program's dialogue (up to 4 lines of script on the TV screen, where it 1 Press [SETUP] to display the main menu.
[] DTV Closed i ,71_ Caption In addition tothe basicclosed captiondescribedon page26, DTVhasits own closedcaptioncalled DTVCC.Usethis menuto changethe settings for DTVCC. ! (b i!iii Press [SETUP] to display the main menu. Use [Cursor A/r] caption, Sii ii)i_ to select the desired DTV closed then press [ENTER]. or 2 Use [Cursor A/V] to select "DETAIL", then press "W/ [ENTER].
[] CC Style Youcanchangethe styleofCCsuchasfont, colororsize,etc, 6 Press [SETUP] to display the main menu. Use [Cursor A/V] to select "On", then press [ENTER]. or 2 Use [Cursor A/V] to select "DETAIL", then press [ENTER]. or 7 Use [Cursor A/r] to select an item, then press [ENTER]. Then use [Cursor A/r] to select the desired setting and press [ENTER]. Picture display 3 Use [Cursor A/V] to select "Closed Caption", then press [ENTER].
i ,?i_ [Font Color] Font color of the displayed below. [Edge Type] caption can be switched as Edge type of the displayed below. caption can be switched as [Font Opacity] Font opacity of the displayed as below. caption can be switched 8 Press [SETUP] to exit. ii!;i_!,!_ ii iii:_il [Back Color] Background color of the displayed switched as below. caption can be ii !!i{ii [Back Opacity] Background opacity of the displayed switched as below.
See the following [] V-chij description for setting each item. V-chip reads the ratings for programs, then denies accessto the programs which exceed the rating level you set. With this function, you can block certain programming inappropriate for children. A C 1 Press [SETUP] to display the main menu. Siii li i F' A..."A. MPAA Rating"_ B..."B. TV Rating"_ 2 Use [Cursor A/V] to select "DETAIL", then press [ENTER]. C..."C.
i!iii MPAARatingisthe ratingsystem createdbyMPAA(Motion Picture Association of America). Use [Cursor A/V] to select "MPAA Rating", then press [ENTER]. ......... _ Use [Cursor A/V] to select "TV Rating", then press [ENTER]. i iiill_ or Use [Cursor or A/V] to select the desired press [ENTER] repeatedly and "Block". rating, then to switch between "View" Use [Cursor A/VIgils] to select the desired then press [ENTER] repeatedly "View" and "Block".
Rating Category TV-MA Mature audience only TV-14 Unsuitable TV-PG Parental TV-G General audience TV-Y7 Appropriate older for all children TV-Y Appropriate for all children for children higher under 14 Although the default code "0000" is supplied with the unit, you can set your own password. _ _ Use [Cursor&Iv] guidance suggested Category Sub Rating to select "New Password", then press [ENTER].
i ,?i_ [] PC Settings Thisfunctionletsyouadjustthe PCscreenposition,clockand phaseduring PCinput, I Press [SETUP] to display the main menu. Adjust the setting. Auto Adjustment Use [Cursor A/V] to select "Adjust", then press [ENTER]. 2 Use [Cursor A/Y] to select "DETAIL", then press or [ENTER]. or • The Horizontal/Vertical position, the PC screen are automatically Horizontal Position, Vertical Use [Cursor
[]HDMI Audio Youcanset themethodofsoundinputfor the HDMI l-IN jack, Press [SETUP] to display the main menu. 2 Use [Cursor A/Y] Press [SETUP] to exit. to select "DETAIL", then press [ENTER]. or 3 Use [Cursor A/V] [ENTER]. to select "HDMI1 Audio", then press or Use [Cursor A/V] to select the desired then press [ENTER]. sound input, oF Select if you have connected both digital device to the HDMI l-IN Auto jack and analog device to the audio sources.
[]Troubleshooting If the unit does not perform before calling for service. Guide properly No power when operated as instructed in this owner's manual, check the following Be sure the power cord is plugged in. If a power failure occurs, unplug the power cord for 30 minutes reset itself. No picture or sound No color chart once to allow the unit to • Check if the power is on. • Check the outlet connection. • Check the antenna or cable connection to the main unit.
Theentered channel number Many digital channels have alternate channel numbers. Theunitchanges the changes automatically numbers automatically totheones signifying thebroadcasting stations. These are thenumbers used foranalog broadcasts. Remote control does notwork •Check theantenna orcable connection tothemain unit. •Check thebatteries oftheremote control. •Check ifthereisanobstacle between theinfrared sensor window andtheremote control. •Test thesignal output. IfOK,thenpossible infrared sensor trouble.
i ,i'i_ [] Glossary ATSC Password Dolby Digital Acronym that stands for Advanced The system developed by Dolby A stored 4-digit number that allows Television Systems Committee and the name of the digital broadcasting standards. Laboratories to compress digital sound. It offers stereo sound (2ch) or multi-channel audio. access to parental control Aspect Ratio HDMI (high-definition separately from main-audio channel. This audio channel is used as an The width of a TV screen relative height.
[] Cable Channel Designations If yousubscribe to cableTV,the channelsaredisplayedas1-135. Cablecompanies oftendesignatechannelswith lettersor letter-numbercombinations.Pleasecheckwith yourlocalcablecompany. Thefollowingisa chartofcommoncablechanneldesignations.
SYLVANIA LIMITED WARRANTY FUNAI CORR will repair this product, workmanship as follows: free of charge in the USA in the event of defect in materials or DURATION: PARTS: FUNAI CORP.will provide parts to replace defective parts without charge for one (1) year from the date of original retail purchase. Certain parts and LCD image burn-in are excluded from this warranty. LABOR: FUNAI CORP.will provide the labor without charge for a period of ninety (90) days from the date of original retail purchase.