iModeSERIES MODEL NO.
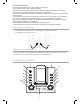
IMPORTANT SAFETY INSTRUCTIONS CAUTION RISK OF ELECTRIC SHOCK DO NOT OPEN CAUTION: TO REDUCE THE RISK OF ELECTRIC SHOCK, DO NOT REMOVE COVER (OR BACK). NO USER-SERVICEABLE PARTS INSIDE. REFER SERVICING TO QUALIFIED SERVICE PERSONNEL.
IMPORTANT SAFETY INSTRUCTIONS Before using the unit, be sure to read all operating instructions carefully. Please note that these are general precautions and may not pertain to your unit. For example, this unit may not have the capability to be connected to an outdoor antenna. 1. Read these instructions. All the safety and operating instructions should be read before the product is operated. 2. Keep these instructions. The safety and operating instructions should be retained for future reference. 3.
IMPORTANT SAFETY INSTRUCTIONS 18. Object and liquid entry. Never push objects of any kind into this product through openings as they may touch dangerous voltage points or short out parts that could result in fire or electric shock. Never spill or spray any type of liquid on the product. 19. Outdoor antenna grounding. If an outside antenna is connected to the product, be sure the antenna system is grounded so as to provide some protection against voltage surges and built up static charges.
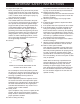
POWER SOURCE AC Operation: Unwind the AC power cord and extend it to its full length. Insert the small plug of the AC power cord to the unit. Insert the AC plug of AC Outlet the cord into any convenient 120V 60Hz household outlet. Please note that this unit is equipped with a AC Plug polarized AC plug which has one blade wider than the other. This is a safety feature to reduce the likelihood of electric shock. This polarized AC plug will only fit in a polarized AC outlet.
BATTERY PRECAUTIONS: Follow these precautions when using a battery in this device: 1.Use only the size and type of battery specified. 2.Be sure to follow the correct polarity when installing the battery as indicated in the battery compartment. A reversed battery may cause damage to the device. 3.Do not mix different types of batteries together (e.g. Alkaline and Carbon-zinc) or old batteries with fresh ones. 4.
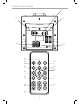
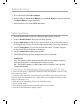
Locations of Controls 15 17 16 R L AUX IN SPEAKERS 19 20 AC~ 21 22 28 23 29 30 24 25 31 26 32 27 6
Control Definitions 1 Standby Button Press the Standby Button to turn the unit on or off (Standby mode) 2 CLOCK SET Button Press and hold this button then press the HOUR button at the same time to set hour. Press the MIN button to set minute. 3 Hour Button 4 Minute Button 5 DBBS Button (Dynamic Bass Boost System) Press to turn DBBS on, the DBBS Indicator will lit. Press again to turn it off, the DBBS Indicator will not lit. 6 Volume Knob Turn to adjust volume.
Control Definitions 21 DBBS Button (Dynamic Bass Boost System) 22 STANDBY Button 23 MENU Button 24 Skip/Search Buttons 25 REPEAT Button 26 CHAPTER +/- Buttons 27 PLAYLIST / 28 Play/Pause Button 29 Stop Buttons Button 30 SELECT Button 31 SHUFFLE Button 32 ALBUM / Buttons 8
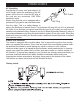
Setting the Clock 1. Press and hold the CLOCK Set Button . 2. While holding the CLOCK Set Button, press the Hour Button to adjust the hour and the Minute Button to adjust the minute. 3. When finished, release the CLOCK Set Button. Radio Operations: 1. Press the Standby Button on the unit or Remote Control to power on the unit. 2. Slide the RADIO/iPod/AUX selector to RADIO position. 3. Slide the Band Switch to AM or FM as desired.
Docking an iPod 1. Select the correct iPod adapter as the table below to matching your iPod. iPod Adapter #8 - iPod Nano (1st Gen, 2nd Gen, 4th Gen) iPod Adapter #10 - iPod (4th Gen, 5th Gen (Video), iPod Classic) iPod Adapter #13 - iPod Nano (3rd Gen) iPod Adapter #14 - iPod Touch (1st Gen, 2nd Gen) 2. Insert the selected iPod adaptor to the docking on the unit then insert the iPod to the docking as the figure on the right. 3. Slide the RADIO/iPod/AUX IN Selector to iPod position 4.
NOTES ON CLEANING: ~ Use a soft, dry cloth for cleaning. ~ For stubborn dirt, soak the cloth in a weak detergent solution, wring well and wipe. Use a dry cloth to wipe it dry. Do not use any type of solvent, such as thinner and benzene, as they may damage the surface of the unit. ~ If you use a chemical-saturated cloth to clean the unit, follow that product's instructions.
LIMITED PRODUCT WARRANTY This quality product is warranted to be free from manufacturer’s defects in material and workman-ship, provided that the unit is used under the normal operating conditions intended by the manufacturer. Should you have any problem with this product, please and it is highly recommended to visit our website at www.curtisint.