SYLVAMIA 15" Digital / Analog LCDTV Owner's Manual LCI ;iiiiiiiiiiiiiiiiiiiiiiiiiiiiiiiiiiiiiiiiiiiiiiiiiiiiiiiiiiiiiiiii_ii_i_ / HK;HDERNmC_TELEViSiON nn_ DIGITAL. ..... I YOU TO RECEIVE DIGITAL/ANALOG MUST CONNECT ANTENNA.
WARNING:TO REDUCE THE RISK OF FIRE OR ELECTRIC SHOCK, DO NOT EXPOSE THIS APPLIANCE TO RAIN OR MOISTURE. THIS SYMBOL INDICATES THAT DANGEROUS VOLTAGE CONSTITUTING A RISK OF ELECTRIC SHOCK IS PRESENTWlTHINTHIS CAUTION: TO REDUCETHE RISK OF ELECTRIC SHOCK, THIS SYMBOL INDICATES THATTHERE DO NOT REMOVE COVER (OR BACK). NO USER SERVICEABLE IMPORTANT FARTS INSIDE. REFER SERVICING TO QUALIFIED FERSONNEL. INSTRUCTIONS The important SERVICE ACCOMPANYING IN THE LITERATURE THE APPLIANCE.
7 OBJECT AND LIQUID ENTRY - Never push objects of any kind into this TV through openings as they may touch dangerous voltage points or short out parts that could result in a fire or electric shock. Never spill liquid of any kind on the TV. 'I_ SERVICING - Do not attempt to service thisTVyourself as opening or removing covers may expose you to dangerous voltage or other hazards. Refer all servicing to qualified service personnel.
LOCATION For safe operation and satisfactory performance of the unit, keep the following . Shield it from direct sunlight and keep it away from . Avoid dusty or humid places. sources of intense . Avoid heat dissipation. places with insufficient ventilation unit. Do not place the unit on a carpet . Install the unit in a horizontal position. for proper because . Avoid locations subject to strong vibration. . Do not place the unit near strong magnetic . Avoid moving the unit to locations .
[]Features [] Contents • DTV/TV/CATV - You can use your remote control to select channels which are broadcast in digital, conventional analog, standard definition, and high definition formats. Also, cable subscribers can access their cable TV channels. • Program Information Display (DTV only) - You can display the title, contents and other information of the current DTV program on the TV screen.
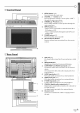
[] Remote Control Function 1, POWER button (p12) Press to turn the unit on and off. MUTE button (pl 5) Press to turn the sound on and off. 10. Press to return to previous menu operation, 11. SLEEP button (pl 8) Press to activate the sleep timer. digital mode (DTV) and analog mode. 12. from the major channel. +lOg button • Press to display information, • Press to display the channel signal type and TV setting. external input mode, VOL.
[] Control Panel 1 2 3 4 1, 2, SETUP button (p13) Press to display the main menu, VOLUME / buttons(plS) Press to adjust the volume or move right(_)/left( through 3, CHANNEL A/V buttons 4, i (plS) Press to select channels or move up/clown main menu items. top of the unit ) the main menu items. iNPUT button (p16) • Press to access connected an external through the device like a DVD player or VCR, • Press to switch between the digital mode (DTV) and 5, analog mode.
[]Attachinqa Wall Mount BracketJsoid separately). Thefollowing isa descriptionofthe methodfor attaching a wall mountto thisunit. When performing this operation, refer to the instruction manual includedwith the wall mount kit. Youneedthe following wall mount kit for thisunit. Vision Mount L(DMounts/ model number:VMFb Formore information,pleasevisitCSAVwebsiteat www.csavinc.com rear of this unit ,_1_and t2) indicate the position of the screw holes on this unit• ..........................................
[] Basic Connection Thissection describeshowto connectthe unit to an antenna, cable/sateBte box,etc. Note: . Besure your an tenna or other device is connected properly before plugging in the power cord. [Antenna Cable Connection] When connecting Connect the unit to an antenna or cable TB company (without the RF coaxial cable on your home outlet to the antenna cable/satellite box) input jack of this unit. }iii¸ e.g.
[] E×ternai Device [Component Component Video video Use a component Connection Cable Connection] connection offers better video cable to connect picture quality for video devices connected the unit to external video devices equipped to the unit. with component video output jacks. If you connect to the unit's component video input jack, connect RCA audio cables to the audio L/R jacks of VIDEO2.
[Video Connection] Video connection If you connect offers standard picture quality for video to the unit's video input jack, connect When the audio jack of the video device is monaural, devices connected to the unit. RCA audio cables to the audio L/R jacks of VIDE01. connect the RCA audio cable to the audio L input jack. }iiJ̧ rear of this unit i !ii!¸ e.g.) !;ii_ camcorder VCR Nete: .
[] Initial Setup Thissection will guideyou through the unit's initialsetting whichincludes selecting a languagefor youron-screenmenuand "AUTOPRESET CH',which automatically scansand memorizesviewable channels. Before youbegin: Make sureif the unit isconnectedto antenna or cable. After making all the necessary connections, press [POWER] to turn on the unit. • This operation _ may take a few moments. Use [Cursor A/V] to select the on-screen language from the choices on the right side of the TV screen.
© iC: [] Main Menu [] Auto Channel Thissection describes the overviewof the main menu displayedwhen you press[SETUP].Formoredetails, seethe referencepagefor eachitem. Themain menuconsistsof the function setting itemsbelow. Scan If you switchwires(e.g., betweenantenna and CAW)or if you movethe TV to adifferent areaafter the initial setting, or if you restorethe DTVchannel you deleted, you will needto performauto channelscan. Before you begin: Makesureif the unit isconnectedto antenna or cable.
[] Language Note: . If you connect the cable system directly, installer. , Ifyou press [POWER] or [SETUP] during the setting will be canceled. contact the CATV Selection You can choose English, Spanish, or French as your on-screen language. auto channel scan, Press [SETUP] to display the main menu. , When no channel can be received by auto channelscan, "NO TV SIGNALS" will be displayed on the TV screen. , Channel settings will be saved even if the power fails.
W ........ [] Channel O Selection Selectchannelsbypressing[ON.A/V] [] Volume or [the Number buttons]. i _i]i Adjustment Thissectiondescribes howto adjustthe volume.Themutefunction,which turnsthe soundoff and on, isalso described. • To select the memorized channels, use [CN.A/V] [the Number buttons], • To select tile non-memorized channels use [the Number or Use [VOL. "/ ] to adjust the audio volume. buttons]. or To Use [the Number buttons] VOLUME IIIIII ..........
[] Switching Each Mode [] MTS Youcaneasilyswitch with the remotecontrol tothe DTV(ATSC)andTV (NTSC)or to accessan externaldevicewhen they are connectedto the unit. Press [INPUT] repeatedly to cycle through System MTS(multkhannel television sound)systemisthe methodof encoding3 additional channelsof audio into an NTSC-formataudio carrier.Thissection describeshow to switch the audio in the analogmode and howto switch the audio languagein the digital mode. analog TV, digital TV, VIDEO1 and VIDEO2.
IC: [] Screen Information Youcan displaythe currently selectedchannelor other information suchas the audio modeon the TVscreen. Inthe analog mode,the current channelnumberis displayed. In the digital mode,the detailedbroadcastinginformationfor the current channelsuchas programtitle, program guidesare displayed. !iiill i Press [DISPLAY]. Press [DISPLAY] repeatedly available display modes.
[]TV Screen Display [] Sleep Timer Mode 2 types of display modescan beselected inthe digital modewhen the broadcastingstation is sending16:9video signal. Press [SCREEN MODE] repeatedly to switch the TV Thesleeptimer can beset to automatically turn 0ffthe unit after an incrementalperiod of time. _ Press [SLEEP] to set the sleep timer. aspect ratio. SCREEN MODE SLEEP SLEEP OFF • Sleep timer display appears 21 Press [SLEEP] repeatedly time until shut off, LETTERBOX on the TV screen.
[] Channel Add/Delete Thechanneladd/delete functionletsyou add the channelthat wasnot addedby the auto channelscandueto the receptionstatusat the initial setting. Youcan also delete the unnecessarychannels. _ Press [SETUP] to display _ Press [SETUP] to exit. the main menu. Note: . "ADD/DELETE(DTV)" or 'ADD/DELETE(TV)" menu will disappear automatically in about 10 seconds. .
[] Picture Adjustment [] Closed Caption Youcan adjust brightness, contrast,color,tint and sharpness. Press [SETUP] to display Youcan view closedcaptioning (cc)for TVprograms,movies and news. Closedcaption referto text of dialogue or descriptionsdisplayedon-screen for the hearing impaired. the main menu. Press [SETUP] to display the main menu. 2 Use [Cursor [ENTER]_ AiY] to select"PICTURE", then press e.g.
© [] DTV Closed i _/ii Caption 0,_ Press[SETUP] to exit. In addition to the basicclosedcaption describedon page20, DTVhasits own closedcaption called DTVCCUsethis menuto changethe settingsfor DTVCC. _!ote_ . To show the closed caption on your TV screen, signal must contain the closed caption data. Press [SETUP] to display the main menu. broadcast . Not all TVprograms and commercials have the closed caption or all types of the closed caption. . Captions ° Changing seconds.
[] DTVCC Style Youcan changethe style of DTVCCsuchasfont, color or size,etc. Press [SETUP] to display the main menu. • CAPTION SIZE Closed captioning font size can be changed as below. • FONT STYLE Font style of the displayed below. 2 Use [CursorA/Y] to select"DTVCC", caption can be switched caption can be switched as • CHARACTER EDGE then press [ENTER], Edge type of the displayed as below. e.g.
[] Back Light Setting [] Color Temperature Youcan setthe desiredbrightness mode. Youcan adjust colortemperatureof theTVscreen. Press [SETUP] to display 2 Use [Cursor A/Y] the main menu. to select"BACK Press [SETUP] to display the main menu. LIGHT", then press Use [(:ursor [ENTER] repeatedly to change the setting. Sly] [ENTER] repeatedly to select"COLOR to change e.g.
[ V-chi V-chip readsthe ratingsfor programs,then deniesaccessto the programs which exceedthe rating level you set.With this function, you canblock certain programminginappropriate for children. _ _ Press [SETUP] to display Use [Cursor A/T] to select"TV RATING", then press [ENTER]. the main menu. e.g.) digital TV mode - V- CNFPSETUP- oF TV RATING MPAARATING DDWNLDADABLE RATING CHANGEPASSWORD 2 Use [Cursor J.iY] to select"V-CHIP SETUP", then press [ENTER]. e.g.
i :i ¸¸ MPAARatingisthe ratingsystemcreatedby MPAA(Motion Picture Associationof America). Rating Category [_ TV-Y Appropriate for all children TV-Y7 Appropriate older for all children lower 7 and Use [Cursor _,/V] to select"MPAA RATING", then press [ENTER]. e.g.
Although thedefault code "0000" issupplied with the unit, you can set your own password. _ Use [Cursor A/Y] to select"CHANGE PASSWORD", then press [ENTER]. e.g.) digital TV mode - V - CHIP SETUPW RATING MPAA RATENG DOWNLOADASLERATING CHANGE PASSWORD or Press [the Number buttons] enter the new 4-digit • Enter password on the remote control to password, again in "CONFIRM PASSWORD:' space, NEW PASSWORD CONFIRM G PASSWORD Press [SETUP] to exit.
'_ S% _ _ _' _ J_ *+ _'Y" 1 *¸¸_ )CL Troubleshooting Guide If the unit does not perform properly once before calling for service. No power when operated as instructed in this operation manual, check the following Be sure the power cord is plugged in. If a power failure occurs, unplug the power cord for 30 minutes reset itself. No picture or sound i)iiii_il to allow the unit to . Check if the power is on. • Check the outlet connection. .
Theentered channel number Many digital channels have alternate channel numbers. Theunitchanges the changes automatically numbers automatically totheones signifying thebroadcasting stations. These are thenumbers used foranalog broadcasts. Remote control does notwork .Check theantenna orcable connection tothemain unit. •Check thebatteries oftheremote control. .Check ifthereisanobstacle between theinfrared sensor window andtheremote control. .Test thesignal output. IfOK,thenpossible infrared sensor trouble.
i/i; []Glossary_ ATSC Dolby Digital SAP(secondary audio program) Acronym that stands for Advanced Television Systems Committee and the name of the digital broadcasting standards, The system developed by Dolby Laboratories to compress digital sound. It offers stereo sound (2ch) or multi-channel Second-audio channel delivered separately from main-audio channel.This audio audio. broadcasting.
SYLVAMHA LiMiTED WARRANTY FUNAI CORP.will repair this product, workmanship as follows: free of charge in the USA in the event of defect in materials or DURATION: PARTS: FUNAI CORP.will provide parts to replace defective parts without charge for one (1) year from the date of original retail purchase. Certain parts and LCD image burn-in are excluded from this warranty. LABOR: FUNAI CORP.will provide the labor without charge for a period of ninety (90) days from the date of original retail purchase.